This is a one of the best collections of Ubuntu 14.04 (Trusty Tahr) "After Install" document I've seen.
Link to the GOOGLE DOC
There is too much there to describe, you'll just have to click on the link and see it for yourself.
Saturday, June 14, 2014


Thursday, June 12, 2014
Google Chrome: error while loading shared libraries: libudev.so.0
After upgrading from Ubuntu 12.04 to Ubuntu 14.04 my Google Chrome Browser stopped working. It wouldn't start when I clicked on it in the Unity Launcher so I opened a Terminal Windows and tried to start it there by typing in google-chrome. When I did this I got the following error;
/opt/google/chrome/chrome: error while loading shared libraries: libudev.so.0: cannot open shared object file: No such file or directoryWhat the hell do you do? Reinstall Google Chrome right? Wrong, that didn't work. After some internet searching I found the following Terminal Commands that worked like a charm. You only need to run one of these commands. Which one depends on which 'bit' version of Ubuntu you have 64-bit or 32-bit (mine is 32-bit)
Open a Terminal Windows and type ONE of the below commands.
64-bit fix
sudo ln -s /lib/x86_64-linux-gnu/libudev.so.1.3.5 /usr/lib/libudev.so.0
32-bit fix
sudo ln -s /lib/i386-linux-gnu/libudev.so.1.3.5 /usr/lib/libudev.so.0
FIXED!!!!!!
Here's a link back to the site where I found this fix;
http://askubuntu.com/questions/369310/how-to-fix-missing-libudev-so-0-for-chrome-to-start-again
Upgrading from 12.04 to 14.04
I stayed with Ubuntu 12.04 LTS through all the upgrades until 14.04LTS came out. Well I couldn't wait until July for the upgrade to just happen (LTS's are not upgraded until a point release on the new LTS) so I made it upgrade tonight. It's done with a single Terminal Command (make sure you have 12.04 up to date before trying this;
1. Open a Terminal Window and type the following;
sudo update-manager -d
This will start the upgrade process. It took about one hour to download all the updates, an hour and 20 minutes to do all the installs and 15 minutes for the clean up process. (about two hours total). Once done I had no problems getting into the system and thing looked good. (I had to upgrade my nVidia Driver to 331.38 (SYSTEM SETTING--->SOFTWARE & UPDATES--->ADDTIONAL DRIVERS tab)

I've found two other things I need to fix, Photoshop CS2 the ALT is not functioning again but I know how to make it work (there is a post in this blog on howto make it right). The second is more difficult, Chrome won't start. When I figure it out I'll post another how to on it.
1. Open a Terminal Window and type the following;
sudo update-manager -d
This will start the upgrade process. It took about one hour to download all the updates, an hour and 20 minutes to do all the installs and 15 minutes for the clean up process. (about two hours total). Once done I had no problems getting into the system and thing looked good. (I had to upgrade my nVidia Driver to 331.38 (SYSTEM SETTING--->SOFTWARE & UPDATES--->ADDTIONAL DRIVERS tab)
I've found two other things I need to fix, Photoshop CS2 the ALT is not functioning again but I know how to make it work (there is a post in this blog on howto make it right). The second is more difficult, Chrome won't start. When I figure it out I'll post another how to on it.
Monday, March 24, 2014
Fix Your STEAM Install (Connection Error)
I had to put a little effort into get Steam to work on my Ubuntu 12.04 Install (Video Drivers update crashed me) so when it stopped working I fought it to get it back up and running. The error I kept getting was "Could not connect to Steam network. This could be due to a problem with your internet connection, or with the Steam network. Please visit www.steampowered.com for more info."
 Well my Internet Connection wasn't the problem and I didn't see any outcry that Steam was down so it had to be something on my system. I uninstalled and reinstalled from the Ubuntu Software Manager and even downloaded the Steam .deb file, all with no luck.
The answer was to use the Terminal Command Line to reset Steam. Here's how;
1. Start TERMINAL
2. Type
steam --reset (HIT ENTER)
3. Wait for this command to run completely
(it will download all the Steam System files again.)
4. Re-enter your UserName and Password and you're good to go.
This should not affect your Steam Game Library but I cannot guarantee it as I only had one game downloaded and installed when I crashed and I deleted it when I tried to "fix" Steam before I found the reset command. USE AT YOUR OWN RISK!
The answer was to use the Terminal Command Line to reset Steam. Here's how;
1. Start TERMINAL
2. Type
steam --reset (HIT ENTER)
3. Wait for this command to run completely
(it will download all the Steam System files again.)
4. Re-enter your UserName and Password and you're good to go.
This should not affect your Steam Game Library but I cannot guarantee it as I only had one game downloaded and installed when I crashed and I deleted it when I tried to "fix" Steam before I found the reset command. USE AT YOUR OWN RISK!
Sunday, March 02, 2014
Master PDF Editor
Do you need to edit PDF Files? If so, then read this article on WEB UPD8's site on how to install Master PDF Editor. MASTER PDF EDITOR is NOT Open Source but is free for personal use on Linux ($50 on Windows). The WEB UPD8 site is worth browsing too.
Monday, February 03, 2014
Expanding your Virtual Hard Drive in VirtualBox
I was getting an error saying I was out of Hard Drive Room when I tried to install the LibreOffice onto my VirtualBox Windows 7 install on my Ubuntu 12.04 box. So I had to expand the Virtual Hard Drive. To change the size of a dynamically growing virtual drive in VirtualBox 4.3 running on Ubuntu 12.04, run the following two commands in a Terminal Window:
VBoxManage list hdds
This will display a list of all your Virtual Drives in VirtualBox. You will need to write down or copy the uuid of the Virtual Drive you want to increase in size. You will have a Virtual Drive for every Virtual OS you have installed on VirtualBox. They have names with them so they are easy to differentiate.

The last command is:
VBoxManage modifyhd <uuid> --resize <newsize in MB>
When I did mine, my command looked like this (note the double hyphens):
VBoxManage modifyhd d009bb80-64a4-4ac2-a405-3681dff3964e --resize 30000
This increased my Virtual Drive from 14gb to 30gb.
That's all the Terminal Commands we need so close your Terminal Window and start you VirtualBox Windows 7. Once your Virtual Windows 7 starts we need to tell it that it has more hard drive room. To achieve this do the following:
In Windows 7, Right Click on COMPUTER and select MANAGE.

Once the Computer Management screen appears, select Disk Management to view new unallocated space (10.74 GB in below picture)

To finish, Right Click on your (C:) Volume (13.57 GB NTFS in the above picture) and select "Extend Volume..." from the menu that pops up. Choose the Unallocated Space when asked (just choose the defaults when the Wizard asks). This will make your Unallocated Volume go away and your (C:) Volume will now be bigger. Done!
Sunday, December 15, 2013
Connect to FTP Servers with Nautilus

The connection dialog window provides the options to connect to various types of connections; FTP (public), FTP (Login), SSH, Windows Share, WebDAV and WebDAV (Secure). The one I wanted was FTP with Login/Password.
So here's what we do to make an FTP connect we can access in Nauitlus which will allow us to just cut, copy, paste files to and from the remote FTP server.
1. Open Nautilus and Click on the FILE menu option.
2. Select the CONNECT TO SERVER... option.
3. That will open up a dialog box.
4. Select FTP (with login) from the TYPE dropdown
5. You should now see this dialog box.

7. Check the REMEMBER THIS PASSWORD box.
8. Click on CONNECT and your done!
This is fine for a one time use, but if you don't want to have fill out the dialog every time, you need to make the connection a BOOKMARK.
While you are connected to the FTP server you should see your FTP server connection listed under NETWORK list on the left side (bottom) menu of Nautilus. Simply RIGHT CLICK on the connection listing and select the BOOKMARK option from the Right Click Menu. Now your FTP connection will show up as a Bookmark in Nautilus (left side menu)

Saturday, December 14, 2013
Nautilus Extension For Quick Image Editing
Every want to right click an image in Nautilus and change it's size, rotate it, or convert its format? If so then the IMAGE TOOLS Nautilus Extension is for you. This extension lets you perform the following actions:
Resize, rotate or flip images
Convert images to or from: bmp, gif, jpg, pcx, png, tif, and more
Enhance Images: brightness/color/contrast/sharpness
Add Effects: black and white, blur, border, contour, grey scale, negative, shadow, vintage or watermark.
To install it, OPEN A TERMINAL WINDOW and type the following command, pressing ENTER after each one:
sudo add-apt-repository ppa:atareao/nautilus-extensions
sudo apt-get update
sudo apt-get install nautilus-image-tools
nautilus -q
DONE!!!
To use it just open Nautilus, right click on an image file and scroll down the list until you find the IMAGE TOOLS option.
It's not Photoshop or Gimp but for a quick edit here or there it works just fine.
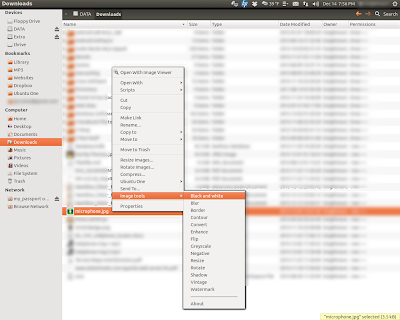
Resize, rotate or flip images
Convert images to or from: bmp, gif, jpg, pcx, png, tif, and more
Enhance Images: brightness/color/contrast/sharpness
Add Effects: black and white, blur, border, contour, grey scale, negative, shadow, vintage or watermark.
To install it, OPEN A TERMINAL WINDOW and type the following command, pressing ENTER after each one:
sudo add-apt-repository ppa:atareao/nautilus-extensions
sudo apt-get update
sudo apt-get install nautilus-image-tools
nautilus -q
DONE!!!
To use it just open Nautilus, right click on an image file and scroll down the list until you find the IMAGE TOOLS option.
It's not Photoshop or Gimp but for a quick edit here or there it works just fine.

Wednesday, December 11, 2013
Remove and Reinstall Your Video Drivers (Nvidia)
After my Linux Kernel Upgrade to 3.2.0-57 I had to reboot. On reboot I got a Black TERMINAL SCREEN asking for my USER NAME and PASSWORD. Even after giving my user/password I was still stuck at the TERMINAL Screen. Last time this happened it was a problem with my video driver (Nvidia). So I tried this fix again and it worked! Here's how;
1. At the Terminal Screen type the following and hit ENTER;
sudo apt-get purge nvidia*
2. That removes your Nvidia Drivers, once it runs (it takes about 10 minutes and runs several lines in the Terminal) we reinstall the current Nvidia Driver with the following command;
sudo apt-get install nvidia-current-updates-dev
3. Once this command runs, just reboot your system and you should be good to go.
1. At the Terminal Screen type the following and hit ENTER;
sudo apt-get purge nvidia*
2. That removes your Nvidia Drivers, once it runs (it takes about 10 minutes and runs several lines in the Terminal) we reinstall the current Nvidia Driver with the following command;
sudo apt-get install nvidia-current-updates-dev
3. Once this command runs, just reboot your system and you should be good to go.
Monday, November 04, 2013
Change ALT - LEFT CLICK Behavior
I've got Photoshop CS2 installed on my Ubuntu 12.10 system running under Wine. It worked just fine but some upgrade change the behavior of the ALT Left Click combo to a Drag Window function. This was affect everything, that used ALT Left Click, so it had to be changed. Here's How:
1. Open a Terminal Window and type:
sudo aptitude install compizconfig-settings-manager <ENTER>
2. Once it installs, start CompizConfig Settings Manager and navigate to the following menus
-->Window Management
------>Move Window
----------->Initiate Window Move (Mouse Picture beside it)

3. Change that setting to any unused key/mouse combo
(I used SHIFT/CTRL/SUPER/MOUSE 3)

Close the CompizConfig Settings Manager and that should do it.
1. Open a Terminal Window and type:
sudo aptitude install compizconfig-settings-manager <ENTER>
2. Once it installs, start CompizConfig Settings Manager and navigate to the following menus
-->Window Management
------>Move Window
----------->Initiate Window Move (Mouse Picture beside it)

3. Change that setting to any unused key/mouse combo
(I used SHIFT/CTRL/SUPER/MOUSE 3)

Close the CompizConfig Settings Manager and that should do it.
Tuesday, June 18, 2013
Adding self-signed SSL certficates to Google Chrome

Well really it's not that big a deal but I just have to find fixes to these kind of things.
1. Open a TERMINAL window.
2. TYPE sudo apt-get install libnss3-tools (HIT ENTER).
3. Open GEDIT or any text editor and cut and paste the below text (in green and no blank lines at the top or bottom):
#!/bin/sh
#
# usage: import-cert.sh remote.host.name [port]
#
REMHOST=$1
REMPORT=${2:-443}
exec 6>&1
exec > $REMHOST
echo | openssl s_client -connect ${REMHOST}:${REMPORT} 2>&1 |sed -ne '/-BEGIN CERTIFICATE-/,/-END CERTIFICATE-/p'
certutil -d sql:$HOME/.pki/nssdb -A -t TC -n "$REMHOST" -i $REMHOST
exec 1>&6 6>&-
4. Save this file in your HOME directory as import-cert.sh and close GEDIT.
5. Import your SSL by typing the following command into your TERMINAL window.
bash import-cert.sh YOUR.SERVER.NAME 443
6. Done!
NOTES: Replace YOUR.SERVER.NAME with your sever's fully quilitified domain name. If your server is using a different PORT (443 is default) then replace the 443 with whatever PORT your company uses. Make sure you can connect to YOUR SERVER (connect your VPN?)
Other useful certutil commands (TYPE them in a TERMINAL window):
List all certificates in your database:
certutil -L -d sql:$HOME/.pki/nssdb
To delete a certificate
certutil -d sql:$HOME/.pki/nssdb -D -n <certificate nickname>
Replace <certificate nickname> with the name displayed by the List Certificates command.
FULL CREDIT: The Bash Script is NOT mine. I did NOT write it, I found it on THIS SITE and it was written by Peter van der Does (according to the website). Follow the link and read his article for a description of what all this does.
Sunday, June 16, 2013
Get Your Galaxy S3 Working With UBUNTU 12.04 +

 |
| ES File Explorer |
That program is called ES File Explorer and is a very useful, free, Android App. It will connect to Ubuntu SMB Shares, Window Workgroup Shares, Windows Domain Shares, FTPs and Cloud Storage Services (Gdrive, Box, DropBox, and even SkyDirve) allowing file transfers between your portable device (phone) and your remote storage options. I highly recommend it as an Android File Manager.
Well I thought I'd try to get my Galaxy S3 to connect with the USB cable again. Here's the problem, Android 4 + uses MTP protocol (Media Transfer Protocol) instead of just mounting as a removable drive (like a USB Thumb Drive or Camera SD Card). The MTP protocol was created by Microsoft so we can blame them :-)
Here's what we need to do, we need to get Ubuntu to use the MTP protocol. We will need to use GVFS, the Gnome Virtual File System, which is built into Ubuntu 13.04 (I think) but has been backported to Ubuntu 12.04 and 12.10. Lets Add GVFS.
1. Open a Terminal Window
2. TYPE sudo add-apt-repository ppa:langdalepl/gvfs-mtp (hit enter)
3. TYPE sudo apt-get update (hit enter)
4. TYPE sudo apt-get upgrade (hit enter)
5. Reboot your Computer. I REPEAT, REBOOT YOUR COMPUTER !!!
PHONE CHANGES
6. Turn the USB Debugging Mode ON in your Android Phone/Device.
a. On your phone/device goto SETTINGS.
b. Scroll down to DEVELOPER OPTIONS and select it.
c. About the 4th item down will be a check block labeled USB DEBUGGING
d. Check USB DEBUGGING (turn it on)
Done! Plug your Android 4 + Device into your Ubuntu 12.04 + box and you should now be able to access your Android Device with Nautilus (File Manager).
If your phone memory card doesn't show up, make sure it's on and UNLOCKED. (enter your pass code while your phone is connected)
NOTE: Although I've used these steps to connect a Samsung Galaxy S3 on the Sprint Network running Android 4.1.2 to an Ubuntu 12.04 box, this method should work with other Android 4+ devices like tablets (Nexus 7, 10s) and other Android 4+ phones (HTC One, etc...) and will work on Ubuntu 12.10. The only thing is, this is about the 3rd time I've tried to do this and I did not Undo the other attempts before trying this. The other attempts got my phone to show up in Nautilus and listed the file structure but not any files and did not allow file transfers. Some of the prior attempts may have changed things that I did not list here.
Sunday, January 20, 2013
Error: API mismatch: the NVIDIA kernel module
I was trying to get STEAM working on Ubuntu 12.04. I downloaded and installed the STEAM App and when I started it, it told me I had to upgrade my Nvidia Driver from version 295.40 to version 304.43 or 310.11. It gave me nice instructions, which I followed and it looked like it worked. Ubuntu said it need to reboot to complete the driver update, which I did.
On reboot I was greeted with a Black TERMINAL SCREEN asking for my USER NAME and PASSWORD. Even after giving my user/password I was still stuck at the TERMINAL Screen. Well I remembered the command STARTX, which I tried. That's when I got the following ERROR MESSAGE;
"Error: API mismatch: the NVIDIA kernel module has version 295.49, but this NVIDIA driver component has version 310.11. Please make sure that the kernel and all NVIDIA driver components has the same version."
No matter what I did I could not get Ubuntu to boot into a GUI. I knew this was a Video Drive Issue so I began my Google Searches. Many of the things I found involved editing your /etc/X11/xorg.conf file, which I was afraid to do. After reading several articles I pieced together how to remove and reinstall your Nvidia Video Driver from a Terminal Screen. Here's how;
1. At the Terminal Screen type the following and hit ENTER;
sudo apt-get purge nvidia*
2. That removes your Nvidia Drivers, once it runs (it takes about 10 minutes and runs several lines in the Terminal) we reinstall the current Nvidia Driver with the following command;
sudo apt-get install nvidia-current-updates-dev
3. Once this command runs, just reboot your system and you should be good to go.
As a bonus, this Driver Removal and Reinstall lets the STEAM APP start working. I'll do a post on STEAM and it's Linux Game Selection once I get a chance to play with it a little.
On reboot I was greeted with a Black TERMINAL SCREEN asking for my USER NAME and PASSWORD. Even after giving my user/password I was still stuck at the TERMINAL Screen. Well I remembered the command STARTX, which I tried. That's when I got the following ERROR MESSAGE;
"Error: API mismatch: the NVIDIA kernel module has version 295.49, but this NVIDIA driver component has version 310.11. Please make sure that the kernel and all NVIDIA driver components has the same version."
No matter what I did I could not get Ubuntu to boot into a GUI. I knew this was a Video Drive Issue so I began my Google Searches. Many of the things I found involved editing your /etc/X11/xorg.conf file, which I was afraid to do. After reading several articles I pieced together how to remove and reinstall your Nvidia Video Driver from a Terminal Screen. Here's how;
1. At the Terminal Screen type the following and hit ENTER;
sudo apt-get purge nvidia*
2. That removes your Nvidia Drivers, once it runs (it takes about 10 minutes and runs several lines in the Terminal) we reinstall the current Nvidia Driver with the following command;
sudo apt-get install nvidia-current-updates-dev
3. Once this command runs, just reboot your system and you should be good to go.
As a bonus, this Driver Removal and Reinstall lets the STEAM APP start working. I'll do a post on STEAM and it's Linux Game Selection once I get a chance to play with it a little.
Monday, January 07, 2013
A Better Weather Application
A few posts ago I told you how to add a nice little weather indicator to your Ubuntu top bar. I was surprised that that post was one of my most viewed. That little app was called WEATHER INDICATOR and was nice then but has since developed a few flaws (forecast stopped working being the biggest). Since I now know that I'm not the only one who wanted to know the weather from my desktop I went searching for another weather app. Well I found a very nice one and it's called MY-WEATHER-INDICATOR.

What I like about this one is that it gives you the option to add cell phone like widget to your desktop that tell's you the time, weather and forecast at a glance. You don't have to have the widget and can just have the nice little top bar weather like the old one I posted but it's nice to have the option.
Want to see it in action, here's a link to a video by UbuntuHelpGuy.
If you've stayed with me this far I can only assume you want this too! Here's how.
Step 1
Open a TERMINAL windows and type the following:
Step 2
sudo add-apt-repository ppa:atareao/atareao (HIT ENTER and TYPE your PASSWORD)
Step 3
sudo apt-get update (HIT ENTER and TYPE your PASSWORD)
Step 4
sudo apt-get install my-weather-indicator (HIT ENTER and TYPE your PASSWORD)
Step 5
Close the TERMINAL window once it's done.
Step 6
Go to your DASH HOME on the UNITY BAR (left side, top).
Step 7
In the SEARCH BAR type in WEATHER and you should see the application My-Weather-Indicator.
Step 8
Click on its Icon, running the program, and fill out the preferences.

Check the SHOW WIDGET option on the LOCATION tab and pick SUPER in the drop down to get the weather gadget to appear on your desktop.

Don't forget to check the AUTOSTART block on the GENERAL OPTIONS tab to make My-Weather-Indicator start on boot.
Make sure to play with the app as it's running on your Top Bar because it has lots of options, including weather maps and sunset/rise info.
NOTE: if you followed my older post on how to install the WEATHER INDICATOR app, you should uninstall it or you will have WEATHER INDICATOR and MY-WEATHER-INDICATOR both running on your TOP BAR. To uninstall the old WEATHER INDICATOR start UBUNTU SOFTWARE CENTER and search for WEATHER INDICATOR and click on the REMOVE button on the left. I had to reset after the uninstall to get the old app to go away. I'm sure there was some Terminal Command I could have ran but resetting was easy.
Saturday, December 29, 2012
Android Tip: Advanced Map Viewer
 AdvancedMapViewer.apk file will install the Advanced Map Viewer App on your Device. (Note you may have to go to SETTING --> SECURITY and CHECK the UNKNOWN SOURCES option in order to do the install on your Android Device).
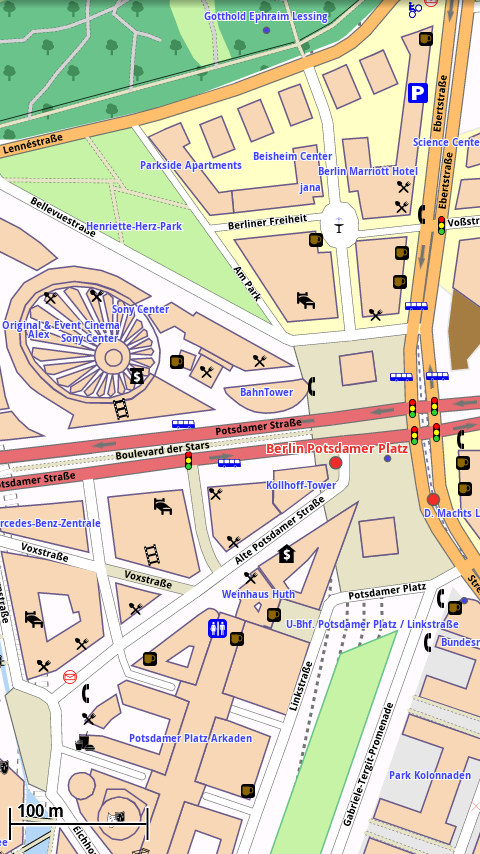 Then go to ftp://download.mapsforge.org/
1. To set C:GEO to use the offline maps you do not need the ADVANCED MAP VIEWER APP just the .MAP files for the states you want to keep on your phone.
2. Start the C:GEO App. Use your MENU Button to go to SETTINGS. Scroll down in the settings menu and find the MAP SOURCES section (probably set to GOOGLE MAPS).
3. There should be a DIRECTORY WITH OFFLINE MAPS section. CLICK on the "..." and pick the Folder on your phone or tablet where you put the .MAP files. Your MAP SOURCES should now be "OSM: Offline-MAPNAME".
Sunday, July 22, 2012
Add Extensions for LibreOffice
Lets make LibreOffice a little more useful. We'll add a couple of Extensions.
The first one we are adding is Multisave. Multisave allows you to save your LibreOffice Writer files to three formats at once. The formats are Native, Microsoft Doc, and PDF. You can save them in all three formats or just pick the ones you want. Since I use MS Office at work this Extension makes the transfer process painless.
The second Extension is Writer2Epub. This Extension lets you save you documents in the Epub format which you can read on your Android device with one of the many free Epub readers. This is nice for putting files you need on your cell phone or tablet in a nice format for reading on the go. Many of the free Epub readers have nice features like Auto Place Saving, Notes, and some can even read your files out loud. My Epub (eBook) Reader of choice is FBREADER. It's free and you can get a plug-in for it that does Text to Speech so it will read your books aloud.
Let's start by getting the Extension Files you'll need;
1. Download the OXT file for Multisave.
2. Download the OXT file for Writer2Epub.
3. Remember where you put them you will need them in the next steps.
Now lets add the Extensions LibreOffice Writer;
Click here for Official Instruction
or
1. Start LibreOffice Writer.
2. Click on the TOOLS menu and select EXTENSION MANGER
3. This will open the Extension Manger Window

4. Click on ADD button which opens a File Selector Dialog Window.
5. Navigate to the Extension File you just downloaded and select it. (.OXT file)
6. You maybe asked to scroll through a License Agreement but just follow through the wizard.
7. Once the install wizard is done close EXTENSION MANAGER and close WRITER.
8. Restart WRITER and we're done.
Repeat the above process for both the Extension Files you downloaded.
To use the MULTISAVE Extension;
1. Create a Document in WRITER (basically type something).
2. Select FILE from the Writer Menu and you'll see a MULTISAVE option.
3. Select MULTISAVE from the FILE menu and the following Save Window will popup.

4. Pick the Save Location, Type in a File Name, and Check the Formats you want the file save as.
5. Click the SAVE Button and your done!
To use the WRITER2EPUB Extension;
1. Create a Document in WRITER (basically type something).
2. Save the Document
3. You should see a Green E at a weird angle in the Tool Bar's Upper Left side (there are 3 of them).
4. Click on the Green E and you'll get a popup window that will allow you to give your Epub file a Title, Author, Keywords and other options.

5. Once you fill out your Epubs information just click the OK Button to generate the Epub File.
NOTE: If you do not have any images in your file or don't want a book cover image Check the NO COVER option on the upper right of the Epub Dialog.
6. Done!
NOTE: Sometimes WRITER2EPUB insists you save your file before conversion even though you've already done it. Just re-save it and Click on the Green E again and it will work.
There are many more Extensions to explore and not just for WRITER. If you want to browse for something you might need or want just go HERE and click on the EXTENSION link.
The first one we are adding is Multisave. Multisave allows you to save your LibreOffice Writer files to three formats at once. The formats are Native, Microsoft Doc, and PDF. You can save them in all three formats or just pick the ones you want. Since I use MS Office at work this Extension makes the transfer process painless.
The second Extension is Writer2Epub. This Extension lets you save you documents in the Epub format which you can read on your Android device with one of the many free Epub readers. This is nice for putting files you need on your cell phone or tablet in a nice format for reading on the go. Many of the free Epub readers have nice features like Auto Place Saving, Notes, and some can even read your files out loud. My Epub (eBook) Reader of choice is FBREADER. It's free and you can get a plug-in for it that does Text to Speech so it will read your books aloud.
Let's start by getting the Extension Files you'll need;
1. Download the OXT file for Multisave.
2. Download the OXT file for Writer2Epub.
3. Remember where you put them you will need them in the next steps.
Now lets add the Extensions LibreOffice Writer;
Click here for Official Instruction
or
1. Start LibreOffice Writer.
2. Click on the TOOLS menu and select EXTENSION MANGER
3. This will open the Extension Manger Window

4. Click on ADD button which opens a File Selector Dialog Window.
5. Navigate to the Extension File you just downloaded and select it. (.OXT file)
6. You maybe asked to scroll through a License Agreement but just follow through the wizard.
7. Once the install wizard is done close EXTENSION MANAGER and close WRITER.
8. Restart WRITER and we're done.
Repeat the above process for both the Extension Files you downloaded.
To use the MULTISAVE Extension;
1. Create a Document in WRITER (basically type something).
2. Select FILE from the Writer Menu and you'll see a MULTISAVE option.
3. Select MULTISAVE from the FILE menu and the following Save Window will popup.

4. Pick the Save Location, Type in a File Name, and Check the Formats you want the file save as.
5. Click the SAVE Button and your done!
To use the WRITER2EPUB Extension;
1. Create a Document in WRITER (basically type something).
2. Save the Document
3. You should see a Green E at a weird angle in the Tool Bar's Upper Left side (there are 3 of them).
4. Click on the Green E and you'll get a popup window that will allow you to give your Epub file a Title, Author, Keywords and other options.

5. Once you fill out your Epubs information just click the OK Button to generate the Epub File.
NOTE: If you do not have any images in your file or don't want a book cover image Check the NO COVER option on the upper right of the Epub Dialog.
6. Done!
NOTE: Sometimes WRITER2EPUB insists you save your file before conversion even though you've already done it. Just re-save it and Click on the Green E again and it will work.
There are many more Extensions to explore and not just for WRITER. If you want to browse for something you might need or want just go HERE and click on the EXTENSION link.
Thursday, June 14, 2012
Installing Skype 4.0 for Linux on Ubuntu 12.04
I not a big fan of using Microsoft Software on Ubuntu but sometimes you just have too. Skype is one of those things. Linux has been stuck at version 2.3 for awhile now but version 4.0 has just been released. Here's how to install it on Ubuntu 12.04;

1. Get the .deb file here Skype 4.0 for Linux (you will have to get the one that says it's for Ubuntu 10.10 but it will work)
2. Once the you have the skype-ubuntu_4.0.0.7-1_i386.deb file downloaded, just double click it to launch the installer.
3. Software Center will start and tell you that an old version is available for your distro and you should only continue if you trust the source. Just agree and let it install.
4. Done.
You can read about the new feature and get other tips, tricks and hardware compatibility list here SKYPE HOME PAGE

1. Get the .deb file here Skype 4.0 for Linux (you will have to get the one that says it's for Ubuntu 10.10 but it will work)
2. Once the you have the skype-ubuntu_4.0.0.7-1_i386.deb file downloaded, just double click it to launch the installer.
3. Software Center will start and tell you that an old version is available for your distro and you should only continue if you trust the source. Just agree and let it install.
4. Done.
You can read about the new feature and get other tips, tricks and hardware compatibility list here SKYPE HOME PAGE
Saturday, June 09, 2012
Changing which Application Launches when a File is Clicked on.
My MP3's were taking forever to open with Rythembox so I changed the default application that opened MP3s when I click on them. Here's how;
1. Launch Nautilus and right click on the file with the file-type or extension you want to change.
2. Choose Properties from the context menu (The Right Click Menu).
3. Click on the Open With tab.
4. Select the desired Application you want to open the given file-type with.
5. Click on the Set As Default button
6. Done
6. Done

Sunday, May 27, 2012
Enough Work! Time for Some Games: Hedgewars and Warzone 2100
Well we've done a lot of work with Ubuntu boxes but we have to have some fun too so I've decided to point you to a couple of my favorite Linux (Ubuntu 12.04) games.
The first is HEDGEWARS. This game is a clone of the Worms game with a nice twist on the weapons. The trailer video is a little long but worth watching. Hedgewars has a single player mode and a multiplayer/online mode.
My second pick is WARZONE 2100. Warzone 2100 is a RTS (Real Time Strategy) game. It reminds me of Command and Conquer or Starcraft. It is set in the post apocalyptic future and claims to have a unit build tree of over 400 different unit types. It has two single player modes (Skirmish and Campaign) and an online multiplayer mode. The video below is not mine but it gives you a good idea of what the game looks and plays like. The official trailer is a good intro to the game but doesn't show game play.
How do you get these fun and free games? Well this one is easy; Just open Ubuntu Software Center and search for HEDGEWARS and click on the INSTALL BUTTON, then search for WARZONE 2100 and click on the INSTALL BUTTON. Done! Now get your game on!
The first is HEDGEWARS. This game is a clone of the Worms game with a nice twist on the weapons. The trailer video is a little long but worth watching. Hedgewars has a single player mode and a multiplayer/online mode.
My second pick is WARZONE 2100. Warzone 2100 is a RTS (Real Time Strategy) game. It reminds me of Command and Conquer or Starcraft. It is set in the post apocalyptic future and claims to have a unit build tree of over 400 different unit types. It has two single player modes (Skirmish and Campaign) and an online multiplayer mode. The video below is not mine but it gives you a good idea of what the game looks and plays like. The official trailer is a good intro to the game but doesn't show game play.
How do you get these fun and free games? Well this one is easy; Just open Ubuntu Software Center and search for HEDGEWARS and click on the INSTALL BUTTON, then search for WARZONE 2100 and click on the INSTALL BUTTON. Done! Now get your game on!
Monday, May 07, 2012
Google TASKS make it an App. (and Google Chrome Browser too)
I use Google Tasks on my tablet and cell phone but didn't have a quick easy way to check my ToDo's on my Computer without remembering to go to Google's website. If I could remember to check the site I wouldn't need the lists. I wanted to embed my Google Tasks list into my Ubuntu 12.04 Desktop but I settled for a compromise instead. I made it into an App and put it on my Unity Launcher.
To do this you will need to have the Google Chrome Browser installed on your Ubuntu System. To install Chrome, start a Terminal Window and type the following:
wget -q -O - https://dl-ssl.google.com/linux/linux_signing_key.pub | sudo apt-key add - (HIT ENTER)
sh -c 'echo "deb http://dl.google.com/linux/chrome/deb/ stable main" >> /etc/apt/sources.list.d/google.list' (HIT ENTER all one line)
sudo apt-get update (HIT ENTER)
sudo apt-get install google-chrome-stable (HIT ENTER)
Close your Terminal Window because you should now have the Google Chrome Browser installed and working on your system.
Launch Google Chrome Browser and goto http://mail.google.com/tasks/ig (Google Tasks webpage). Once on that page you should see your list of Tasks (if you don't see your Tasks List you probably don't have a Google Tasks account. Get one! they are free).

While on the Google Tasks webpage you have to click on the little Wrench Icon in the upper right side of the Google Chrome Browser. This give you a drop down menu list. Navigate to TOOLS-->CREATE APPLICATION SHORTCUT. Click on it and a pop up window will appear.

In the pop window Check the APPICATIONS MENU option and click the CREATE button (if you want a Desktop Shortcut then Check the DESKTOP option too).

To do this you will need to have the Google Chrome Browser installed on your Ubuntu System. To install Chrome, start a Terminal Window and type the following:
wget -q -O - https://dl-ssl.google.com/linux/linux_signing_key.pub | sudo apt-key add - (HIT ENTER)
Close your Terminal Window because you should now have the Google Chrome Browser installed and working on your system.
Launch Google Chrome Browser and goto http://mail.google.com/tasks/ig (Google Tasks webpage). Once on that page you should see your list of Tasks (if you don't see your Tasks List you probably don't have a Google Tasks account. Get one! they are free).

While on the Google Tasks webpage you have to click on the little Wrench Icon in the upper right side of the Google Chrome Browser. This give you a drop down menu list. Navigate to TOOLS-->CREATE APPLICATION SHORTCUT. Click on it and a pop up window will appear.

In the pop window Check the APPICATIONS MENU option and click the CREATE button (if you want a Desktop Shortcut then Check the DESKTOP option too).

Your almost done. Just click on your Unity Dash Home button and type TASK into the Search box. You should see a green check mark icon labeled TASKS. Just drag it onto your Unity Launcher Bar. When you click on the TASKS Icon on the Unity Launcher Bar you will get a nice popup window that gives you access to your Google Tasks. (I guess you could have just drug a shortcut onto your desktop from Firefox but what fun would that have been).
Subscribe to:
Posts (Atom)