Saturday, December 29, 2012

Android Tip: Advanced Map Viewer


If you own an Android Phone (Or Tablet) and want to use it as a GPS with Maps while you travel but don't want to eat up all your Data Plans 5gb limit or be dependent on having Cell Signal or maybe your Android Tablet doesn't have Cell Data Service, here's a nice solution.

Download ADVANCED MAP VIEWER (AdvancedMapViewer.apk)

You can download this directly onto your Android Device or to your computer and transfer the file to your Android Device.  Then use whatever File Viewer Program you are use to using on your Android Device to RUN the  AdvancedMapViewer.apk file on your Android Device. (My favorite is ES File Explorer File Manager) Google Play Link

Running the 
AdvancedMapViewer.apk file will install the Advanced Map Viewer App on your Device.  (Note you may have to go to SETTING --> SECURITY and CHECK the UNKNOWN SOURCES option in order to do the install on your Android Device).
Now create a FOLDER on your Android Device called MAPS (or something you can remember)
Then go to ftp://download.mapsforge.org/maps/north-america/us/ and download any maps that you want to keep on your Android Device. (They are listed by state and run about 60mb each on the average and have a .MAP extension).  Once again you can download these .MAP files straight to your Android device or to your computer then transfer them to your Android Device.  You should put the .MAP files in the FOLDER (MAPS) you created earlier.
Finally just run the ADVANCED MAP VIEWER app, pick the folder where you put your maps and your done.  
Once the app starts, you can click (tap?) the "Bulls Eye" icon on the top/middle of the apps screen to use your GPS to start tracking.

You now have complete state maps and don't have to use any data or even have cell service.
BONUS:  You can use these .MAPS with the c:geo app if you do any GeoCaching.  

1. To set C:GEO to use the offline maps you do not need the ADVANCED MAP VIEWER APP just the .MAP files for the states you want to keep on your phone.  


2. Start the C:GEO App.  Use your MENU Button to go to SETTINGS.  Scroll down in the settings menu and find the MAP SOURCES section (probably set to GOOGLE MAPS).  

3. There should be a DIRECTORY WITH OFFLINE MAPS section.  CLICK on the "..." and pick the Folder on your phone or tablet where you put the .MAP files.  Your MAP SOURCES should now be "OSM: Offline-MAPNAME".

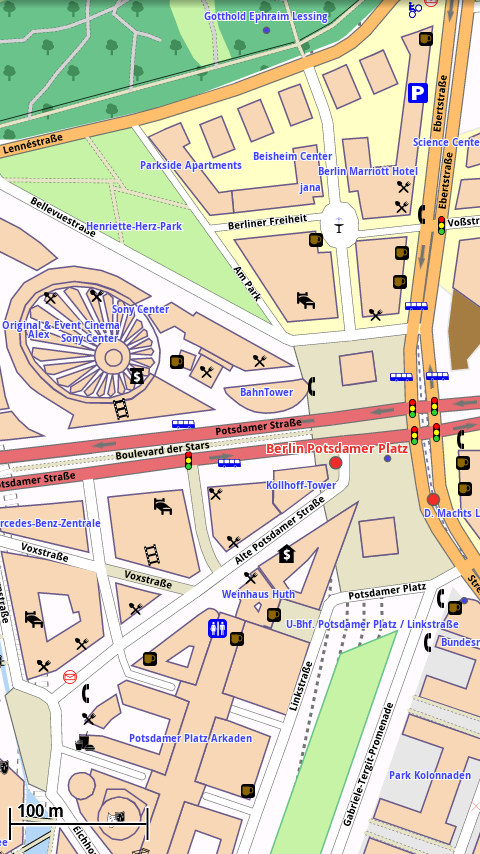
The screenshot are taken from the Apps Homepage

Sunday, July 22, 2012

Add Extensions for LibreOffice

Lets make LibreOffice a little more useful.  We'll add a couple of Extensions.

The first one we are adding is Multisave.  Multisave allows you to save your LibreOffice Writer files to three formats at once.  The formats are Native, Microsoft Doc, and PDF.  You can save them in all three formats or just pick the ones you want.  Since I use MS Office at work this Extension makes the transfer process painless.

The second Extension is Writer2Epub.  This Extension lets you save you documents in the Epub format which you can read on your Android device with one of the many free Epub readers.  This is nice for putting files you need on your cell phone or tablet in a nice format for reading on the go.  Many of the free Epub readers have nice features like Auto Place Saving, Notes, and some can even read your files out loud.  My Epub (eBook) Reader of choice is FBREADER.  It's free and you can get a plug-in for it that does Text to Speech so it will read your books aloud.

Let's start by getting the Extension Files you'll need;

1.  Download the OXT file for Multisave.
2.  Download the OXT file for Writer2Epub.
3.  Remember where you put them you will need them in the next steps.

Now lets add the Extensions LibreOffice Writer;
Click here for Official Instruction

or

1.  Start LibreOffice Writer.
2.  Click on the TOOLS menu and select EXTENSION MANGER
3.  This will open the Extension Manger Window


4.  Click on ADD button which opens a File Selector Dialog Window.
5.  Navigate to the Extension File you just downloaded and select it. (.OXT file)
6.  You maybe asked to scroll through a License Agreement but just follow through the wizard.
7.  Once the install wizard is done close EXTENSION MANAGER and close WRITER.
8.  Restart WRITER and we're done.

Repeat the above process for both the Extension Files you downloaded.


To use the MULTISAVE Extension;

1.  Create a Document in WRITER (basically type something).
2.  Select FILE from the Writer Menu and you'll see a MULTISAVE option.
3.  Select MULTISAVE from the FILE menu and the following Save Window will popup.

4.  Pick the Save Location, Type in a File Name, and Check the Formats you want the file save as.
5.  Click the SAVE Button and your done!


To use the WRITER2EPUB Extension;

1.  Create a Document in WRITER (basically type something).
2.  Save the Document
3.  You should see a Green E at a weird angle in the Tool Bar's Upper Left side (there are 3 of them).
4.  Click on the Green E and you'll get a popup window that will allow you to give your Epub file a Title, Author, Keywords and other options.

5.  Once you fill out your Epubs information just click the OK Button to generate the Epub File.
NOTE:  If you do not have any images in your file or don't want a book cover image Check the NO COVER option on the upper right of the Epub Dialog.
6.  Done!

NOTE:  Sometimes WRITER2EPUB insists you save your file before conversion even though you've already done it.  Just re-save it and Click on the Green E again and it will work.


There are many more Extensions to explore and not just for WRITER.  If you want to browse for something you might need or want just go HERE and click on the EXTENSION link.


Thursday, June 14, 2012

Installing Skype 4.0 for Linux on Ubuntu 12.04

I not a big fan of using Microsoft Software on Ubuntu but sometimes you just have too.  Skype is one of those things.  Linux has been stuck at version 2.3 for awhile now but version 4.0 has just been released.  Here's how to install it on Ubuntu 12.04;


1.  Get the .deb file here Skype 4.0 for Linux (you will have to get the one that says it's for Ubuntu 10.10 but it will work)

2.  Once the you have the skype-ubuntu_4.0.0.7-1_i386.deb file downloaded, just double click it to launch the installer.

3.  Software Center will start and tell you that an old version is available for your distro and you should only continue if you trust the source.  Just agree and let it install.

4.  Done.

You can read about the new feature and get other tips, tricks and hardware compatibility list here SKYPE HOME PAGE


Saturday, June 09, 2012

Changing which Application Launches when a File is Clicked on.


My MP3's were taking forever to open with Rythembox so I changed the default application that opened MP3s when I click on them.  Here's how;
1.  Launch Nautilus and right click on the file with the file-type or extension you want to change.
2.  Choose Properties from the context menu (The Right Click Menu).
3.  Click on the Open With tab.
4.  Select the desired Application you want to open the given file-type with.
5.  Click on the Set As Default button

6.  Done

Sunday, May 27, 2012

Enough Work! Time for Some Games: Hedgewars and Warzone 2100

Well we've done a lot of work with Ubuntu boxes but we have to have some fun too so I've decided to point you to a couple of my favorite Linux (Ubuntu 12.04) games.

The first is HEDGEWARS.  This game is a clone of the Worms game with a nice twist on the weapons.  The trailer video is a little long but worth watching.  Hedgewars has a single player mode and a multiplayer/online mode.


My second pick is WARZONE 2100.  Warzone 2100 is a RTS (Real Time Strategy) game.  It reminds me of Command and Conquer or Starcraft.  It is set in the post apocalyptic future and claims to have a unit build tree of over 400 different unit types.  It has two single player modes (Skirmish and Campaign) and an online multiplayer mode.  The video below is not mine but it gives you a good idea of what the game looks and plays like.  The official trailer is a good intro to the game but doesn't show game play.


How do you get these fun and free games?  Well this one is easy;  Just open Ubuntu Software Center and search for HEDGEWARS and click on the INSTALL BUTTON, then search for WARZONE 2100 and click on the INSTALL BUTTON.  Done!  Now get your game on!


Monday, May 07, 2012

Google TASKS make it an App. (and Google Chrome Browser too)

I use Google Tasks on my tablet and cell phone but didn't have a quick easy way to check my ToDo's on my Computer without remembering to go to Google's website.  If I could remember to check the site I wouldn't need the lists.  I wanted to embed my Google Tasks list into my Ubuntu 12.04 Desktop but I settled for a compromise instead. I made it into an App and put it on my Unity Launcher. 


To do this you will need to have the Google Chrome Browser installed on your Ubuntu System.  To install Chrome, start a Terminal Window and type the following:


wget -q -O - https://dl-ssl.google.com/linux/linux_signing_key.pub | sudo apt-key add - (HIT ENTER)

sh -c 'echo "deb http://dl.google.com/linux/chrome/deb/ stable main" >> /etc/apt/sources.list.d/google.list' (HIT ENTER all one line)

sudo apt-get update (HIT ENTER)

sudo apt-get install google-chrome-stable (HIT ENTER)


Close your Terminal Window because you should now have the Google Chrome Browser installed and working on your system.


Launch Google Chrome Browser and goto http://mail.google.com/tasks/ig (Google Tasks webpage).  Once on that page you should see your list of Tasks (if you don't see your Tasks List you probably don't have a Google Tasks account.  Get one! they are free).  


While on the Google Tasks webpage you have to click on the little Wrench Icon in the upper right side of the Google Chrome Browser.  This give you a drop down menu list.  Navigate to TOOLS-->CREATE APPLICATION SHORTCUT.  Click on it and a pop up window will appear. 


In the pop window Check the APPICATIONS MENU option and click the CREATE button (if you want a Desktop Shortcut then Check the DESKTOP option too).


Your almost done.  Just click on your Unity Dash Home button and type TASK into the Search box.  You should see a green check mark icon labeled TASKS. Just drag it onto your Unity Launcher Bar.  When you click on the TASKS Icon on the Unity Launcher Bar you will get a nice popup window that gives you access to your Google Tasks.   (I guess you could have just drug a shortcut onto your desktop from Firefox but what fun would that have been).

Gimp 2.8 Stable, Released!

Gimp has not had a major update since 2008 but that just changed.  Gimp 2.8 Stable has been released!


In order to get it onto your Ubuntu 12.04 release you have to take a couple of simple steps.  The first step, at least for me, was uninstalling my older Gimp release.

1.  Start Ubuntu Software Center
2.  Click on the INSTALLED tab
3.  Click on the GRAPHICS link on the right side
4.  Located GIMP and click the REMOVE button.

NOTE:  I tried to simple install Gimp 2.8 without removing my older version of Gimp but that caused my software center to crash and gave me errors and not allow me to ADD or REMOVE any software packages.  I had to disable the new Gimp 2.8 Software Sources before I could continue.  Once I disabled the Gimp 2.8 Software Sources, I was able to uninstall my older Gimp Packages.  I then re-enabled the new Gimp 2.8 Software Sources and re-installed Gimp 2.8 and it work just fine.

Once that is done, you can close the Ubuntu Software Center and open a terminal window.  We'll need to add a third party software source and then install the new Gimp 2.8.  In the Terminal Window type:


sudo add-apt-repository ppa:otto-kesselgulasch/gimp  (HIT ENTER and wait until done)
sudo apt-get update && sudo apt-get install gimp (HIT ENTER and wait until done)

Close the Terminal Window, you are done and are ready to use Gimp 2.8.


One of the new features that I like is the Single Window Mode.  This makes Gimp act like other programs, containing itself to one window instead of the usual 3 or 4.  Here's a screenshot to just show you.

Gimp 2.8 Single-Window Mode

To activate the Single-Window Model simple click on the WINDOWS section on the MENU (see above screenshot) and check the SINGLE-WINDOW MODE at the bottom of the menu (highlighted option in above screenshot in orange).  Once I get a chance to play with it some, I'll post more.

Sunday, April 29, 2012

Ubuntu 12.04. Ubuntu Tweak

There are several tweaks you can make to Ubuntu 12.04 but their settings are scatter throughout various apps and config files in Ubuntu. Let's get them all in one easy to use program.


Ubuntu Tweak is just what we need.  Let's install it.

1.  Open a TERMINAL window

2.  Type the following in the TERMINAL window;

      sudo add-apt-repository ppa:tualatrix/ppa (Hit Enter)
      sudo apt-get update (Hit Enter)
      sudo apt-get install ubuntu-tweak (Hit Enter)
      ubuntu-tweak (Hit Enter)

3.  That last one launches Ubuntu Tweak.

4.  Done. (there are too many options to explain them all.  See Screen shots)

TIPS:

You can find the Ubuntu Tweaks program under the SYSTEM filter in the DASH or by doing a search for ubuntu tweak in the DASH SEARCH.


On the TWEAKS tab there is an option for UNITY.  This is where you tweak your UNITY LAUNCHER BAR (left side in screen shots), your DASH and the UNITY TOP PANEL.  I like to set my Unity Launcher Icon Size to 32 so I can see more icons on it and I like my Dash Size set to Netbook which makes it full screen for some reason.


OVERVIEW


TWEAKS


ADMINS


JANITOR


Ubuntu 12.04. Weather on Unity's top panel

Okay, in Unity the widgets are gone and the bottom panel is gone, but I still want Ubuntu Desktop to tell me things.  Simple things like the date, time, sound volume and network connections are all up there on the top panel but there is one I really miss, the WEATHER.  Let's add it.

AppIndicators are applications that come with an indicator displayed on the top Unity panel (near where the TIME is displayed).  We want Weather Indicator.  It's a nice little app that displays the temperature and when clicked on gives more weather related details.

How to install it;

1.  Open a TERMINAL window.

2.  Type the following into the TERMINAL window;
     sudo add-apt-repository ppa:weather-indicator-team/ppa (Hit Enter)
     sudo apt-get update (Hit Enter)
     sudo apt-get install indicator-weather (Hit Enter)
     
3.  Close the TERMINAL window.

4.  Click on the DASH HOME button on the UNITY BAR (upper left corner see screen shot)

5. In the search bar type indicator-weather.

6. Click on the WEATHER INDICATOR app (orange one in screen shot)


7. Go through the setup wizard to select your home city and other settings.

8.  Done.


Notice that it's 62 degrees outside!  
If you click on the temperature you will get other weather related info.


NOTE:  I noticed that you have to manual start WEATHER INDICATOR app if you reset your computer.  I'll have figure out how to run it at start up and post here. 

UPDATE: See comments to read how to get weather indicator to run at startup.  Thanks swhitney for the help.

A BETTER WEATHER - If you want a much nicer weather app check out this one
   

Ubuntu 12.04 Installed

I've upgraded from Ubuntu 11.10 to 12.04.  The only problem I ran into was Skype caused the upgrade to stop and I had to remove it before I continued.  Since Microsoft acquired Skype I guess I won't miss it much.  Everything I've read says that Unity got several improvements.  We'll see.

Monday, April 02, 2012

Ubuntu 11.10 and Photoshop CS2

I've got Photoshop CS2 running on Ubuntu 11.10 with WINE.  I noticed that when I upgraded from Ubuntu 11.04 that any command in Photoshop that needed the ALT (Left Click) combo would not work.  I know it had to do with all the Unity Keyboard Shortcuts but which one?

I'll save you some guess work.  Open CompizConfig Setting Manager then scroll down to the Window Management section. Click on the Move Window option (3 column, 2 one down).


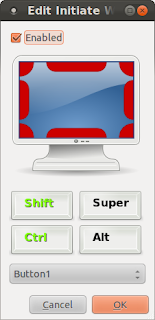
This will open the General Tab.  Notice the Initiate Window Move shortcut?  Yeah, it's set to ALT-Button1 or ALT Left Click.  So every time we try an ALT command in Photoshop, Unity intercepts the ALT-Left Click and tries to Initiate Window Move. So to change it Click on the button labeled <ALT>Button1 beside the Initiate Window Move option in the General Tab


This will open a window that allows you to change the shortcut to a combination that you don't need anywhere else.

Now your ALT Clicks in Photoshop will behave as you expect (in this screen shot I've set my Initiate Window Move combo to SHIFT CTRL Button1).

B.T.W.  the  SUPER = the windows logo key on your keyboard

Sunday, March 25, 2012

Five Ubuntu 11.10 Shortcuts and some common one's.

Ubuntu 11.10 Keyboard Shortcuts
SuperKey + S(Windows Logo Key) Work space Switcher.
SuperKey + T(Windows Logo Key) Open Trash.
Ctrl+Alt + TOpens Terminal Window.
Prt-Scn = (Print Screen) Take a screenshot of the whole screen.
Alt + Prt-ScnTake a screenshot of the current window.


Common Keyboard Shortcuts

Ctrl + C = Copy the selected text/object.
Ctrl + X = Cut the selected text/object.
Ctrl + V = Paste/insert the selected text/object.
Ctrl + A = Select all text.
Ctrl + B = Make the selected text bold.
Ctrl + I = Make the selected text italic.
Ctrl + U = Underline the selected text.
Ctrl + N = Open a new document or window.
Ctrl + S = Save the current document.
Ctrl + O = Open another document.
Ctrl + P = Print the current document.
Ctrl + Z = Undo the last change you made.
Ctrl + Shift + Z = Redo a change that you just undid.

I know the common shortcuts are "very common" but I had to learn them from someone so I'm just paying it forward.

Thursday, March 22, 2012

Ubuntu 11.10 Unity

It's been about a week since I upgraded to Ubuntu 11.10.  I thought by now I'd be longing for 10.10 back and raving about what a big mistake upgrading was.  I assumed I'd at least switch to the Gnome 3.x desktop but I've been surprised by Unity.  I don't hate it, don't love it either, but it's growing on me.  Don't get me wrong, it has some issues and annoyances (Right Click Context Menus) but I can see where they are going with this.  I've looked at some Youtube videos of the next Ubuntu Release, 12.04, and see that they're addressing some of my complaints, the biggest of which is not having the ability to customize the look/feel of Unity.  I haven't found any "show stoppers" yet so I think I can live with the small issues I've encountered until Ubuntu 12.04 with Unity 5.0 comes out in a month.

I've thought about doing more 11.10 "how to's" but since we are so close to 12.04 I think I'll wait, upgrade early and write some articles for Ubuntu 12.04 LTS instead.

One parting tip... Most of the Unity customization lives in the CompizConfig Settings Manager.  To get to it; open a TERMINAL Window and type;
   ccsm

Sorry about the Blue Tint, it's one of those "annoyances"


Saturday, March 17, 2012

Ubuntu 11.10 Right Click Desktop Shortcut Option.


Ubuntu 11.10 offers no way to create desktop shortcuts with a Right Click.  Let's make it bend to our will.

1. Install gnome-panel by opening a TERMINAL window and typing the following (it'll ask for your password)
sudo apt-get install gnome-panel

2.  Once Gnome-Panel installs we need to create a Bash Script.
    a. Open gEdit (or any text editor) and type the following;
#!/bin/bash
gnome-desktop-item-edit --create-new ~/Desktop
    b.  Save the Bash file with the name Create-Launcher

3. Copy the Bash File (Create-Launcher) to the nautilus-scripts folder by opening a TERMINAL window and typing the following;
cp Create-Launcher ~/.gnome2/nautilus-scripts

4.  Now change the permission on our new file (Create-Launcher) so that it has Execution permission by opening a TERMINAL window and typing;
chmod +x ~/.gnome2/nautilus-scripts/Create-Launcher

5. Move the new file to the right click/scripts section of nautilus by opening a TERMINAL window and typing;
mv ~/.gnome2/nautilus-scripts/Create-Launcher ~/.gnome2/nautilus-scripts/"Create Launcher"

6. Done!

Now when you Right Click on a blank spot on your desktop you see a Scripts option in the menu that appears that expands to give you a Create Laucher option.

If you select the Scripts/Create Launcher option you get the standard Desktop Shortcut Creator Wizard or to you "die hard" Linux people, the Ubuntu Create Launcher Dialogue Box. 


Monday, March 12, 2012

Made the jump to 11.10 and Unity

I finally made the jump to Ubuntu 11.10 with it's Unity interface.  I don't really want the Unity Desktop and would have liked to have a built-in choice (I know I can install Gnome 3 but it would have been nice to have this choice built-in).

My reason for making this jump is simple; from everything I've read Canonical is committed to Unity and if I want to stay with Ubuntu then it's Unity or custom work every upgrade.

We are getting close to the Ubuntu's Long Term Release and it will have Unity so I'm going to give it a chance.  I have to admit that I have some dislike of Unity going into this but I think most of it is because Canonical has taken away my choice in this matter.  However Canonical and Ubuntu has been good to me over the years since I've started this blog so I'm going to give them the benefit of the doubt, assume they know what their doing and give Unity a fair try.

The upgrade from 11.04 to 11.10 was painless, taking about an hour.  It booted fine and keep most everything I had under 11.04.  For some reason it decided to change my background to a Star Trek theme.  I think I had download this theme once in the past but it was too busy to use.  Since it is still too busy to use the only thing I've done so far is change the background.  I actually put some thought into this; its not Microsoft, its not Apple, and its not the Ubuntu I'm use to, so I went with something different.  I'll post more as I learn.