It's really been just over seven months now. I started my Linux experiment on November 1, 1996. One of my friends was singing Linux's praises and told me I should try it.
To be honest I had tried Linux before but never did get any use out of it. I think it was SUSE Linux 6 or 7. I couldn't get it to work with my MS Windows network, couldn't get online with it or do anything productive. To be fair I didn't give it a real chance. I installed it, played with it for a few days, then never used it again.
My friend works in the IT field and told me that Linux had changed since I last tried it. He told me that there was a Distro that he liked called Ubuntu. Well I just happen to have a Dell box laying around that needed it's OS reinstalled, so I took a chance.
I decided to give it a try but remembering back to my first Linux experience, I decided to force myself to use it for 30 days no matter what problems I had. My friend was also Blogging and I thought I'd like to try that too so I decided to combine the two idea.
I forced myself to stick with my pledge to use nothing but Linux for 30 days. At first it was hard and I was tempted to cheat but never did. Every time I hit a road block I would research until I found a solution. In the end I solved every problem except one, the VPN to work, and someone has suggested a solution to that one too but I haven't had time to try it.
I thought that when MS Vista came out that it would set a new bar in the OS field and make Linux look out and tired. That couldn't have been further from the truth. Vista is such a poor OS Microsoft is having to force people to take it.
I had planed to reinstall MS Windows on this Dell box at the end of the 30 days but I had gotten used to Linux and started liking it. So seven months later Ubuntu Linux is still on this box and I've updated it from Version 6 to Version 7. I've taken XP off my old laptop and put Linux on. I've made my work laptop a duel boot Linux/XP and I am thinking about removing Vista from my new laptop and making it a duel boot XP/Linux. We will see.
Thursday, July 12, 2007
Wednesday, July 11, 2007
Added a Printer but Can't Share It with Vista
There comes a time when you want to get information from the computer screen to paper. To do this you have to install a printer. I thought I'd have more trouble than I did but it was easy. I had an older HP Laserjet 1100 that uses the parallel port and I wanted to install it locally. I also want to share it so that my Linux Laptop and MS Windows Laptop can use it. Here's what I've done so far;
Add the printer locally;
0. I had to reset my computer and change my BIOS settings under PORTS-->Parallel setting it to the EPP Mode. (I read on-line before I installed the printer and this suggestion showed up in several articles so I made the change before I started).
1. Goto SYSTEM-->Administration-->Printing
2. This will open a new window. Double Click on NEW PRINTER. Next you will be presented with a three step wizard (Add New Print Wizard)
3. Wizard Step 1. Pick either Local/Detected Printer or Networked Printer. I choose Local, then clicked the Forward button.
4. Wizard Step 2. Pick your printer Manufacture and your pinter Model. Ubuntu suggested a Printer Driver for me (ljet4). The list of printers, models, and drivers looks pretty extensive but I'm sure not every modern printer will be full supported but you should be able to find a combo that will get you working. Click Forward
5. Wizard Step 3. Name your printer, give it a "friendly" Description and a Location. The printer name is the important part here since you will have to use it if you Share it on your network. Ubuntu suggested mine be named Laserjet-1100 and that was good to me. I assume that the name is case sensitive like everything else in Linux. Click Apply
If this is the only computer that will use the printer, you are done. You can Right Click on the printer in the SYSTEM-->Administration-->Printing window and change all the default settings and paper handling options for your printer. You can also change your driver setting and printer name.
I wanted my printer shared on my network So I had to plow on. I've ran into some trouble sharing the printer. I went to SYSTEM-->Administration-->Printing then Single Clicked on my printer (selecting it) and then clicked on Global Settings and checked the Share Printers option in the menu.
I then went to my MS Windows Laptop (running Vista) and tried to add the newly shared linux box printer. I went to START-->Printers-->Add New Printer. I told Vista that it was a Network Printer and it searched for all shared printers on my network. None were found. I figured this would happen so I told Vista that I would manually enter the printer location. I typed //LinuxBoxName/Laserjet-1100 (remember the Name from Wizard Step 3 above?). Vista thought about this for a second, sent out some packets on the network, then asked me for a User Name and Password to connect to this printer. Ok, I figured it wanted my LinuxBox User/Pword. Tried it and it didn't work. I tried the VistaBox User/Pword it didn't work. Remembering how MS windows likes to have DomainName/UserName or ComputerName/UserName, I tried LinuxBox/UserName and LinuxBoxPword , it didn't work !!!
It appears that Vista can see the LinuxBox on the network and can see it's printer but the LinuxBox wants a password to access the printer. I can't figure out how to get Vista to give the LinuxBox that User/Pword. I've read about it online and saw where Linux use a program called CUPS. To access CUPS you start a Browser and type http://localhost:631/printers/Laserjet-1100 as the Address (replace Laserjet-100 with your printer name). I have explored CUPS a little and can even access the CUPS interface from the VistaBox (http://LinuxBoxName:631/printers/Laserjet-1100) but still can't add the LinuxBox Printer to the VistaBox. This is where I'm stuck.
This weekend I will try to add the LinuxBox Printer to the LinuxLaptop and see if it's just a Vista thing.
Add the printer locally;
0. I had to reset my computer and change my BIOS settings under PORTS-->Parallel setting it to the EPP Mode. (I read on-line before I installed the printer and this suggestion showed up in several articles so I made the change before I started).
1. Goto SYSTEM-->Administration-->Printing
2. This will open a new window. Double Click on NEW PRINTER. Next you will be presented with a three step wizard (Add New Print Wizard)
3. Wizard Step 1. Pick either Local/Detected Printer or Networked Printer. I choose Local, then clicked the Forward button.
4. Wizard Step 2. Pick your printer Manufacture and your pinter Model. Ubuntu suggested a Printer Driver for me (ljet4). The list of printers, models, and drivers looks pretty extensive but I'm sure not every modern printer will be full supported but you should be able to find a combo that will get you working. Click Forward
5. Wizard Step 3. Name your printer, give it a "friendly" Description and a Location. The printer name is the important part here since you will have to use it if you Share it on your network. Ubuntu suggested mine be named Laserjet-1100 and that was good to me. I assume that the name is case sensitive like everything else in Linux. Click Apply
If this is the only computer that will use the printer, you are done. You can Right Click on the printer in the SYSTEM-->Administration-->Printing window and change all the default settings and paper handling options for your printer. You can also change your driver setting and printer name.
I wanted my printer shared on my network So I had to plow on. I've ran into some trouble sharing the printer. I went to SYSTEM-->Administration-->Printing then Single Clicked on my printer (selecting it) and then clicked on Global Settings and checked the Share Printers option in the menu.
I then went to my MS Windows Laptop (running Vista) and tried to add the newly shared linux box printer. I went to START-->Printers-->Add New Printer. I told Vista that it was a Network Printer and it searched for all shared printers on my network. None were found. I figured this would happen so I told Vista that I would manually enter the printer location. I typed //LinuxBoxName/Laserjet-1100 (remember the Name from Wizard Step 3 above?). Vista thought about this for a second, sent out some packets on the network, then asked me for a User Name and Password to connect to this printer. Ok, I figured it wanted my LinuxBox User/Pword. Tried it and it didn't work. I tried the VistaBox User/Pword it didn't work. Remembering how MS windows likes to have DomainName/UserName or ComputerName/UserName, I tried LinuxBox/UserName and LinuxBoxPword , it didn't work !!!
It appears that Vista can see the LinuxBox on the network and can see it's printer but the LinuxBox wants a password to access the printer. I can't figure out how to get Vista to give the LinuxBox that User/Pword. I've read about it online and saw where Linux use a program called CUPS. To access CUPS you start a Browser and type http://localhost:631/printers/Laserjet-1100 as the Address (replace Laserjet-100 with your printer name). I have explored CUPS a little and can even access the CUPS interface from the VistaBox (http://LinuxBoxName:631/printers/Laserjet-1100) but still can't add the LinuxBox Printer to the VistaBox. This is where I'm stuck.
This weekend I will try to add the LinuxBox Printer to the LinuxLaptop and see if it's just a Vista thing.
Wednesday, May 16, 2007
Installing BERYL on Ubuntu Feisty Fawn
 I installed Beryl today and it looks great. Beryl gives your desktop a 3D look and adds tons of eye candy effects to windows moves, opens, closes, etc. The instructions below are not mine but they are ones I followed that got Beryl working on my machine. Here's the original article where I found the Howto. You need to note that the instructions vary with graphic cards. I have an Nvidia graphics card and this script worked for me. I have a 64mb card with 512mbs of system ram on a 2.0 ghz machine. The effects speeds are ok but they are a little choppy. There were some warnings about making your machine unusable if this script (or Beyrl) has problems during installation so use this with care. Read the linked article before you try this.
I've got a new laptop with Vista on it and Beryl puts Vista's effects to shame. Why risk your system? Here's why (some youtube videos of Beryl in action)
INSTRUCTIONS NVIDIA GRAPHIC CARD ONLY
1. Open a terminal. Execute:
sudo echo "Beryl for nVidia installation Ubuntu Feisty 704"
This step will ask for your password and let the rest of the script run without interuptions
2. Copy and paste all the text below into the Terminal in one action.
sudo cp /etc/X11/xorg.conf /etc/X11/xorg.conf.backup.beryl-script
sudo cp /etc/apt/sources.list /etc/apt/sources.list.backup.beryl-script
echo "deb http://ubuntu.beryl-project.org feisty main
deb-src http://ubuntu.beryl-project.org feisty main" | sudo tee -a /etc/apt/sources.list
wget http://ubuntu.beryl-project.org/root@lupine.me.uk.gpg -O- | sudo apt-key add -
sudo apt-get update
sudo apt-get -y install beryl beryl-manager emerald-themes
sudo nvidia-xconfig --add-argb-glx-visuals
sudo cp /usr/share/applications/beryl-manager.desktop /etc/xdg/autostart/beryl-manager.desktop
cp /usr/share/applications/beryl-manager.desktop ~/Desktop/beryl-manager.desktop
echo -e "Logout now and then press \e[0;31mCTRL+ALT+BACKSPACE\e[0m to restart xorg"
echo "Installation completed !"
3. Logout and then press [CTRL+ALT+BACKSPACE] to restart.
Tuesday, May 08, 2007
Someone Take Out the Trash
While playing around with WINE I got some files stuck in the trash can. I kept getting a "You do not have the permission required to delete" error. After a bit of reading I found the following command line will delete these stuck files.
Open a Terminal window and type:
sudo rm -rf $HOME/.Trash
I learned that you should NOT use the -f switch on whims, it will just remove (delete) whatever you tell it too without any undo or warnings.
BTW rm -r DIRECTORY will delete whole directories from a TERMINAL.
Open a Terminal window and type:
sudo rm -rf $HOME/.Trash
I learned that you should NOT use the -f switch on whims, it will just remove (delete) whatever you tell it too without any undo or warnings.
BTW rm -r DIRECTORY will delete whole directories from a TERMINAL.
Sunday, April 22, 2007
Upgraded from 6.1 to 7.04 (Feisty Fawn)
I upgraded from 6.1 to 7.04 (feisty fawn) last night. Everything went well but kinda slow. I started at 1230 am and didn't finish until 3:45 am. Compared to the initial install of 6.1 this seamed like a long time, but it was mostly flawless. I got a couple of pop-up messages telling me that a few pieces of software were no longer supported and Automatrix told me it was the wrong version now, but nothing I couldn't guess the answer to. I haven't noticed anything yet that is broken but I didn't see that much new either. This is my first Linux upgrade so I don't know what to expect. It said it had a fancier windows interface but when I turned it on it took away my minimize and maximize buttons.
After the three hour upgrade I was too tired to test it much, but I'll get into it soon and write about it here. I have NOT upgraded the laptop yet because one of my friends has been fighting 7.04's wireless support. I am using the laptop and don't consider it a test bed anymore so as soon as I put feisty fawn through it's paces on the test computer, I'll try it on the laptop.
p.s. I'm still working on the Pocket PC stuff
After the three hour upgrade I was too tired to test it much, but I'll get into it soon and write about it here. I have NOT upgraded the laptop yet because one of my friends has been fighting 7.04's wireless support. I am using the laptop and don't consider it a test bed anymore so as soon as I put feisty fawn through it's paces on the test computer, I'll try it on the laptop.
p.s. I'm still working on the Pocket PC stuff
Tuesday, March 20, 2007
How to sync your Pocket PC with Ubuntu
I have a Dell Axim Pocket PC and want to connect it to Ubuntu. Well here we go.
Connect your pocket PC to your Ubuntu machine using the serial to USB cable and power on the pocket PC.
Open a terminal (Applications -> Accessories -> Terminal).
Load the USB to serial driver by entering the following command in the terminal.
sudo modprobe ipaq
Issue the following command to make sure Ubuntu detects your pocket PC.
dmesg | tail
It showed /dev/ttyUSB0
as the device name. The next step is to install the packages we need. Enter the command as shown below:
sudo apt-get install synce-dccm synce-serial librra0-tools
This command will ask you to enter the IP addresses for your pocket PC, your DNS server etc. Enter the IP address of your router for the DNS server option (where you’ll get a blank field, whereas for other options, you’ll get a default value). It’s usually 192.168.0.1, but then it depends on the router. Leave the defaults for all other IPs.
Once the installation is complete, run the following command to specify the serial port:
sudo synce-serial-config /dev/ttyUSB0
You’ll get a message that
You can now run synce-serial-start to start a serial connection.
Make sure your pocket PC is connected and on. If your pocket PC is setup to sleep after certain minutes, you may have to switch it on again. Now start the dccm daemon.
You can start it in 2 ways.
dccm -d 4 -f
where -d 4 shows debugging is enabled and -f forces the daemon to run in the foreground.
Once you issue the above command, you’ll see the following in the terminal:
dccm[xxxx]: Running in foreground
dccm[xxxx]: Listening for connections on port xxxx
where xxxx stands for some number.
Now open another terminal and issue the following command:
sudo synce-serial-start
This will start the pocket PC synchronization. If you have firewall enabled, then you might see the warning as shown below:
Warning!
You have firewall rules that may prevent SynCE from working properly!
synce-serial-start is now waiting for your device to connect
In that case follow the firewall steps below. If you don’t have a firewall, then go to Continue after Firewall.
Firewall setting:
I user Firestarter as the firewall for front end. If you are using Firestarter, then go to /etc/firestarter/ directory. Change the file permission for user-pre to rw-r—– using the following command:
sudo chmod 640 user-pre
Now edit the file using
sudo gedit user-pre
Enter the following lines in the file:
$IPT -I FORWARD 1 -s 192.168.131.0/24 -d 192.168.131.0/24 -j ACCEPT
$IPT -I OUTPUT 1 -s 192.168.131.0/24 -d 192.168.131.0/24 -j ACCEPT
$IPT -I INPUT 1 -s 192.168.131.0/24 -d 192.168.131.0/24 -j ACCEPT
Save and close the file. Change the file permission back to r–r—– by issuing
sudo chmod 440 user-pre
The above change will work only if you had gone with the default IPs while installing the packages required for syncing.
Restart the computer and open two terminals. Issue the dccm command as given above in one terminal and sudo synce-serial-start on the other terminal. Make sure your Pocket PC is on before you do this.
Continue after firewall:
Once you issue the command sudo synce-serial-start in terminal 2, you’ll see the following messages (or similar messages) in terminal 1 where you issued the dccm command.
dccm[xxxx]: Connection from 192.168.xxx.xxx accepted
info package (88 bytes):
0000: 24 00 00 00 03 00 a3 2b $……+
0008: 11 0a 00 00 00 00 00 00 ……..
0010: 61 05 f3 56 00 00 00 00 a..V….
0018: 24 00 00 00 2c 00 00 00 $…,…
0020: 3e 00 00 00 50 00 50 00 >…P.P.
0028: 43 00 00 00 50 00 6f 00 C…P.o.
0030: 63 00 6b 00 65 00 74 00 c.k.e.t.
0038: 50 00 43 00 00 00 44 00 P.C…D.
0040: 65 00 6c 00 6c 00 20 00 e.l.l…
0048: 41 00 78 00 69 00 6d 00 A.x.i.m.
0050: 20 00 58 00 35 00 00 00 ..X.5…
0058:
dccm[xxxx]: Talking to ‘PPC’, a PocketPC device of type Dell Axim X5
This shows that the system is talking to the pocket PC. The next step is to setup a partnership. You are generally allowed upto 2 partnership. I have setup a partnership with my Windows machine and one more was remaining. I used that for syncing with Ubuntu.
Issue the following command in terminal 2 to establish the partnership:
synce-matchmaker create
You’ll get a message similar to the one shown below if you are able to establish the partnership.
[rra_matchmaker_create_partnership:xxx] Partnership file not found for ID XXXXXXXX
[rra_matchmaker_create_partnership:xxx] Partnership slot 2 is empty on device
Partnership creation succeeded. Using partnership index 2.
Once the partnership is established, then you can issue the following command to list the files in the pocket PC. You’ll get the list of files if the partnership is established.
synce-pls
Archive 5136 Sat 10 Feb 2007 05:04:15 PM CST House materials.psw
Archive 408 Sun 28 Jan 2007 11:10:28 AM CST Note2.pwi
Archive 408 Sun 24 Dec 2006 06:30:38 PM CST Note1.pwi
Directory Mon 31 Dec 2001 06:00:00 PM CST Business/
Directory Mon 31 Dec 2001 06:00:00 PM CST Personal/
Directory Mon 31 Dec 2001 06:00:00 PM CST Templates/
The above list is the list of folders in my pocket PC. Here is the list of command you can use to access the pocket PC files:
synce-pcp - Copy a file
synce-pmkdir - Create a directory
synce-pmv - Move a file
synce-prmdir - Delete a directory.
Once you are done syncing your pocket PC, issue the following command to kill the daemon and then disconnect the pocket PC.
killall -HUP dccm
That’s it. Next we figureout how to do somethinng usefull with this like sync with Evolved
Connect your pocket PC to your Ubuntu machine using the serial to USB cable and power on the pocket PC.
Open a terminal (Applications -> Accessories -> Terminal).
Load the USB to serial driver by entering the following command in the terminal.
sudo modprobe ipaq
Issue the following command to make sure Ubuntu detects your pocket PC.
dmesg | tail
It showed /dev/ttyUSB0
as the device name. The next step is to install the packages we need. Enter the command as shown below:
sudo apt-get install synce-dccm synce-serial librra0-tools
This command will ask you to enter the IP addresses for your pocket PC, your DNS server etc. Enter the IP address of your router for the DNS server option (where you’ll get a blank field, whereas for other options, you’ll get a default value). It’s usually 192.168.0.1, but then it depends on the router. Leave the defaults for all other IPs.
Once the installation is complete, run the following command to specify the serial port:
sudo synce-serial-config /dev/ttyUSB0
You’ll get a message that
You can now run synce-serial-start to start a serial connection.
Make sure your pocket PC is connected and on. If your pocket PC is setup to sleep after certain minutes, you may have to switch it on again. Now start the dccm daemon.
You can start it in 2 ways.
dccm -d 4 -f
where -d 4 shows debugging is enabled and -f forces the daemon to run in the foreground.
Once you issue the above command, you’ll see the following in the terminal:
dccm[xxxx]: Running in foreground
dccm[xxxx]: Listening for connections on port xxxx
where xxxx stands for some number.
Now open another terminal and issue the following command:
sudo synce-serial-start
This will start the pocket PC synchronization. If you have firewall enabled, then you might see the warning as shown below:
Warning!
You have firewall rules that may prevent SynCE from working properly!
synce-serial-start is now waiting for your device to connect
In that case follow the firewall steps below. If you don’t have a firewall, then go to Continue after Firewall.
Firewall setting:
I user Firestarter as the firewall for front end. If you are using Firestarter, then go to /etc/firestarter/ directory. Change the file permission for user-pre to rw-r—– using the following command:
sudo chmod 640 user-pre
Now edit the file using
sudo gedit user-pre
Enter the following lines in the file:
$IPT -I FORWARD 1 -s 192.168.131.0/24 -d 192.168.131.0/24 -j ACCEPT
$IPT -I OUTPUT 1 -s 192.168.131.0/24 -d 192.168.131.0/24 -j ACCEPT
$IPT -I INPUT 1 -s 192.168.131.0/24 -d 192.168.131.0/24 -j ACCEPT
Save and close the file. Change the file permission back to r–r—– by issuing
sudo chmod 440 user-pre
The above change will work only if you had gone with the default IPs while installing the packages required for syncing.
Restart the computer and open two terminals. Issue the dccm command as given above in one terminal and sudo synce-serial-start on the other terminal. Make sure your Pocket PC is on before you do this.
Continue after firewall:
Once you issue the command sudo synce-serial-start in terminal 2, you’ll see the following messages (or similar messages) in terminal 1 where you issued the dccm command.
dccm[xxxx]: Connection from 192.168.xxx.xxx accepted
info package (88 bytes):
0000: 24 00 00 00 03 00 a3 2b $……+
0008: 11 0a 00 00 00 00 00 00 ……..
0010: 61 05 f3 56 00 00 00 00 a..V….
0018: 24 00 00 00 2c 00 00 00 $…,…
0020: 3e 00 00 00 50 00 50 00 >…P.P.
0028: 43 00 00 00 50 00 6f 00 C…P.o.
0030: 63 00 6b 00 65 00 74 00 c.k.e.t.
0038: 50 00 43 00 00 00 44 00 P.C…D.
0040: 65 00 6c 00 6c 00 20 00 e.l.l…
0048: 41 00 78 00 69 00 6d 00 A.x.i.m.
0050: 20 00 58 00 35 00 00 00 ..X.5…
0058:
dccm[xxxx]: Talking to ‘PPC’, a PocketPC device of type Dell Axim X5
This shows that the system is talking to the pocket PC. The next step is to setup a partnership. You are generally allowed upto 2 partnership. I have setup a partnership with my Windows machine and one more was remaining. I used that for syncing with Ubuntu.
Issue the following command in terminal 2 to establish the partnership:
synce-matchmaker create
You’ll get a message similar to the one shown below if you are able to establish the partnership.
[rra_matchmaker_create_partnership:xxx] Partnership file not found for ID XXXXXXXX
[rra_matchmaker_create_partnership:xxx] Partnership slot 2 is empty on device
Partnership creation succeeded. Using partnership index 2.
Once the partnership is established, then you can issue the following command to list the files in the pocket PC. You’ll get the list of files if the partnership is established.
synce-pls
Archive 5136 Sat 10 Feb 2007 05:04:15 PM CST House materials.psw
Archive 408 Sun 28 Jan 2007 11:10:28 AM CST Note2.pwi
Archive 408 Sun 24 Dec 2006 06:30:38 PM CST Note1.pwi
Directory Mon 31 Dec 2001 06:00:00 PM CST Business/
Directory Mon 31 Dec 2001 06:00:00 PM CST Personal/
Directory Mon 31 Dec 2001 06:00:00 PM CST Templates/
The above list is the list of folders in my pocket PC. Here is the list of command you can use to access the pocket PC files:
synce-pcp - Copy a file
synce-pmkdir - Create a directory
synce-pmv - Move a file
synce-prmdir - Delete a directory.
Once you are done syncing your pocket PC, issue the following command to kill the daemon and then disconnect the pocket PC.
killall -HUP dccm
That’s it. Next we figureout how to do somethinng usefull with this like sync with Evolved


Sunday, January 21, 2007
PhotoShop CS2 On Ubuntu Sorta
I own Photoshop CS2 and have it installed on a Windows XP Laptop. This is the only computer I have it on. I don't think I am violating any copy rights as long as I don't run photoshop on the laptop at the same time I run it on the Ubuntu Box.
I've been trying to get Photoshop CS2 to run on Ubuntu. I have had limited success. Here's what I've done so far;
1. I've installed WINE and it's working fine.
2. I copied my entire Adobe Directory from the MS Windows XP Laptop to a Flash Drive (950mbs)(c:\program files\adobe)
3. I've EXPORTED the "HKEY_LOCAL_MACHINE/Software/Adobe/" Registery Key from the MS Window Machine to a file call adobe.reg (on the windows machine run REGEDIT navigate to the above key, select it, and then chose FILE/EXPORT it will asked for a name I used ADOBE)
4. I copied this new file (adobe.reg) to the flash drive.
5. I copied all the Adobe files from the flash drive (from c:\program files\adobe) to my Ubuntu Box and put them in the home\USERNAME\.wine\dirve_c\Program Files\Adobe\ driecroty
6. I then copied the adobe.reg file to the same directory
7. I then started TERMINAL and navigated to home\USERNAME\.wine\dirve_c\Program Files\Adobe\
8. I then ran wine regedit adobe.reg to import the registry settings into WINE.
9. I then navigated to the home\USERNAME\.wine\dirve_c\Program Files\Adobe\Adobe Photoshop CS2\ directory and ran wine Photoshop.exe command in TERMINAL
It took about 2 to 3 minutes but Photoshop CS2 started but gave an error saying that the serial number or activation code was wrong. (The start time is long. I thought it had locked up)
10. Well I started searching on Google and found several links to instructions to make Photoshop CS2 run on a flash drive (I searched for Portable Photoshop CS2) I followed these instructions and made a working Portable Photoshop CS2. This worked just fine on any MS Windows Machine that I had Administrator Rights on.
11. I created another directory on my Ubuntu Box in the following location home\USERNAME\.wine\dirve_c\Program Files\PS\ I then copied my Portable Photoshop CS2 directory from my flash drive to this new directory on the Ubuntu Box. I navigated to it and run the following command in a TERMINAL wine Portable_Photoshop.exe .
It worked!! Everything was good but the problem I'm having is that if you touch the keyboard you get an error saying "requested library not loaded" or something like it and everything stops. This might be something I've done wrong with my WINE installation.
Oh, Well, it's a start. Anyone who has any suggestions please post them here.
I've been trying to get Photoshop CS2 to run on Ubuntu. I have had limited success. Here's what I've done so far;
1. I've installed WINE and it's working fine.
2. I copied my entire Adobe Directory from the MS Windows XP Laptop to a Flash Drive (950mbs)(c:\program files\adobe)
3. I've EXPORTED the "HKEY_LOCAL_MACHINE/Software/Adobe/" Registery Key from the MS Window Machine to a file call adobe.reg (on the windows machine run REGEDIT navigate to the above key, select it, and then chose FILE/EXPORT it will asked for a name I used ADOBE)
4. I copied this new file (adobe.reg) to the flash drive.
5. I copied all the Adobe files from the flash drive (from c:\program files\adobe) to my Ubuntu Box and put them in the home\USERNAME\.wine\dirve_c\Program Files\Adobe\ driecroty
6. I then copied the adobe.reg file to the same directory
7. I then started TERMINAL and navigated to home\USERNAME\.wine\dirve_c\Program Files\Adobe\
8. I then ran wine regedit adobe.reg to import the registry settings into WINE.
9. I then navigated to the home\USERNAME\.wine\dirve_c\Program Files\Adobe\Adobe Photoshop CS2\ directory and ran wine Photoshop.exe command in TERMINAL
It took about 2 to 3 minutes but Photoshop CS2 started but gave an error saying that the serial number or activation code was wrong. (The start time is long. I thought it had locked up)
10. Well I started searching on Google and found several links to instructions to make Photoshop CS2 run on a flash drive (I searched for Portable Photoshop CS2) I followed these instructions and made a working Portable Photoshop CS2. This worked just fine on any MS Windows Machine that I had Administrator Rights on.
11. I created another directory on my Ubuntu Box in the following location home\USERNAME\.wine\dirve_c\Program Files\PS\ I then copied my Portable Photoshop CS2 directory from my flash drive to this new directory on the Ubuntu Box. I navigated to it and run the following command in a TERMINAL wine Portable_Photoshop.exe .
It worked!! Everything was good but the problem I'm having is that if you touch the keyboard you get an error saying "requested library not loaded" or something like it and everything stops. This might be something I've done wrong with my WINE installation.
Oh, Well, it's a start. Anyone who has any suggestions please post them here.
Saturday, December 30, 2006
A Blog For Fun
I know I promised a "How To" on building a DVR computer and I am going to do that (I'm rounding up the parts now) But I got bored and while archiving my photos and reading my friends personal Blogs I decided to do a personal one too. I wanted something different so I decided on a photo blog with a bit of a theme. I will be uploading some of the photos I took as I traveled my state. So please visit it until I get the goods together for the DVR.
Oh! The site name and address? WVpictures.blogspot.com
Oh! The site name and address? WVpictures.blogspot.com
Thursday, December 21, 2006
Extending This Project
I have acquired a Mni Atx motherboard (1ghz cpu firewire/usb2/sound/video etc.) Its only 6 inches square. I have a tv tuner/video capture card too. I think I'm going to build a media PC. I think I will try FREEVO on it. This will be both a hardware and software project along with a little modding. (I might try to stuff it all inside an old VCR for media conversion).
I think this will be an interesting and useful how to project. I should be able to document it with photo's and maybe a little video just for something different.
As soon as I have all the part together I will start the project. I think since FREEVO is a Linux program it will fit in here on this Blog. I will need to find a Linux Distro that works with the motherboard I have since everything is on board except the capture card. I hope this won't be a problem but we will see.
I'll probably start the project after Christmas (I have the week off)
I think this will be an interesting and useful how to project. I should be able to document it with photo's and maybe a little video just for something different.
As soon as I have all the part together I will start the project. I think since FREEVO is a Linux program it will fit in here on this Blog. I will need to find a Linux Distro that works with the motherboard I have since everything is on board except the capture card. I hope this won't be a problem but we will see.
I'll probably start the project after Christmas (I have the week off)
Thursday, December 07, 2006
READ FROM THE BOTTOM UP
This Blog reads from the bottom up. I change the look a little and turned archiving back on.
Saturday, December 02, 2006
The End?
It's been thirty days (I had a few late work days so the math is a little fuzzy) and this is my first time back on a MS Windows machine. Lets talk about what I've learned and done with Ubuntu 6.1 Linux. I installed it on two computers, a desktop and a laptop. I managed to get 95% of all my hardware working on both machines but it was a fight (more later). The only real problem I had was with a scanner and these are cheap enough to replace.
My over all opinion of Linux was good, not great, not wow, but good. The good things that stick out to me were the application add/remove programs with the Internet updates, the highly customizable desktop, and the nice way Linux handles multiple users. The bad I remember was the command line and the way Linux felt like MS Windows 98 (Windows over DOS). It felt like I was working on two different OS's, one a pretty point and click windows system and the other an ugly command line back end. Ubuntu Linux makes me think of “The Wizard of Oz”, “Ignore the man behind the curtains, I am the great and powerful Oz”, Ubuntu puts a pretty face (windows) on the ugly truth (command line).
I found almost all the applications that I was looking for except a good graphics editor. There is no Photoshop equal in the Linux world (or the mac or windows world either). GIMP is ok but it is not Photoshop. Firefox rules, OpenOffice is great, Evolution was outstanding and Rythmbox did everything I asked it too. I ripped CD/DVD's and burnt them back. I converted the audio/video files to different formats. I edited the imported video, I did work (word processing, spread sheets, ect) with easy. I kept up on my podcasts and moved things around with flash drives. I accessed MS Windows network shares, connected the two Linux machines through Linux shares, and remote desktoped everything to and from everything else. It was a good experience and I enjoyed myself.
The sad thing is my worse experience was with the "old guard" Linux Users. Not newbies or general users, it was the "founders". Their “totally free or not at all” attitude is holding Linux back to the point where the community will not grow, and when new users do show up asking why it can't be easier, we're greeted with “you don't matter, your just a stupid newbie”. If you ask a question from one of these “zealots” you are berated for not knowing the answer and told to figure it out yourself or switch back to MS Windows because the Linux Community doesn't need or want you. I came very close to just giving up because of this. I had trouble with graphic drivers and wireless networking because these “zealots” don't thing you should use non-open source drivers even if they are better, free, and gets your hardware to work. They are perfectly happy forcing their moral choices onto you even if it means that Linux stays stuck in the 1990's.
The biggest question is “Will I keep Ubuntu Linux on the Laptop”? The answer is a simple “yes”. Will I remove MS Windows from any of my other personal computers? No. Would I recommend Linux to be installed on any or all of my work machine? No.
As it stands right now, Linux is a nice “hobby” OS but is not universal enough for the business workstation, until something is done with the “zealots” who sacrifice functionality and compatibility for personal moral choices Linux will remain the THIRD OS behind Microsoft and Apple and be treated as a geeky elitist hobby OS .
There is some hope, on one of the news groups, I notice that Ubuntu in their next release will be including the non-open source graphic drivers. I think this will help attract new users and that will be good for Linux.
Anyone who is on this page trying to get MEDIA (mp3, wma, divx, ect.) or GRAPHICS CARDS to work, visit the link on my menu to the right labeled "WHAT UBUNTU LEFT OUT"
For all those who helped me and gave me advice, I would like to say "thank you" and to those "old guard zealots" I hope you "bend" just a little and get the community growing because without you there would be no Linux. It's been fun, I enjoyed the challenge and I now count myself as a new full fledge Linux user.
Written November 30, 2006.
Tuesday, November 28, 2006
Solved the Stutter Problem
Remember when I told you about how I had a one second delay when opening new windows, with Ubunutu 6.1 Linux? When you would open a new window it would make the mouse lock up and cause the sound to stutter. After a second or two all would be well again until you opened any other dialog box or window. Well I figured it would be some power saving feature causing this because I using a 1.2 ghz PIII laptop with 512mbs of ram and a 40ghz 5400rpm hard drive. It shouldn't stutter.
My first thought was with the 5200 Nvidia ToGo graphics card slowing down (heat and power protection). I looked all through Ubuntu settings and turned all the power saving features off. That didn't help. My second thought was a BOIS setting. I went into BIOS and made sure all the power saving features were off there too. Still no help. I did notice an INTEL SPEED STEPPING setting but it was set to max performance. On a whim I disabled it. MAGIC !!! No more stutter.
Ok so what did I loose by turning this off? Well speed stepping lets the computer slow the processor down based on what you are doing. i.e. If you looking at web pages and are spending lots of time reading them and not changing pages much, speed step, would slow your processor down to help save batter power and cool the computer. Mine was taking my processor from 1.2 ghz down to 550 mhz. Man, what a hit! So as I was just reading stuff on the screen the cpu would slow down and when it had to go to the graphics card (opening or drawing another window) it would "stutter" while it kicked the processor back up to full speed. With this "feature" turned off the problems goes away. I will get less up time on my battery and my laptop will run a little hotter. I will monitor these "disadvantages" and report them later. Right now the trade off is well worth it to me and to compensate, since this is a brand new bulb in this laptop screen (I put it in) I turned its brightness down by half. That should help with the power some.
This is the last major problem that I was having with Ubuntu 6.1 Linux on the laptop. This weekend I have to move the desktop linux box back to MS Windows (the box is not mine and the owner wants MS windows). It is nice to know that I will be able to keep a Linux box after the experiment. The other nice thing that is nice, with all the removable media working I can easily move data from the desktop to the laptop.
I thought about duel booting the laptop but I came up with another solution. Someone I know has a similar dell 8100 laptop that was almost totally destroyed (don't ask how). One of the few surviving parts is the hard drive enclosure (the drive died though, odd). I think I will take the old 30gb hard drive that was originally in this machine which still has a valid working MS XP Home addition installed on it with MS Office 2002 pro, and mount it in the salvaged hard drive enclosure and make the hard drives switchable. Just a thought.
There is a 3.5 inch floppy drive in here too, wonder if I can replace it with a second hard drive? More reading.
Most of the rest of this blogs posts will be coming from a now "FULLY FUNCTIONING" Dell 8100 Ubuntu 6.1 Linux Laptop. My next project might be on "How to Pimp Out Your Laptop" I think I will break this one down and do a cool Linux paint job on it. Maybe even talk RycheRox into doing some custom graphics for me... hint, hint...nudge, nudge...know what I mean?, know what I mean?...A winks as good as a nod.
My first thought was with the 5200 Nvidia ToGo graphics card slowing down (heat and power protection). I looked all through Ubuntu settings and turned all the power saving features off. That didn't help. My second thought was a BOIS setting. I went into BIOS and made sure all the power saving features were off there too. Still no help. I did notice an INTEL SPEED STEPPING setting but it was set to max performance. On a whim I disabled it. MAGIC !!! No more stutter.
Ok so what did I loose by turning this off? Well speed stepping lets the computer slow the processor down based on what you are doing. i.e. If you looking at web pages and are spending lots of time reading them and not changing pages much, speed step, would slow your processor down to help save batter power and cool the computer. Mine was taking my processor from 1.2 ghz down to 550 mhz. Man, what a hit! So as I was just reading stuff on the screen the cpu would slow down and when it had to go to the graphics card (opening or drawing another window) it would "stutter" while it kicked the processor back up to full speed. With this "feature" turned off the problems goes away. I will get less up time on my battery and my laptop will run a little hotter. I will monitor these "disadvantages" and report them later. Right now the trade off is well worth it to me and to compensate, since this is a brand new bulb in this laptop screen (I put it in) I turned its brightness down by half. That should help with the power some.
This is the last major problem that I was having with Ubuntu 6.1 Linux on the laptop. This weekend I have to move the desktop linux box back to MS Windows (the box is not mine and the owner wants MS windows). It is nice to know that I will be able to keep a Linux box after the experiment. The other nice thing that is nice, with all the removable media working I can easily move data from the desktop to the laptop.
I thought about duel booting the laptop but I came up with another solution. Someone I know has a similar dell 8100 laptop that was almost totally destroyed (don't ask how). One of the few surviving parts is the hard drive enclosure (the drive died though, odd). I think I will take the old 30gb hard drive that was originally in this machine which still has a valid working MS XP Home addition installed on it with MS Office 2002 pro, and mount it in the salvaged hard drive enclosure and make the hard drives switchable. Just a thought.
There is a 3.5 inch floppy drive in here too, wonder if I can replace it with a second hard drive? More reading.
Most of the rest of this blogs posts will be coming from a now "FULLY FUNCTIONING" Dell 8100 Ubuntu 6.1 Linux Laptop. My next project might be on "How to Pimp Out Your Laptop" I think I will break this one down and do a cool Linux paint job on it. Maybe even talk RycheRox into doing some custom graphics for me... hint, hint...nudge, nudge...know what I mean?, know what I mean?...A winks as good as a nod.
Sunday, November 26, 2006
The definition of FREE by Ubuntu
The definition of FREE by Ubuntu. While trying to figure out how to make my Wireless work I ran into a few threads of discussions about DRIVERS that are given away at no cost (freeware) but are not open source (the company that made the drivers won't tell you how they made them). Several people were mad and were going to stop using Ubuntu because Ubuntu was going to use theses freeware driver from Nvidia and ATI drivers in their next release. Theses drivers are given away free by both companies but they are not open source.
In a move that reminds me of Microsoft, these Open Source Zealots brand these drivers as "NON FREE". The Zealots admit that the drivers work and are even better then the drivers that are Open Source but they claim that these drivers should not be used because the company that made them will not tell them how they made them. This is clearly a case of the Zealots trying to confuse people into thinking that by using the good working drivers provided for free from these companies that you are stealing or betraying Linux.
Don't get me wrong, I understand that non open source software has some problems (Quicken changes ever 2 years, making you upgrade or lose function), but when it comes to hardware drivers, who cares as long as they work. Who is more qualified to make the piece of software that communicates between your graphic card and you system? The company that made the graphics card or some zealot that has a "it works good enough for me" attitude.
After spending hours reading about the "NON FREE" vs "Open Source" crap, I learned that ever problem that I encountered up to this point could have been prevented if UBUNTU would have used "NON FREE" freeware drivers and codecs. (See how stupid "non free" freeware sounds)
If the Linux community wants Linux to succeeded they are going to have to give a little, companies spend millions of dollars developing the hardware and they have a right not to share that expensive work with you. They are providing you with FREE drivers to get it working and if they stop then you are sitting on a dead end road with last years hardware. You will always be behind, and never attract the critical mass of users that you need to get the big companies to pay attention to you and open up those drivers.
In a move that reminds me of Microsoft, these Open Source Zealots brand these drivers as "NON FREE". The Zealots admit that the drivers work and are even better then the drivers that are Open Source but they claim that these drivers should not be used because the company that made them will not tell them how they made them. This is clearly a case of the Zealots trying to confuse people into thinking that by using the good working drivers provided for free from these companies that you are stealing or betraying Linux.
Don't get me wrong, I understand that non open source software has some problems (Quicken changes ever 2 years, making you upgrade or lose function), but when it comes to hardware drivers, who cares as long as they work. Who is more qualified to make the piece of software that communicates between your graphic card and you system? The company that made the graphics card or some zealot that has a "it works good enough for me" attitude.
After spending hours reading about the "NON FREE" vs "Open Source" crap, I learned that ever problem that I encountered up to this point could have been prevented if UBUNTU would have used "NON FREE" freeware drivers and codecs. (See how stupid "non free" freeware sounds)
If the Linux community wants Linux to succeeded they are going to have to give a little, companies spend millions of dollars developing the hardware and they have a right not to share that expensive work with you. They are providing you with FREE drivers to get it working and if they stop then you are sitting on a dead end road with last years hardware. You will always be behind, and never attract the critical mass of users that you need to get the big companies to pay attention to you and open up those drivers.
Saturday, November 25, 2006
Progress To Date
 Since wireless is working on the laptop, I have been able to test Linux to Linux networking, remote desktop, mounted shares, and learned a little about firewalls. I only have 6 days left on this experiment and with networking just coming into play it's going to be tight. I got luck in November and had about 6 work days off but none next week.
Remote desktop works just like it does on MS Windows. The only thing that I have noticed is that I have to use the IP address of the target machine instead of its name. This might just be a delay of the way that Linux networks. I remember the MS Windows 98 days of having to wait 5 to 10 minutes before machines "saw" one another.
To use Remote Desktop you have to ALLOW it on your machine. SYSTEM/PREFERENCES/REMOTE DESKTOP will get you to the ENABLE REMOTE DESKTOP there are just four check blocks here and a text entry box.
- Allow other users to view your desktop
- Allow other users to control your desktop
- Ask you for confirmation
- Require the user to enter a password
- (text box for that password)
 I then went to the laptop and RIGHT clicked on my PANEL and selected ADD. I then choose TERMINAL SERVER CLIENT APPLET. It appeared on my PANEL. I clicked on it and got the familiar TERMINAL SERVER CLIENT window (see photo).
I tried to just type the computers name but that did not work, so I tried the remotes IP address (TERMINAL then type IP ADDR on the remote to get this). That worked but I had to change the PROTOCOL to VNC. I was then asked for the password I set earlier. I enter it and the remote machines desktop appeared in a window before me. I moved my mouse, it's cursor moved, I click on a program, the remote machine started that program. Very nice. You can even transmit sound from one to the other. There are a lot of settings here to play with but this is bulk of it.
When I first tried to connect to the remote system it failed and would not work no mater what I did. I then remembered the firewall. I turned it off and everything worked fine. I read more about the firewall program and VNC and punched a hole in the firewall for VNC and all was well.
WIRELESS working on the LAPTOP!!!!!!
I've done it! I got mad at Ubuntu 6.1 and refused to allow it to beat me. I went to my laptop and decided that I would either get Wireless working on it or Ubuntu 6.1 was leaving this laptop for good. I have spent about 5 hours reading and internet hunting to figure this out. As I read I reliazed that Ubuntu 6.1 did not work with BCM (Broadcom Chip Set) chip set which includes LINKSYS and DELL built-in wireless card. Now I could understand missing a few off brands, but DELL built-ins and Linksys are the two most common out there. Ok, enough of the rant, how did I do it?
I installed a MICROSOFT WINDOWS DRIVER, let me say that again, I used a driver designed for MICROSOFT WINDOWS. In addition I had to downgrade my Ubuntu install to use something called ndiswrapper. This method is not mine, I have just compiled it here from various news groups for your easy use:
HOW TO INSTALL A MOTOROLA WN825G WIRELESS CARD ON UBUNTU 6.1 LINUX
HOW TO READ THIS
1. STEP - Wait until your computer completes each STEP until you go to the next.
2. commands - these will be in red and this is exactly what you type in a TERMINAL window.
3. adding text to text to files - some of these commands open a file in a text editor. What you type will be in blue. After you typed in your text make sure to SAVE the file.
4. programs - that run in the windows envirmont (no command line needed).
--------------------------------------
STEP 0 start a TERMINAL windows (application / Accessories / TERMINAL)
STEP 1 (downgrade) unload the bcm43xx module.
sudo rmmod bcm43xx
STEP 2 add it to modprobe.d's blacklist to ensure that it is never loaded again, even by accident.
sudo gedit /etc/modprobe.d/blacklist
This opens a text editor, at the bottom of the file that is opened type the following then save it
blacklist bcm43xx
STEP 3 install the ndiswrapper-utils package.
sudo apt-get install ndiswrapper-utils
STEP 4 change the ID for your wireless nic to wlan0 from the default eth1.
sudo gedit /etc/iftab
This opens a text editor you change "eth1" to "wlan0" in this file and save it.
STEP 5 restart the network.
sudo /etc/init.d/networking restart
STEP 6 get your MICROSOFT WINDOWS DRIVERS for your wireless card.
Mine is a Motorola WN 825G and was found here
Motorola WN54G Drivers
STEP 7 extract your MICROSOFT WINDOWS DRIVERS and put them someplace you can find again.
I put mine HOME\DOWNLOADS\DRIVERS\WIRELESS
NOTE: if your driver is like mine you will have to extract the file on a MS Windows machine and then copy the files to your linux box or burn them to a CD. I cheated and renamed my WN-WPCI-Web-Update-v1.1.exe file to WIRELESSDRIVER.ZIP then used the Linux Archive Manager to extract it.
In the end you are looking for a file called bcmw15a.inf. I assume other .inf files for other cards will work the same way just change the name.
STEP 8 change to the directory where your .inf file is located.
cd DOWNLOADS
cd DRIVERS
cd WIRELESS
STEP 9 creates the driver wrapper.
sudo ndiswrapper -i bcmwl5a.inf
STEP 10 create the module in /ect/modutils.d.
sudo ndiswrapper -m
Step 11 move the module.
sudo cp /etc/modprobe.d/ndiswrapper /etc/modutils/
Step 12 update the module.
sudo update-modules
STEP 13 restarts your network.
sudo /etc/init.d/networking restart
-------------------------------------------------
Ok that should be it if you do not have WEP enabled. I have WEP enable ...sigh... But I did see that my wireless cards lights were on. I remember what my friend El Gee told me he used to help him, WIFI RADAR. I downloaded and installed WIFI RADAR (add/remove applications) I ran it and it saw my wireless network !!!!
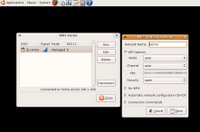 I then disconnected my WIRED Lan line and rebooted becuase I'm a MS Windows person and have to reboot all the time and besides it doesn't hurt anything. After the boot I ran WIFI RADAR and selected my WIRELESS NETWORK (home) and then clicked connect. It told me there was no configuration file for (home) and asked if I'd like to create one. I said YES and was presented with a standard WIRELESS config setup. (SEE Photo) it wanted MODE, CHANNEL, KEY, SECURITY. I set MODE and CHANNEL to AUTO, entered my 26 digit wep KEY, and selected OPEN for SECURITY. There was a small delay and then I was CONNECTED with WEP!!!!
You will notice in the screen shot it says I'm connected in the B mode (11mbs) hmm... this is a G card (54 mbs) ... At least I have wireless on the laptop.
IMPROVING THIS GUIDE
I'm sure there is a command line to configure the WIRELESS card (MODE, CHANNEL, KEY, SECURITY) but I couldn't find it and the WIFI RADAR program has other uses too and is worth getting.
NOTES
1) gets help with the ndiswrapper command
ndiswrapper --help
2) to run WIFI RADAR you have to enter your password like any sudo command.
3) This is not my work. Other people smarter then me figured this out. I just put all the small pieces together in one place in a step by step guide. Some of the steps take a few seconds to complete and will display lots of information in the TERMINAL window. I read it and understood some of it but it did not impact what I did.
I installed a MICROSOFT WINDOWS DRIVER, let me say that again, I used a driver designed for MICROSOFT WINDOWS. In addition I had to downgrade my Ubuntu install to use something called ndiswrapper. This method is not mine, I have just compiled it here from various news groups for your easy use:
HOW TO INSTALL A MOTOROLA WN825G WIRELESS CARD ON UBUNTU 6.1 LINUX
HOW TO READ THIS
1. STEP - Wait until your computer completes each STEP until you go to the next.
2. commands - these will be in red and this is exactly what you type in a TERMINAL window.
3. adding text to text to files - some of these commands open a file in a text editor. What you type will be in blue. After you typed in your text make sure to SAVE the file.
4. programs - that run in the windows envirmont (no command line needed).
--------------------------------------
STEP 0 start a TERMINAL windows (application / Accessories / TERMINAL)
STEP 1 (downgrade) unload the bcm43xx module.
sudo rmmod bcm43xx
STEP 2 add it to modprobe.d's blacklist to ensure that it is never loaded again, even by accident.
sudo gedit /etc/modprobe.d/blacklist
This opens a text editor, at the bottom of the file that is opened type the following then save it
blacklist bcm43xx
STEP 3 install the ndiswrapper-utils package.
sudo apt-get install ndiswrapper-utils
STEP 4 change the ID for your wireless nic to wlan0 from the default eth1.
sudo gedit /etc/iftab
This opens a text editor you change "eth1" to "wlan0" in this file and save it.
STEP 5 restart the network.
sudo /etc/init.d/networking restart
STEP 6 get your MICROSOFT WINDOWS DRIVERS for your wireless card.
Mine is a Motorola WN 825G and was found here
Motorola WN54G Drivers
STEP 7 extract your MICROSOFT WINDOWS DRIVERS and put them someplace you can find again.
I put mine HOME\DOWNLOADS\DRIVERS\WIRELESS
NOTE: if your driver is like mine you will have to extract the file on a MS Windows machine and then copy the files to your linux box or burn them to a CD. I cheated and renamed my WN-WPCI-Web-Update-v1.1.exe file to WIRELESSDRIVER.ZIP then used the Linux Archive Manager to extract it.
In the end you are looking for a file called bcmw15a.inf. I assume other .inf files for other cards will work the same way just change the name.
STEP 8 change to the directory where your .inf file is located.
cd DOWNLOADS
cd DRIVERS
cd WIRELESS
STEP 9 creates the driver wrapper.
sudo ndiswrapper -i bcmwl5a.inf
STEP 10 create the module in /ect/modutils.d.
sudo ndiswrapper -m
Step 11 move the module.
sudo cp /etc/modprobe.d/ndiswrapper /etc/modutils/
Step 12 update the module.
sudo update-modules
STEP 13 restarts your network.
sudo /etc/init.d/networking restart
-------------------------------------------------
Ok that should be it if you do not have WEP enabled. I have WEP enable ...sigh... But I did see that my wireless cards lights were on. I remember what my friend El Gee told me he used to help him, WIFI RADAR. I downloaded and installed WIFI RADAR (add/remove applications) I ran it and it saw my wireless network !!!!
 I then disconnected my WIRED Lan line and rebooted becuase I'm a MS Windows person and have to reboot all the time and besides it doesn't hurt anything. After the boot I ran WIFI RADAR and selected my WIRELESS NETWORK (home) and then clicked connect. It told me there was no configuration file for (home) and asked if I'd like to create one. I said YES and was presented with a standard WIRELESS config setup. (SEE Photo) it wanted MODE, CHANNEL, KEY, SECURITY. I set MODE and CHANNEL to AUTO, entered my 26 digit wep KEY, and selected OPEN for SECURITY. There was a small delay and then I was CONNECTED with WEP!!!!
You will notice in the screen shot it says I'm connected in the B mode (11mbs) hmm... this is a G card (54 mbs) ... At least I have wireless on the laptop.
IMPROVING THIS GUIDE
I'm sure there is a command line to configure the WIRELESS card (MODE, CHANNEL, KEY, SECURITY) but I couldn't find it and the WIFI RADAR program has other uses too and is worth getting.
NOTES
1) gets help with the ndiswrapper command
ndiswrapper --help
2) to run WIFI RADAR you have to enter your password like any sudo command.
3) This is not my work. Other people smarter then me figured this out. I just put all the small pieces together in one place in a step by step guide. Some of the steps take a few seconds to complete and will display lots of information in the TERMINAL window. I read it and understood some of it but it did not impact what I did.
Day Off, Yea Right!
I had big plan for some Linux tests over the holiday but I had to work. I got called out at 9:30 pm on Thanksgiving Day and did not get back home until noon on Black Friday. Once home I had to sleep and didn't get up until 830 pm Friday and had to go back to work to finish somethings. Today, Saturday, Nov 25, 2006 is such a nice warm day here I spent the morning out riding in my Jeep without the top on it. Even Computer Geeks Need Sun.
Thursday, November 23, 2006
FSCK Forced File System Scan
I went to my Linux box today and it told me that "drive dev/hda had been mounted 30 times without being scanned, forced check" and then began running what I think was a disk check with the FSCK command. The process took about 3 minutes.
Ok I understand checking the disk for errors or on bad shutdowns but why FORCE me to do it. Linux, for an OPEN operating system is awful pushy. Why not just install and force virus scan, force a fire wall on me too, hey while were at it, hide my admin account and generate random 20 charter passwords and randomly rotate them a couple of dozen times over the year. This sure does FEEL like the way Microsoft treats me. If you are truely OPEN explain it to me then let me PICK what I want to do, not what you think is best.
I thought open meant choice. Don't get me wrong this fsck might be a good thing, and if it was explained to me before it JUST RAN and offered me a CHOICE, I might have opted in. If you keep protecting me from myself how am I to learn. I've had Hard drive crashes before, I know how to backup my data, I learned from those crashes.
Ok I understand checking the disk for errors or on bad shutdowns but why FORCE me to do it. Linux, for an OPEN operating system is awful pushy. Why not just install and force virus scan, force a fire wall on me too, hey while were at it, hide my admin account and generate random 20 charter passwords and randomly rotate them a couple of dozen times over the year. This sure does FEEL like the way Microsoft treats me. If you are truely OPEN explain it to me then let me PICK what I want to do, not what you think is best.
I thought open meant choice. Don't get me wrong this fsck might be a good thing, and if it was explained to me before it JUST RAN and offered me a CHOICE, I might have opted in. If you keep protecting me from myself how am I to learn. I've had Hard drive crashes before, I know how to backup my data, I learned from those crashes.
Tuesday, November 21, 2006
Visioneer OneTouch 9220 USB Scanner
The Visioneer OneTouch 9220 USB Scanner does not work with Ubuntu. I plug it in and get nothing. I run Xsane and it says it can't find a scanning device. That's too bad, I really wanted to try Xsane and I had some photo's I wanted to scan. Oh, Well.
If some reads this and knows how to get this scanner to work let me know or post the name/model number of a scanner you have working.
If some reads this and knows how to get this scanner to work let me know or post the name/model number of a scanner you have working.
Day 21 of Ubuntu 6.1 Linux
This is day 21 of 30 of my Ubuntu Linux experiment and I barely remember to write my weekly review. This is a good thing because if I have become so use to using Ubuntu that I almost forgot to review it, I must not miss MS Windows much.
I have used the Internet without trouble, figured out multimedia (with some trial and error), did word processing and spread sheet work without incident, burnt CD/DVDs, ripped the same, utilized digital photo's easily, viewed and organized the same, download, listened to, and transfered MP3s and Podcasts, and networked with MS Windows shares. All of this in just 63 hours of "on keyboard time" (21 days of about 3 hours a day). This is pretty good.
So lets break it down:
Office Productivity - 9 of 10
(word processing, spread sheets, email, presentations, PDFs)
Multimedia - 8 of 10
(play cd/dvds, play/record music/video files )
Graphic Software 8 of 10
(view/organize photos)
Graphic Editing 5 of 10
(GIMP there is nothing else close and I'm a photoshop guy)
Web Development/Programing 8 of 10
(These tools all work well nothing stands out here)
Internet - 9 of 10
(Firefox 2.0 and anything else you want)
Hardware Compatibility - 7 of 10
(Most things work well but if they don't figuring out how to fix them is very hard)
USB Function 9 of 10
(Everything I've thrown at it worked)
Networking Wired ? of 10
(I really haven't tested it much yet)
Networking Wireless 0 of 10
(I have now tried 3 wireless cards and none work)
Installation 9 of 10
(I had a bug when I tried to change my time zone)
Over all Linux (Ubuntu 6.1) on a desktop computer I give a 8 of 10
It installs easily, has 90% of what you need and is free.
On a laptop 4 of 10.
Wireless does not function for me and is too hard to trouble shoot. This is a noticable stutter on the user interface. It's a memory hog, yes its a memory hog, it requires 192 mbs of ram to install on it default settings. I am going to try Knoppix on my laptop.
I have used the Internet without trouble, figured out multimedia (with some trial and error), did word processing and spread sheet work without incident, burnt CD/DVDs, ripped the same, utilized digital photo's easily, viewed and organized the same, download, listened to, and transfered MP3s and Podcasts, and networked with MS Windows shares. All of this in just 63 hours of "on keyboard time" (21 days of about 3 hours a day). This is pretty good.
So lets break it down:
Office Productivity - 9 of 10
(word processing, spread sheets, email, presentations, PDFs)
Multimedia - 8 of 10
(play cd/dvds, play/record music/video files )
Graphic Software 8 of 10
(view/organize photos)
Graphic Editing 5 of 10
(GIMP there is nothing else close and I'm a photoshop guy)
Web Development/Programing 8 of 10
(These tools all work well nothing stands out here)
Internet - 9 of 10
(Firefox 2.0 and anything else you want)
Hardware Compatibility - 7 of 10
(Most things work well but if they don't figuring out how to fix them is very hard)
USB Function 9 of 10
(Everything I've thrown at it worked)
Networking Wired ? of 10
(I really haven't tested it much yet)
Networking Wireless 0 of 10
(I have now tried 3 wireless cards and none work)
Installation 9 of 10
(I had a bug when I tried to change my time zone)
Over all Linux (Ubuntu 6.1) on a desktop computer I give a 8 of 10
It installs easily, has 90% of what you need and is free.
On a laptop 4 of 10.
Wireless does not function for me and is too hard to trouble shoot. This is a noticable stutter on the user interface. It's a memory hog, yes its a memory hog, it requires 192 mbs of ram to install on it default settings. I am going to try Knoppix on my laptop.
Streaming (internet radio)
Lets talk streaming. On my MS Windows machine I usually listen to MP3s I've made or Podcasts I've downloaded, very rarely do I listen to live internet radio(Shout Cast, Live 365, ect...) because I couldn't find a stand alone player I liked. Winamp came the closest to what I wanted but you still had to use a web browser to find the stations.
I saw an application in the AUTOMATIX Package Installer called STREAMTUNER and it came with a player called XMMS. I took a shot and installed them. What a suprise, I like them both. XMMS (the little black Winamp looking player in the upper right in the screen shot) is very winamp like in its look and function. Its small and easy to use and if you like Winamp you'll like XMMS (I had an anonymous post suggesting I try XMMS a week ago, thanks, I love it, I'm just sorry I waited until now to get it).
 Now for STREAMTUNER. It is very easy to use. You can see the list of Services (plugins) it knows (SHOUTcast, Live 365, Google Stations, Basic.ch, Punkcast, and Xiph). It also supports bookmarking you favorite stations, and I'm sure you can add your own but I haven't needed to yet. Basically you just select your service (i.e. SHOUTcast tab) then a list of music types (rock, county, talk, alternative, ect) appears on the left side, you then click on the music type you like and a list of all the stations appears in the main window. Double click on the station you want to listen to and STREAMTUNER launches XMMS player and your selected station starts playing. Very, Very easy. and lots of choices.
You'll notice that the main window provides you with the station description, currently playing song, number of listener, and bit rate of the stream.
Hey, I wonder what that RECORD button does??? (upper left in screen shot)
I saw an application in the AUTOMATIX Package Installer called STREAMTUNER and it came with a player called XMMS. I took a shot and installed them. What a suprise, I like them both. XMMS (the little black Winamp looking player in the upper right in the screen shot) is very winamp like in its look and function. Its small and easy to use and if you like Winamp you'll like XMMS (I had an anonymous post suggesting I try XMMS a week ago, thanks, I love it, I'm just sorry I waited until now to get it).
 Now for STREAMTUNER. It is very easy to use. You can see the list of Services (plugins) it knows (SHOUTcast, Live 365, Google Stations, Basic.ch, Punkcast, and Xiph). It also supports bookmarking you favorite stations, and I'm sure you can add your own but I haven't needed to yet. Basically you just select your service (i.e. SHOUTcast tab) then a list of music types (rock, county, talk, alternative, ect) appears on the left side, you then click on the music type you like and a list of all the stations appears in the main window. Double click on the station you want to listen to and STREAMTUNER launches XMMS player and your selected station starts playing. Very, Very easy. and lots of choices.
You'll notice that the main window provides you with the station description, currently playing song, number of listener, and bit rate of the stream.
Hey, I wonder what that RECORD button does??? (upper left in screen shot)
Subscribe to:
Posts (Atom)