Sunday, November 06, 2022

Configure Geany for Python Programming

I use the GEANY text editor/IDE when I need a quick light weight versatile text editor.  I also use it for writing programming code (Python/PHP/HTML). It's available for Linux (including the Raspberry Pi), Windows, and MacOS. It has too many features to list but it allows plugins and helper apps to run or be launched from inside Geany but you have to install the Apps and configure GEANY to use them.  Since I've been writing Python code lately let's configure GEANY to help us out while coding. I'm running Ubuntu 22.04 LTS with Python 3.10.6 installed (also QT5)


Prerequisite:  You need to have Python 3.x installed and working on your system


Let's install GEANY by running the below command in a Terminal Window;
sudo apt install geany

Once GEANY is installed, let's get it's helper Apps installed by typing the following four (4) commands into a Terminal Window.  Let each command finish before executing the next;

sudo apt install pycodestyle
pycodestyle checks code formatting and style

sudo apt install python3-pyflakes pyflakes3
pyflakes3 checks dependencies and import statements

sudo apt install pylint
Pylint analyses your code without actually running it. It checks for errors, enforces a coding standard, looks for code smells, and can make suggestions about how the code could be refactored.

sudo apt install pep8
This document gives coding conventions for the Python code comprising the standard library in the main Python distribution. 

GEANY only has three configurable menu item (under the BUILD menu)  but you can link those three menu items to bash scripts in order to execute multiple helper Apps.  To do this we need to create a bash file (.sh) with the commands we want the helper Apps to run on our code.

To do this we can use GEANY (lol).  Open Geany and create a NEW file from the FILE menu (or press CTRL n).  Once you have a new blank file open, copy and paste the following bash script into that file and SAVE the file in your HOME directory with the file name CheckPythonCode.sh

#!/bin/bash

# This Bash Script is used by GEANY to check your code for errors
echo "======  pycodestyle  ======"
pycodestyle $1
echo "======  pyflakes3  ======"
pyflakes3 $1
echo "======  pylint  ======"
pylint --msg-template="{path}:{line}: [{msg_id}({symbol}), {obj}] {msg}" --reports=n $1
pylint -f parseable -r n $1


Now that you've saved the your new bash script file as CheckPythonCode.sh in your HOME directory we can edit the menu items in Geany to do what we want them to do.  Close your CheckPythonCode.sh bash script and create another NEW File (CTRL n).  We are going to make a Python hello_world.py program and we are going to add a few comment lines to the beginning to tell our helper Apps to ignore a few error types.  Here is the hello_world.py code, we need to copy and paste the following into our NEW Blank file in Geany and save it wherever you keep your python code file or just in your HOME directory;

# pylint: disable=missing-module-docstring
# pylint: disable=missing-class-docstring
# pylint: disable=missing-function-docstring

# This program prints Hello, world!
print('Hello, world!')

NOTE:  The added comment lines tell our pylint helper App to ignore the errors missing-module-docstring, missing-class-docstring, and missing-function-docstring, which are just comments describing modules, classes, and/or functions.


Now with our hello_world.py file open in Geany go to the BUILD menu as pictured.


Once in the BUILD Menu, select the SET BUILD COMMANDS option, which will bring up the following popup screen;


We need to make the following changes;  
NOTE: clicking on a button LABEL will allow you to change that LABEL.

Button number 1 (LABEL - Compile) should have the following text in the COMMAND section;
python3 -m py_compile "%f"

Button number 2 (LABEL - Check) should have the following text in the COMMAND section;
~/CheckPythonCode.sh "%f"

Button number 3 (LABEL - Lint) should have the following text in the COMMAND section;
pep8 --max-line-length=80 "%f"

LABEL - Execute, should have the following text in the COMMAND section;
python3 "%f"

If your Buttons don't look like the picture or close to that, you have to make sure you have a python file open in Geany while editing these COMMANDs

You can now Compile, check your Formatting/Style and check your Dependencies/Import Statements for whatever python file you have open and active in Geany.  You can also launch and execute your code that you have open in Geany.  


Wednesday, November 02, 2022

Installing QT5 for Python 3.x Ubuntu 20.04

I built a new Ubuntu box and needed to install Qt5 to go along with Python 3.10.6.  After some googling I found a discussion at GITHUB which had instructions that worked for me.  I'm just documenting what I did so I can repeat the process when needed.  

Open a Terminal Window so that we can install the needed components.  In the Terminal Window enter the following commands one at a time in the order that they appear.  Let each command finish before moving to the next command:  

sudo apt install python3-pip

pip3 install --user pyqt5  

sudo apt-get install python3-pyqt5  

sudo apt-get install pyqt5-dev-tools

sudo apt-get install qttools5-dev-tools


After all five commands above have finished we need to add two lines to the configuration file /usr/lib/x86_64-linux-gnu/qt-default/qtchooser/default.conf .   To do this, open the default.conf file for editing by executing the below sudo gedit command in a Terminal Window, then copy and paste the two lines below to the bottom of the default.conf file:

sudo gedit /usr/lib/x86_64-linux-gnu/qt-default/qtchooser/default.conf

/usr/lib/x86_64-linux-gnu/qt5/bin
/usr/lib/x86_64-linux-gnu


NOTE: if one or both of these lines are already in your default.conf file do NOT duplicate that line.  Just add the line or lines that are NOT in the default.conf file. 


Now we need to create the uic.py file. To do this open a text editor (like gedit) and copy and paste the below text into the into this new file.  Once you've copied and pasted the below text into the new file we save it as uic.py.  Save the uic.py file to your home directory (I saved mine to a directory called bin in my home directory because bin is in my PATH).  

#!/usr/bin/python3

import subprocess
import sys

child = subprocess.Popen(['pyuic5' ,'-x',sys.argv[1]],stdout=subprocess.PIPE)

print(str(child.communicate()[0],encoding='utf-8'))


Once you've save the uic.py file, open a Terminal Window and navigate to where you saved the uic.py file (probably in your home directory).  Once there we need to change the Permissions on the uic.py file to allow execution.  Use the below command in your Terminal Window to do this. Make sure you are in the same directory as your uic.py file in your Terminal Window.

chmod +x uic.py


Now we need to create a symlink.  To do this open a Terminal Window and navigate to the directory where you saved the uic.py file (probably your HOME directory).  Once there type the following command into your Terminal Window:

sudo ln uic.py "/usr/lib/x86_64-linux-gnu/qt5/bin/uic"


Last we will create a Desktop Link so that Qt5 Designer shows up in your App Menu.  To do this open a text editor (like gedit or geany) and copy and paste the below text into the editor.  Once you've copied and pasted the below text into your text editor save the file as qtdesigner.desktop in the directory  /.local/share/application/ which is located in your HOME folder (you may have to turn on "show hidden folder" in you file manager to see this directory).

[Desktop Entry]

Name=Qt5 Designer
Icon=designer
Exec=/usr/lib/x86_64-linux-gnu/qt5/bin/designer
Type=Application
Categories=Application
Terminal=false
StartupNotify=true
Actions=NewWindow
Name[en_US]=Qt5 Designer

[Desktop Action NewWindow]
Name=Open a New Window
Exec=/usr/lib/x86_64-linux-gnu/qt5/bin/designer


If all went well you should now have Qt5 and Qt5 Designer installed in your Ubuntu 20.04 running nicely with your your Python 3.x. You should also have the Qt5 Designer App list in your App Menu as a click to launch Application.

Hope this helps as it worked for me.  If you run into trouble please visit the link to the GITHUB discussion on this topic.  Like I said this is just a rewrite of information from that discussion.

Monday, September 19, 2022

SNAP Store Won't Update

If you are getting either of these errors 

Unable to update "Snap Store": (null): cannot refresh "snap-store": snap "snap-store" has running apps (ubuntu-software)

or

Pending update of "snap-store" snap close the app to avoid disruptions (7 days left)

Then the snap-store process is running while you are trying to update it.  The snap-store process will sometime start and run in the background even if the you didn't start it. I assume this is so it can check to see if anything needs updated. So to update the Snap Store we need to 'kill' it's process then run the update.  Here's how:

Open a Terminal window and type the following:

sudo pkill snap-store && sudo snap refresh snap-store

If sudo pkill snap-store doesn't work then open the System Monitor and find the snap-store process and force end it.  Then run sudo snap refresh snap-store .

Tuesday, July 12, 2022

Firefox Audio Low Ubuntu 20.04

 About two week ago my Firefox audio was playing but very low or no sound at all.  This was happening on anything with video (Youtube, local news sites, etc.).  When I would bring up the sound settings I would see a separate audio slider for Firefox and it was set to either very low or off.  If you slide the slide up, Firefox would play sound just fine, until you closed it, then, on the next opening of Firefox the volume would be very low again.  

After a few google searches of this problem I found a solution that worked for me.

1.  Open a Terminal Window.

2.  In the Terminal type the following and hit ENTER

rm ~/.config/pulse/*

That's it.  You should now have your sound back in Firefox.  Since this fix remove files involved in PULSE AUDIO (your sound system files) other programs may have the same issues and not just Firefox.  I had about six files in the  ~/.config/pulse/ directory, all of which looked like temp files and one was called cookie.  So if you're having trouble with sound in a app this may fix that too, not just Firefox.

NOTE: My Firefox version is 102.0 (64-bit).

Saturday, June 18, 2022

Ubuntu 22.04 "After Install" Fixes

Some Ubuntu 22.04 "After Install" things that I did. 


1. Install restricted media codecs to play various kinds of audio/video media files

sudo apt install ubuntu-restricted-extras


2.  Access the new screenshot tool that also includes screencasting.

Press the Print Screen Key to take the screenshot


3. Cleaning your system

Use the apt autoremove command to remove unneeded packages (Ones that are not required anymore).

sudo apt autoremove


4. Add AppImage support

In 22.04 AppImage applications won’t run even if you setting the "Allow Execution" file permission. To get them to run, you need to install the libfuse2 library which AppImage files need to run:

sudo apt install libfuse2


This is a quick and dirty post just to get the methods on "paper" before I forget.


Saturday, June 04, 2022

Adding AppImage Apps to a Files "File Association" List

Some AppImage programs don't create file association or don't add themselves as an "Open With" option (in the list when right clicked on).  Let's use XnView as an example;

1.  Created a file named xnview.desktop in your favorite text editor and add the following to it. When done just save it (I wanted a desktop shortcut too so I saved mine in my Desktop folder).  Replace USERNAME with your user name. I also store all my AppImages files in my Home directory in the folder AppImages and all my custom Icons are stored in my Pictures folder in a folder called Icons.  You may need to change the paths in the Exec= and Icon= sections to match your setup.

[Desktop Entry]
Encoding=UTF-8
Name=XnView
Comment=Image Viewer
Exec=/home/USERNAME/AppImages/XnView_MP.glibc2.18-x86_64.AppImage %F
Type=Application
Icon=/home/USERNAME/Pictures/Icons/XnView.png
Categories=Graphics;
MimeType=image/xnview;
Name[en_US]=XnView

2.  Once saved, the xnview.desktop file appeared on your desktop (if you saved it to your Desktop folder).  I right clicked on it's icon and selected the Allow Launching. If you saved your's elsewhere you will have to find it, right click on it, select Permissions and check the "Allow Executing File as a program" tick box.

3.  Opened a Terminal Window and navigated to your Desktop folder (or the location of where you saved your xnview.desktop file) by typing;
cd Desktop

4.  Now copy the xnview.desktop file to  /usr/share/applications directory.
sudo cp xnview.desktop /usr/share/applications/xnview.desktop

5. Now to edit your mimeapps.list file.  Type the following into your Terminal Window
gedit ~/.config/mimeapps.list

6.  Once Gedit opens your mimeapps.list files, we need to add the following line under the section [Added Associations];  
 image/jpeg=xnview.desktop; 

7.  Once done adding the single line, just save your mimeapps.list file and close Gedit.

That's it.  Now when you Right Click on a graphics file you will now find XnView as one of the apps you can use to open that file with.  You can also make it the Default App for opening that file type or just add it to the list of apps that can open that file type. The first time, you may have to pick the "Other Application" option to find XnView or your AppImage App.

I've done this on Ubuntu 20.04 and on 22.04.  Worked on both.

Wednesday, May 25, 2022

AppImage Apps not working on Ubuntu 22.04 (fix)

Ubuntu 22.04 does not included the libfuse2 package by default. The AppImage distribution and most AppImage Apps need the libfuse2 package to function.  So AppImage will not work on Ubuntu 22.04 out of the box.  We need to install the libfuse2 package through a Terminal Window to fix this problem. Just open a Terminal Window and type the following:

sudo apt install libfuse2*

That's it, your AppImage's should now work.  Short and easy!

New Build and Extra Internal Hard Drives - Ubuntu 22.04

 I'm building a new system for Ubuntu 22.04.  My old system is a Core I5 4th Gen. Intel CPU with 16gb ram and an Nvidia Gtx 950. I upgraded it to a 1 TB Samsung ssd main drive with a 2 TB Western Digital sata storage drive. It's a system I build in 2014 so it's time for some new hardware.

My new build is an AMD Ryzen 9 5900x 12 core / 24 thread CPU sitting on an Asus TUF Gaming 570x Wifi Plus motherboard with 32gb of DDR4 ram.  My main hard drive is a Samsung 980 Pro 1TB PCIe Gen 4 x4 NVMe Internal Solid State Drive. For graphics I'm using an EVGA XC Gaming Nvidia RTX 3060.  For a case I got a Fractal Design Meshify 2 Light Tempered Glass with a MainGear 850 Watt full modular power supply. (For anyone looking to do a build, all these parts worked flawlessly with Ubuntu 22.04).  

To have some fun with this build I made a 3 hour road trip to the closest MicroCenter Store.  If you've never been to one it's well worth the time to visit if your a tech/computer geek. The staff was knowledgeable, courteous and went out of their way to be helpful.  

The giant square in the center is the CPU duel cooling fans/radiators

After I got the core system up and running i decided I wanted to add a couple more internal hard drives for storage.  I had a Samsung 1TB 860 SSD sata laying around and I bought a new Western Digital 8TB WD Red Plus NAS Internal Hard Drive HDD - 5640 RPM, SATA 6 Gb/s for about $179.

So let's add a couple of internal hard drives to our new Ubuntu 22.04 box:

The first thing you need to do is to physically install your new internal hard drive and get your BIOS to recognize it.  To physically connect your hard drive to your computer, making sure your computer is powered off and unplugged from the wall.  Once powered off, opening your case and find a location that was made for your hard drive (3.5 inch, 2.5 inch, NVMe socket, etc...).  

  • NVMe drives just plug into their socket at a 45 degree angle, then move the free end towards the motherboard and put it's hold down screw in (Check your motherboard manual for the NVMe socket location).


  • 3.5 and 2.5 inch drives are going to be SATA drives in modern computers.  You will have places inside your computer case designed to hold these kind of hard drives. Usually you will have to use four small screws to attach these drives to your case.  Once attached, you need to connect a SATA data cable from your hard drive to your motherboard (red in picture below).  In addition you will need to connect a SATA power cable from your hard drive to your computers power supply (yellow, black and red in the picture below).  


  • This is just an overview, there are to many cases, hard drives, cables designs to list all the options you may see.  You should watch a few YouTube videos that match your case and hard drive types.

Once your hard drive is mounted and it's power & data cables are plugged into your motherboard and power supply, you can power your computer back on.  Most new computers will flash a message on the screen during boot saying it found a new hard drive. Some will wait for you to press a key before continuing to boot.  On some computers you will have to go into your BIOS or UEFI and manually tell your computer you've added a hard drive. 
If you need help with this step you will need to read your motherboard manual or google your motherboard/computer to find online help with this step.  There are just too many options to cover in this post.  Google or YouTube it! or, god forbid RTFM.

Now that your new internal hard drive is physically installed let's go through the steps you need to take in Ubuntu to get it to recognize your new internal hard drive and let you puts some data on it.  


MAKE A DIRECTORY TO LINK YOUR NEW DRIVE TO

Linux (Ubuntu) needs a directory to link your new hard drive to.   To make this directory open a Terminal Window and type the following commands in red into your Terminal Window. You can and should change drivename to something you can remember (no spaces). I named mine Storage.
sudo mkdir /media/drivename

Once the directory is created we need to change its permissions so we can save, change and delete things on our new hard drive.  To do this type the following into your Terminal Window.  Replace drivename with the same name as you did in the above statement.
sudo chmod 777 /media/drivename


We need to create a Boot Table, Partition and Format our new hard drive, for that let's install Gparted.

INSTALLING GPARTED

1.  Open a Terminal Window and type the commands shown in red.

2.  Update your software and libraries
sudo apt-get update
sudo apt-get upgrade

3. Install Gparted
sudo apt install gparted


USING GPARTED

Now close the Terminal Window and open your application Menu and find the GPARTED App we just installed and open it.  It will ask for your password which it will need since we are making hardware changes.

Once Gparted is open you should see your main system hard drive with two partitions (maybe more). The 2nd partition is your SWAP file. 


Click on the drop down box in the right/upper side of the window and select your newly installed hard drive.  It will probably be listed as /dev/sdb  I'm pick /dev/sdc as a sample here.  You can see on my system I have three hard drives and one usb drive in my list. (four total).  /dev/sda is my main drive, /dev/sdb is a 1.82 TB internal hard drive, /dev/sdc is a 4.55 TB internal hard drive, and because I know and based on it's size /dev/sde is a 8gb usb thumb drive.  You'll want to pick your NEWLY INSTALLED internal hard drive (probably /dev/sdb).


Once you have your newly installed hard drive selected, on the MENU click on DEVICE -->CREATE PARTITION TABLE.  


It will popup a dialog box warning you about erasing everything on the selected hard drive. It is serious about the erasure thing so make sure you have your newly installed hard drive selected. In addition, it is asking you to choose a Partition Table Type.  If this drive will only be used with Linux (Ubuntu) You should pick GPTIf you are duel booting with MS Windows, pick MSDOS. Click on the APPLY button making the selected changes. I'm assuming you picked GPT for the rest of this tutorial.


Once the new Partition Table is created on the newly installed hard drive we need to make a new Partition on it. On the MENU click on PARTITION--->NEW


It will then display the Create New Partition sub-window.  Assuming that you want to use the all the room on your newly installed internal hard drive and have it as one big drive and that it will be used for Ubuntu only (not duel boot with windows) do not bother any of the numbers or settings on the left side (your numbers will be different from my example).  All you need to do is give your drive a PARTITION NAME and a LABEL.  You should leave Primary Partition alone and make sure FILE SYSTEM is set to EXT4 (choose FAT32 if duel booting with MS windows).  Once all that is filled out just click on the ADD button at the bottom of the Create New Partition sub-window.  After Clicking the ADD button, you have to click on the Green Check Make icon near the top of the app, just below the menu.  It will ask you to confirm your choices, then bring up a PROGRESS window and finally when it's done you'll get a DETAILS window with a CLOSE button.  Just Click that CLOSE button. 

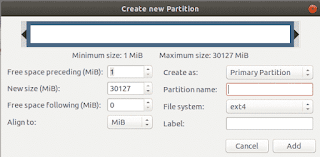
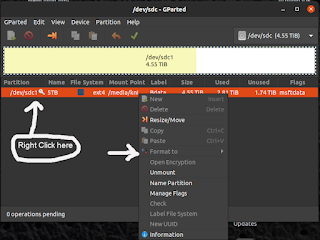
Once your done creating a new partition you need to format your new drive.  To do this just Right Click on your newly created partition (see image below) then select FORMAT TO from the drop down menu and pick EXT4 (FAT32 if duel booting with MS windows) from the list.  Then click on the Green Check Mark Icon near the top of the app, just below the menu.  It will again ask you to confirm your choices. Then it brings up a PROGRESS window and finally when it's done you'll get a DETAILS window with a CLOSE button.  Just Click that CLOSE button


We are done using PARTED.  You can now close it.  Your hard drive will now show up in your file manager but will not be mounted.  You can click on it to manually mount it for use then click on it's eject button to unmount it when done.  The downside to this is that you would have to mount it every time you boot your system.  To make the new hard drive automatically mount on system boot we need edit the fstab file but we need some information about the new hard drive first.


We need to find the UUID number for your newly installed hard drive.  We need this number to add an entry in your fstab file.  The fstab file is used during boot to mount hard drives, cd/dvd drives, network shares and other hardware you might want to access from/on your machine.  Once added to the fstab file your new hard drive will mount every time your system is starts.

Let's find your new hard drives UUID.  You will need this number and it's long so I suggest that you copy and paste it into a text editor.  It is also case sensitive. 
 
To find your new drives UUID we need to open a Terminal Window and type the following command.
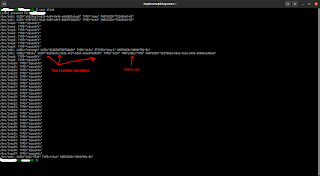
sudo blkid

This will generate a screen that looks something like this (below).  We need the UUID="b224be41-3132-4f17-95a7-e5ae9f6d5245"part without the quotes (").  We will need it to look like UUID=b224be41-3132-4f17-95a7-e5ae9f6d5245 .  Best thing to do is copy the line and paste it into a text editor and delete the parts you don't need including the quotes.  You can just write this long number down or print it to paper and type it in later when we edit our fstab file.  Figuring out which line we need to copy is best done by looking at the LABEL, PARTLABEL and TYPE.  They will be the same as what you set them too when you set them up in GPARTED.


Once you have your UUID we need to edit you fstab file.  We need to be careful here, if we do it wrong our system may not boot.  To open your fstab file for editing we need to use the sudo command because fstab is a system file.  There are two or three text editor we can use but gedit is a nice graphical one. If you want or need to use another, you can just replace gedit with nano or vm (sudo nano /etc/fstab OR sudo vm /etc/fstab) in the below command. The fstab file is just a text file so lets open it for editing 

sudo gedit /etc/fstab

This is a sample my fstab file for reference. Your will look different

Once fstab is open for editing in gedit (or other text editor) we need to add a new entry at the bottom of the file (last line).  Here is the line you need to add.  Replace YOUR-UUID-NUMBER with your new hard drives UUID you got using the sudo blkid command.  You also need to replace drivename with directory name you linked your hard drive to in step one. 

UUID=YOUR-UUID-NUMBER   /media/drivename   ext4 defaults 0 2

If you used fat32 instead of ext4 your entery will look something like this:

UUID=YOUR-UUID-NUMBER   /media/drivename  vfat defaults,user,exec,uid=1000,gid=100,umask=007 0 0

Once you've added the line you need.  Check itThen Double Check it!  I'm serious, check it again.  Get this wrong and you may end up in a "no boot" situation.  If you are sure it's correct, save the fstab file.

Okay let's test it. Open a Terminal Window and type:

sudo mount -a

If you did everything correct after running that last command you should be able to open your file manager and see your new hard drive listed and be able to click on it, showing no files, then right clicking on the empty file list and creating a new folder, then right clicking on the new folder and renaming it and lastly right clicking on the renamed folder and move it to trash or delete it.

If you can make a new folder, rename it, and then delete it, you should be good to go.  You should try copying a text file or picture to the new hard drive and open it, edit it and save it back to the new hard drive.

If you can't do these things, something went wrong.  You should go back and remove anything you added to fstab using the sudo gedit /etc/fstab command and re-saving the fstab file in it's original state.

You would think there would be a better, easier way to do this but I haven't found one yet.


Sunday, February 06, 2022

Adding or Changing Default Aliases

 I wanted to add a shorter ls command to use in the Terminal that showed directories and their contents in the format I wanted to see them in.  I decided that I'd also shorten the command by 50% (well one letter) by using just 'l' instead of 'ls'.  I read the 'man' page for ls and a few trusted websites and finally settled on the following parameters;  

ls -h -F -l -o -g --group-directories-first --color=auto

These parameters when added to 'ls' basically lists the directories first then files in alphabetical order A-Z, show how many files are in the directory, the permissions of the directory/file, the directory/file size, it's creation date/time, and it's name all in pretty colors. 

Once I figured out what parameters I wanted I created a '.sh' shell script file called 'l.sh' and put it in my home directory's 'bin' folder which is also in my PATH.  It worked well but I had to type 'bash l.sh' to get it to work.  While testing I used just the 'l' command a few times and it worked but it did not run my l.sh script file it used something else and it was different from the standard 'ls' command too.  

After some reading I figured out that there was a special file called '.bashrc' and it had sections in it for ALIASES.  The .bashrc file was located in my home folder and can be opened with your favorite text editor.  

I found this section in my .bashrc file which was using the 'l' command I wanted but it had it's own parameters (not the one's I wanted)  

# some more ls aliases
alias ll='ls -alF'
alias la='ls -A'
alias l='ls -CF' 

So I edited the .bashrc file and replaced the alias l='ls -CF' to my parameters;
alias l='ls -h -F -l -o -g --group-directories-first --color=auto'

I saved the .bashrc file and rebooted the computer (The .bashrc file loads at start up which is why I rebooted, you may not have too but better safe then sorry).  So when I was done this section of my .bashrc file looked like this;

# some more ls aliases
alias ll='ls -alF'
alias la='ls -A'
alias l='ls -h -F -l -o -g --group-directories-first --color=auto'

And just like that I can now just type 'l' (without the ' ' ) and it runs my version of the ls command.  You can also add other alias in this section (my audio breaks sometimes so I have a fixaudio.sh script file that I alias here too, so now I just type 'fixaudio' and my audio fix program executes).  If you are going to do a lot of aliases you can also link to another file you create and add it's file name to a section in .bashrc near this section.


NOTE:  Backup your original .bashrc file before you edit it.  There is other stuff in it, not just the alias section.


Wednesday, January 19, 2022

Installing and Updating ClamAV & ClamTK

Virus are becoming more common on Linux Systems.  Why take a chance when there is a nice free antivirus option with little overhead available for Linux, ClamAV.  With it you can control manual or automatic scanning, which directories or files are scanned, signature updates and more.  With the addition of ClamTK you also get a graphical interface. I use both to manually scan directories.

This article will tell you how to install and update ClamAV (Antivirus Command Line App) and ClamTK (Graphical Front End).

Open a Terminal Window and copy & paste the commands in RED into the Terminal one at a time in the order they appear.  Press the ENTER key after each command to execute it.


Section One:
How to install ClamAV.

1.  Check for system updates

sudo apt-get update

2. Install all system updates 

sudo apt-get upgrade

3. Install ClamAV and run it as a Process 

sudo apt-get install clamav clamav-daemon -y


Section Two:
Update the ClamAV Signature Database

1. Stop the ClamAV Process

sudo systemctl stop clamav-freshclam

2. Update the Signature Database   

sudo freshclam

3.  Restart the ClamAV Process

sudo systemctl start clamav-freshclam

NOTE: Section Two is how you manually update the ClamAV Signature Database but the graphical interface, ClamTk, will give you an option to automate the Signature Database updates.


If you just want to use ClamAV from the Terminal (Command Line) then you can stop here but if you want a nice Desktop Front End that will give you a graphical interface then proceed to Section Three and install ClamTK


Section Three:
Download the latest version of ClamTK for your distro 

1.  In a web browser go to this site and download the ClamTK installer for your distro (.deb was mine for Ubuntu) 

https://gitlab.com/dave_m/clamtk/-/wikis/Downloads

2.  Once downloaded run the following command in Terminal (command line).  Replace the CHANGE_ME part with the name of the file you downloaded.  (Mine was called clamtk_6.14-1_all.deb so my command was "sudo dpkg -i Downloads/clamtk_6.14-1_all.deb"

sudo dpkg -i Downloads/CHANGE_ME

3.  After ClamTK installs you can run it from the terminal with the command (clamtk) or you use your desktop to start the app by clicking on it.

clamtk

NOTE: From time to time ClamTK will tell you that "Updates Are Available" and only provide you with a button that says BACK that does nothing when clicked. This just means that ClamTK (the Graphical Front End) has been updated.  This isn't related to ClamAV or it's Signature Database  To install the update just repeat all 3 steps in Section Three.  The "Updates Are Available" warning often confused me into thinking that ClamAV needed updated or it's Signature Database needed updated but I have those options set to Automatic Updates.  So when you see this it's just the ClamTK advising that they have updated their graphic front end. Your ClamAV and it's Signature Database are fine and have been doing their automatic updates.    


That's it you're done.  You now have a nice antivirus program for your Linux machine and a little piece of mine.

Wednesday, July 28, 2021

My-Weather-Indicator (Panel and Desktop Widget Options)

My Weather Indicator is my go to weather app.  It shows current weather conditions for your area on the Panel or on a nice Desktop Widget (widget is off by default).  It also allows you to pick from four different weather sources (OpenWeatherMap, World Weather Online, Yahoo Weather, or Wunderground) and will show both your local weather and one additional area (optional).  You can see detailed hourly forecast, weekly forecast, and current weather maps.  In addition it has sunrise, sunset, and moon phases.  Best of all it runs on Ubuntu 20.04 unlike Gnome Weather (at least for me).

I have an old article on how to install My Weather Indicator and it was popular so I thought I'd do an updated post.

It's fairly easy to get it running, you just need to add a repository, update them, install and configure My-Weather-Indicator. Let get it installed and running:


1. open a terminal window

2. Type in the following command and press ENTER

sudo add-apt-repository ppa:atareao/atareao

3.Type in the following command and press ENTER

sudo apt update

4. Type in the following command and press ENTER 

sudo apt install my-weather-indicator


Once the My-Weather-Indicator has installed it should appear in your app list.  Simple run the program and it will start it's configuration screen.


I selected AUTO LOCATION which worked just fine for me.  If you want the Desktop Widget active make sure you check the SHOW WIDGET box here.

Open Weather Maps is default which is what I used.  Some of the optional services may require you to have an account with them.  Open Weather Map did NOT require an additional settings other than just checking the tick.


I'm in the U.S.A. so I set most of the UNITS settings to US Standards


If you want the App to run on startup make sure you check the AUTOSTART box.

Tuesday, June 01, 2021

Mount your Virtualbox OS Guest file system as a Hard Drive in Ubuntu

In case something is broken within your VirtualBox Guest OS or if you just want to access the files, the following will allow you to mount your VirtualBox Guest OS disk images in your Ubuntu (Host) like it's an attached hard drive or just another directory.  This access will have full read/write permissions so you'll be able to copy files to/from it, delete files, or change files on your VirtualBox Guest OS.

Make sure your VirtualBox Guest OS is shutdown and the virtual disk image is NOT in use. 

NOTE: Remember to UN-MOUNT it once your finished accessing the Guest OS files (see below).


Let's get started:

1.  Open a Terminal Window. Run the following command:

vboximg-mount --list

vboximg-mount  is how you make your VirtualBox Disk Images (Guests) available to the Host. The --list option will list all VirtualBox Disk Images along with their UUID.

2.  Next perform a FUSE mount of the virtual disk image:

Create a folder as a mount point. In this case let's use vboxdisc:

mkdir vboxdisc

Then enter the following command:

vboximg-mount -i UUID -o allow_root vboxdisc

NOTE: (remember to replace the UUID with your own in the above command): 

NOTE: You might need to edit the “/etc/fuse.conf” to allow the -o allow_root flag to work. To do this run the command sudo gedit /etc/fuse.conf and enable, by remove # at it's beginning, “user_allow_other” line.

3.  Now mount your partition (vol2 for instance) to /mnt by typing the following command:

sudo mount vboxdisc/vol2 /mnt

NOTE: change vol2 to match your partition name.

4.  Finally go to the /mnt directory to see your Guest OS files.


*************************************************************

Remember to UN-MOUNT once your finished accessing the Guest OS files.


How to Unmount:

To unmount the VirtualBox Guest OS file system, run the following command:

sudo umount /mnt

To unmount the VirtualBox Disk Image, run the following command:

umount ~/vboxdisc

And finally to remove ~/vboxdisc  folder run the following command:

rm -r ~/vboxdisc

Tuesday, May 11, 2021

Useful TERMINAL Commands

I will try to keep updating this post with useful Terminal shortcuts and commands I find helpful.  So bookmark this one and leave any commands you think should be added in the comments and I'll move them to the main post.

Don't get writers block at the Terminal Window


sudo !!

This runs the last command you typed but runs it as sudo.  If you typed a long command and forgot to start it with sudo or didn't know you needed sudo, instead of retyping the whole thing or using UP ARROW to paste the command back in, just type sudo!! and hit ENTER.  This will add the sudo and re-run the command as soon as you press the ENTER key.


CTRL x e

To use this just hold the CTRL key, press x, then press e while still holding down the CTRL key.  This will open the nano text editor where you can type out whatever commands you want to run in Terminal even multi lines.  Think of it as a one use bash script file. When you exit nano your typed in commands will then run in your open Terminal window.


ls -h --group-directories-first --color=auto

This command displays a directory list in colors and puts folders first, organizing them in ascending alphabetical order. Following the folders are the files in said directory also listed in ascending alphabetical order.  It's a little long so you may want to open a text editor and save it as a bash script, that's what I did, so now I can just type l (lower case L) in my terminal and a nice colored, folder first, directory list appears.  HERE is a quick guide on how to write a bash script, make it executable, and add it's folder to your PATH.  The only thing I notice that this tutorial didn't say was you SAVE your script file as a .sh files in a folder that is in your PATH.


mv FileName.txt NewFileName.txt

To RENAME a file you use the command mv for some reason. Simple repalce FileName.txt with the file name you want to rename and replace NewFileName.txt with the name you want the file to have. The mv command also functions as a MOVE command too. To use it as a MOVE command just add a destination directory path in front of the NewFileName.txt part. i.e.


mv FileName.txt /home/UserName/Documents/NewFileName.txt

This will move the FileName.txt to /home/UserName/Documents/ directory and rename the file to NewFileName.txt if you don't want to rename the file and just want to move it, then just make the file name the same as it was (mv FileName.txt /home/UserName/Documents/FileName.txt)


Some simple commands I forget:

  • ~  is a shortcut or substitution for the directory /home/userName/  think of it as the root of your home directory.

  • cp FileName.txt ~/Documents/ This copies FileName.txt to the Documents folder in your home directory. cp FileName.txt ~/Documents/NewFileName.txt would copy and rename FileName.txt  to NewFileName.txt and put it in your Documents folder.

  • find . -name "*.bak" -type f -delete  This deletes all files with the .bak extension in your current directory and in all sub-directories below your current directory. BEFORE USING THIS YOU SHOULD RUN  find . -name "*.bak" -type f TO SEE THE LIST OF ALL FILES YOU WILL BE DELETING.  USE WITH CAUTION.

  • rm -r DirectoryName This will remove a directory and everything below it.  This is a recursive delete of a directory or directories and all their files. USE WITH CAUTION. 

  • rmdir dir1 is a safer command that will remove empty directories but will give you an error if dir1 has files or sub-directories in it.  This command deletes the empty directory called dir1 .


chmod options permissions file_name
   
   Examples

  • chmod u=rwx,g=rx,o=r myfile.txt
  • chmod 754 myfile.txt
  • chmod -R 755 /PATH/TO/DIRECTORY

In the first Example above;

The Current User(u=) can read(r), write(w) and execute(x) myfile.txt 
Members of Current User's Group(g=) can read(r) and execute(x) myfile.txt
Others(o=) may only read(r) the file myfile.txt


If you wanted to, you could add r,w and/or x 's to the g= or o= part of that command or take away either r, w, or x from the u= part of that example, BUT YOU SHOULDN'T.  Very, very, rarely do want to give USER, GROUP and OTHERS all permission or take all permission away for all.  With the wrong combinations of r,w, and/or x you could easily lock yourself and everyone else out of access to a file by not giving enough permission to the file or cause security risks by giving too many permissions to your files.  The above example is the most common permissions you will find on user's files (home directories or additional hard drives storage space).  The System Files are another matter and you should read a more in depth article before playing with those permissions.

In the second Example above;
This means the exact same thing as the first example, it's just 
using octal permissions notation.  Here is how it works;

The first position of the 3 digit number, represents the user(u=), the 2nd digit position represents the group(g=), the 3rd digit position represents others(o=).  The actual numbers in those positions are derived from the following table;

4 stands for "read"
2 stands for "write"
1 stands for "execute"
0 stands for "no permission."

By simply adding the above numbers together you will get a single digit number that will represent the permissions you want the User, Group and Others to have.  Lets say you want to give User full access (read, write and execute) and you want Group's to just have read access (read) and you want Others to have any write and read but not execution.  All you do is add; you want User to read (4) + write(2) + execute(1). Well that's 4+2+1=7.  So our first number is 7.  You want Group to have only read. Well that's just 4. So our second digit is 4.  You also want Others to have read and write, but no execute. Well that's read(4) + write(2). So it's 4 + 2 = 6.  Our last digit is 6.  You now have your three digit number, 746.  Your command to set those permissions on myfile.txt would be chmod 746 myfile.txt.  

In the third example above we uses an Option;

In the third example we want to change the permissions on all the files and folders and subfolders/subfiles in the directory located at /PATH/TO/DIRECTORY.  This is called a Recursive Change. So if we run the command chmod -R 777 Documents from our Home directory, this would change the permissions of every files, folder, subfolder, and subfiles in the Documents directory allowing everyone full unrestricted access to everything contained in the Documents directory (Not a good Idea BTW).  When using the -R option with chmod you should check all the subfolders and subfiles you'll be changing.  You can use chmod in combination with find for a more selective recursive like change (see chmod Helper Commands below). 
Of special note on options, chmod -r 777 Documents means something completely different from chmod -R 777 Documents  CASE MATTERS -R means Recursive, -r means take away read permissions

Options for chmod

-c, --changes Like --verbose, but gives verbose output only when a change is actually made.
-f, --silent, --quiet Quiet mode; suppress most error messages.
-v, --verbose Verbose mode; output a diagnostic message for every file processed.
--no-preserve-root Do not treat '/' (the root directory) in any special way, which is the default setting.
--preserve-root Do not operate recursively on '/'.
--reference=RFILE Set permissions to match those of file RFILE, ignoring any specified MODE.
-R, --recursive Change files and directories recursively.
--help Display a help message and exit.
--version Output version information and exit.

chmod Helper Commands;

ls -l myfile.txt  
Show a single file called myfile.txt and displays its permissions. Here is what that output will look like;

-rwx-rw-r-- 1 UserName GroupName 2441 May 27  2022 myfile.txt

This mean that the UserName has read(r), write(w), and execute(x) permissions and the group called GroupName has read(r) and write(w) permissions, no execute. And Others have read(r) only permission, no write, no execute. (it also says the file is 2441 bytes in size and was created on May 27, 2022)

ls -l  
This will list all the files in your current directory and show you their permissions. This an easy way to the permissions from a bunch of files all at once.

find . -name "*.sh" -exec chmod +x {} \; 
This example will make all .sh files in the current directory executable.

sudo chown -R UserName:UserGroup DirectoryToOwn
The chown command  above changes the Ownership of every file, subdirectory, and subfile in the directory DirectoryToOwn to be owned by the user UserName and by the group UserGroup.  Most of the time UserName and UserGroup are the same. No space before or after the colon (:).  Leave out the -R and replace DirectoryToOwn with a single file name to just assign ownership of a single file or combine chown with find command (above) for a selective group of files. 

sudo blkid
This list all of your hard drive or other mounted drives (flash, etc..) on your system.  You can use this command to find the uuid of a hard drive or flash drive to use in your fstab file for auto-mounting drives on system boot.


sudo dmidecode --type 17
Want to know what kind of memory is in your system?  This handy command will tell you way more information than you'll ever want.  I need to know my manufactures name and this command returned that information under the TYPE heading.


Thursday, April 15, 2021

HDMI Audio not showing as an option

Ran a update today (4-15-2021) on my Ubuntu 20.04.1.  The update asked for a reset and I think I saw something about kernel 5.4 before the update started (after the update my kernel is 5.4.0-72-generic according to the uname -r command).  

After the reboot I had no audio (I use the HDMI Output to my monitors built-in speakers).  I checked my Sound Setting as some kernel updates in the past have flipped my sound output to Digital Output Built-in Sound.  I checked and sure enough it was flipped.  When I went to change it back there was only one sound output option (Digital Output Built-in), no HDMI to be found.  After some Googling I found this solution that worked for me:

Step 1

Open a terminal and run the following command:

pulseaudio -k

This kills the running sound process

Step 2

Physically unconnect then reconnect your monitor from the HDMI port while Ubuntu is running.

Step 3

Open Sound Settings and you should see the option of HDMI in the Output tab:


Hopefully this written howto will help someone who loses their sound after an update.  When Googling for help on this problem I ran across several videos with solutions but without sound they were not very helpful. 


Saturday, March 20, 2021

Fix Graphic Glitches in Windows 10 running in VirtualBox 6.1

 I was having weird graphical glitches on my guest Windows 10 running in VirtualBox 6.1.18 on an Ubuntu 20.04 host.  Some of the glitches I was seeing were multiple cursors in Photoshop cs6, some menu's needed minimized to see items I checked, show checked (refresh), and some transparency problems (again tied to a screen refresh).  None of these broke the system or caused crashes but were annoying, especially the Photoshop multiple cursor thing.

I noticed that I did NOT have ENABLE 3D ACCELERATION checked on my Virtualbox host. I figured that this might be causing my problems so I checked it.


The multiple cursors magically went away but my transparency and screen refresh problems multiplied exponentially.   Just to use the virtual, I went into my Windows 10 (guest) then to SETTING and turned off TRANSPARENCY EFFECTS in the Windows 10 guest(see screen shot below).  Once I did that everything worked flawlessly.


I've decided that I do not need or even want the transparency effects in Windows 10.  And by Enabling 3D Acceleration on my VirtualBox host for the Windows 10 guest, some programs that had some 3d effects disable are now working.  Win! Win! (minus Windows 10 transparency) 

Saturday, January 16, 2021

Wine 6.0 installing on Ubuntu 20.04

Wine 6.0 has been released as the newest stable build.  You can read about it at winehq.org.  I use Wine to run a couple of MS Windows programs that I haven't found good Linux replacements for (Photoshop and Omniforms,  I know GIMP is a good Photoshop replacement but I'm used to Photoshop and the workflow is not the same, besides I haven't taken the time to learn GIMP)...Anyway, let's install Wine 6.0 on Ubuntu 20.04 LTS (or 20.10 noting the difference in step 3).

Open a Terminal Window and type the following commands:

1.  Enable 32-bit support on your system.

     sudo dpkg --add-architecture i386 

2.  Add the Wine keys to your system.

    wget -nc https://dl.winehq.org/wine-builds/winehq.key

    sudo apt-key add winehq.key

3. Add the repository for Ubuntu 20.04 (only run one of these commands)

IF YOU'RE RUNNING 20.04

    sudo add-apt-repository 'deb https://dl.winehq.org/wine-builds/ubuntu/ focal main'

IF YOU'RE RUNNING 20.10

    sudo add-apt-repository 'deb https://dl.winehq.org/wine-builds/ubuntu/ groovy main'

4. Install Wine 6.0

    sudo apt install --install-recommends winehq-stable

If you want to check your Wine Version just type the following in a Terminal Window;

    wine --version


That's it you're done.

*NOTES: When I ran Photoshop after the update, Wine asked to install a couple of items it needed to work.  I just clicked on the yes button.  On step 1, I had already enabled this but running the command again did not hurt anything.