I'm building a new system for Ubuntu 22.04. My old system is a Core I5 4th Gen. Intel CPU with 16gb ram and an Nvidia Gtx 950. I upgraded it to a 1 TB Samsung ssd main drive with a 2 TB Western Digital sata storage drive. It's a system I build in 2014 so it's time for some new hardware.
My new build is an AMD Ryzen 9 5900x 12 core / 24 thread CPU sitting on an Asus TUF Gaming 570x Wifi Plus motherboard with 32gb of DDR4 ram. My main hard drive is a Samsung 980 Pro 1TB PCIe Gen 4 x4 NVMe Internal Solid State Drive. For graphics I'm using an EVGA XC Gaming Nvidia RTX 3060. For a case I got a Fractal Design Meshify 2 Light Tempered Glass with a MainGear 850 Watt full modular power supply. (For anyone looking to do a build, all these parts worked flawlessly with Ubuntu 22.04).
To have some fun with this build I made a 3 hour road trip to the closest MicroCenter Store. If you've never been to one it's well worth the time to visit if your a tech/computer geek. The staff was knowledgeable, courteous and went out of their way to be helpful.
After I got the core system up and running i decided I wanted to add a couple more internal hard drives for storage. I had a Samsung 1TB 860 SSD sata laying around and I bought a new Western Digital 8TB WD Red Plus NAS Internal Hard Drive HDD - 5640 RPM, SATA 6 Gb/s for about $179.
So let's add a couple of internal hard drives to our new Ubuntu 22.04 box:
The first thing you need to do is to physically install your new internal hard drive and get your BIOS to recognize it. To physically connect your hard drive to your computer, making sure your computer is powered off and unplugged from the wall. Once powered off, opening your case and find a location that was made for your hard drive (3.5 inch, 2.5 inch, NVMe socket, etc...).
- NVMe drives just plug into their socket at a 45 degree angle, then move the free end towards the motherboard and put it's hold down screw in (Check your motherboard manual for the NVMe socket location).
- 3.5 and 2.5 inch drives are going to be SATA drives in modern computers. You will have places inside your computer case designed to hold these kind of hard drives. Usually you will have to use four small screws to attach these drives to your case. Once attached, you need to connect a SATA data cable from your hard drive to your motherboard (red in picture below). In addition you will need to connect a SATA power cable from your hard drive to your computers power supply (yellow, black and red in the picture below).
- This is just an overview, there are to many cases, hard drives, cables designs to list all the options you may see. You should watch a few YouTube videos that match your case and hard drive types.
Once your hard drive is mounted and it's power & data cables are plugged into your motherboard and power supply, you can power your computer back on. Most new computers will flash a message on the screen during boot saying it found a new hard drive. Some will wait for you to press a key before continuing to boot. On some computers you will have to go into your BIOS or UEFI and manually tell your computer you've added a hard drive.
If you need help with this step you will need to read your motherboard manual or google your motherboard/computer to find online help with this step. There are just too many options to cover in this post. Google or YouTube it! or, god forbid RTFM.
Now that your new internal hard drive is physically installed let's go through the steps you need to take in Ubuntu to get it to recognize your new internal hard drive and let you puts some data on it.
MAKE A DIRECTORY TO LINK YOUR NEW DRIVE TO
Linux (Ubuntu) needs a directory to link your new hard drive to. To make this directory open a Terminal Window and type the following commands in red into your Terminal Window. You can and should change drivename to something you can remember (no spaces). I named mine Storage.
sudo mkdir /media/drivename
Once the directory is created we need to change its permissions so we can save, change and delete things on our new hard drive. To do this type the following into your Terminal Window. Replace drivename with the same name as you did in the above statement.
sudo chmod 777 /media/drivename
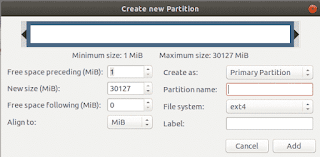
We need to create a Boot Table, Partition and Format our new hard drive, for that let's install Gparted.
INSTALLING GPARTED
1. Open a Terminal Window and type the commands shown in red.
2. Update your software and libraries
sudo apt-get update
sudo apt-get upgrade
3. Install Gparted
sudo apt install gparted
USING GPARTED
Now close the Terminal Window and open your application Menu and find the GPARTED App we just installed and open it. It will ask for your password which it will need since we are making hardware changes.
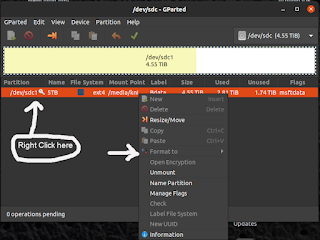
Once Gparted is open you should see your main system hard drive with two partitions (maybe more). The 2nd partition is your SWAP file.Once your done creating a new partition you need to format your new drive. To do this just Right Click on your newly created partition (see image below) then select FORMAT TO from the drop down menu and pick EXT4 (FAT32 if duel booting with MS windows) from the list. Then click on the Green Check Mark Icon near the top of the app, just below the menu. It will again ask you to confirm your choices. Then it brings up a PROGRESS window and finally when it's done you'll get a DETAILS window with a CLOSE button. Just Click that CLOSE button.
We are done using PARTED. You can now close it. Your hard drive will now show up in your file manager but will not be mounted. You can click on it to manually mount it for use then click on it's eject button to unmount it when done. The downside to this is that you would have to mount it every time you boot your system. To make the new hard drive automatically mount on system boot we need edit the fstab file but we need some information about the new hard drive first.
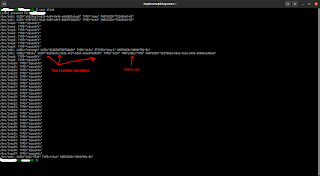
sudo blkid
This will generate a screen that looks something like this (below). We need the UUID="b224be41-3132-4f17-95a7-e5ae9f6d5245"part without the quotes ("). We will need it to look like UUID=b224be41-3132-4f17-95a7-e5ae9f6d5245 . Best thing to do is copy the line and paste it into a text editor and delete the parts you don't need including the quotes. You can just write this long number down or print it to paper and type it in later when we edit our fstab file. Figuring out which line we need to copy is best done by looking at the LABEL, PARTLABEL and TYPE. They will be the same as what you set them too when you set them up in GPARTED.
Once you have your UUID we need to edit you fstab file. We need to be careful here, if we do it wrong our system may not boot. To open your fstab file for editing we need to use the sudo command because fstab is a system file. There are two or three text editor we can use but gedit is a nice graphical one. If you want or need to use another, you can just replace gedit with nano or vm (sudo nano /etc/fstab OR sudo vm /etc/fstab) in the below command. The fstab file is just a text file so lets open it for editing
sudo gedit /etc/fstab
Once fstab is open for editing in gedit (or other text editor) we need to add a new entry at the bottom of the file (last line). Here is the line you need to add. Replace YOUR-UUID-NUMBER with your new hard drives UUID you got using the sudo blkid command. You also need to replace drivename with directory name you linked your hard drive to in step one.
UUID=YOUR-UUID-NUMBER /media/drivename ext4 defaults 0 2
If you used fat32 instead of ext4 your entery will look something like this:
UUID=YOUR-UUID-NUMBER /media/drivename vfat defaults,user,exec,uid=1000,gid=100,umask=007 0 0
Once you've added the line you need. Check it. Then Double Check it! I'm serious, check it again. Get this wrong and you may end up in a "no boot" situation. If you are sure it's correct, save the fstab file.
Okay let's test it. Open a Terminal Window and type:
sudo mount -a
If you did everything correct after running that last command you should be able to open your file manager and see your new hard drive listed and be able to click on it, showing no files, then right clicking on the empty file list and creating a new folder, then right clicking on the new folder and renaming it and lastly right clicking on the renamed folder and move it to trash or delete it.
If you can make a new folder, rename it, and then delete it, you should be good to go. You should try copying a text file or picture to the new hard drive and open it, edit it and save it back to the new hard drive.
If you can't do these things, something went wrong. You should go back and remove anything you added to fstab using the sudo gedit /etc/fstab command and re-saving the fstab file in it's original state.


No comments:
Post a Comment