I have this blog associated with an old email address that I do not want to keep so I needed to transfer this blog to another email account. I started searching and after a few hours I was ready to give up and figured it couldn't be done when I found this great article.
Use the link and read the nice article with screen shots so that you get this right. If you mess this up, you will lock yourself out of your Blog.
He is a summary of the above linked article.
1. Log into your blogger/blogspot account with the old user name (old email address).
2. Click on the Permission tab.
3. Click on the Add Author button on the permissions tabs.
4. Enter your new user name (new email address) and send the invite.
5. Log out of Blogger/Blogspot and log into the new email address.
6. Open the email and click on the invite link in the email.
7. Log out of your new email account
8. Log back into your Blogger/Blogspot account using the Old email address as your user name.
9. Go to the Permission Tab again and you should see two email addresses there, your old and your new.
10. Click on the Grant Admin Privileges button beside the new email address.
11. You can now use either email address (user name) to manage your blog.
12. Click on the Remove link beside your old email address (user name).
13. Confirm the remove and log out as your old email address (user name).
14. Log into Blogger/Blogspot with your new email address (user name).
15. Done!
If you get this wrong you will not be able to manage or worse not able to access your BLOG. I encourage you to read the linked to article, if for no other reason than the fact that they have other good how-to article relating to Blogger/Blogspot.
Wednesday, September 01, 2010
Needed a Cheap Scanner and Got a Printer Too
I needed a cheap scanner that would work with Ubuntu. I had nice little Cannon but it was a MS Windows only scanner. I've looked on and off for about 6 months now, reading on-line about which ones work with Linux and was surprised that there wasn't a lot of information out there on which models work and when I found one, I couldn't find that model for the price I wanted.
I finally stumbled across an HP article which contained a very nice chart that lists what HP printers/scanners/fax/all-in-ones work with different Linux Distros. The chart will tell you what features work and what ones don't. There is a nice how to install the HPLIP software with screen shots and explanations as to what each command does (You will have to use the Command Line but it's not hard) The main thing to remember is not to plug your device into a USB port until the instructions tell you too.
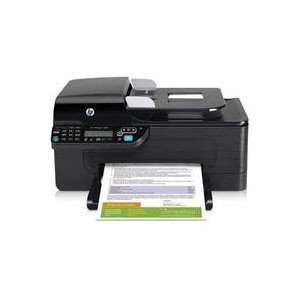
As I said I wanted a cheap scanner but found an HP OfficeJet 4500 AIO on Amazon for $59. It has a ADF (Auto Document Feeder), Printer, Fax, Copier and has a network port (wired). So far, I know the printer, scanner, and copier work just fine on Ubuntu 10.04 but I don't have anyway to test the Fax so your on your own there. Don't get me wrong this is a cheap device, it's all plastic, hinges are weak, and scanning at over 300 dpi is slow, but it works and was only $63 delivered.
Since I bought this for it's scanner, I don't really care, but ink is $25 for a tri-color (200 page limit) and $30 for a Black (700-900 page limit). If you were using this for its printer, you would be ahead to just sell it for $20 and buy a new printer every time you run out of ink.
I want to do some OCR work in Ubuntu and scan in some old photos. As I find software and begin working with Linux scanner software I'll document it here.
Sunday, August 22, 2010
OpenOffice Howto: Paste Unformatted Text Shortcut Key
I know OpenOffice is not just for Linux but I've all but replaced MS Office with it even at work (I still have to have Outlook for email). What I wanted was a way to quickly copy and paste unformatted text. I know there is already a shortcut key combo for this but it's awkward ( CTRL ALT SHIFT V) That's 4 Keys!!! Too many.

Here's what I did to fix this. Start OpenOffice Writer then goto Tools --> Customize. Select the Keyboard tab from the Customize window that popped up (Pictured below). Select Edit in the bottom left list. Then select "Paste Unformatted Text" from the bottom right list and finally assign the keyboard shortcut you want it to be from the top list.

I notice that the F4 key (Function Key F4) is unassigned so I used it and went from a 4 key combo to 1.
Wednesday, July 21, 2010
How to get Google Services working with Evolution V2.28.1 +
How do I get Evolution to use ( Sync with ) my Gmail Account?
How do I get Evolution to Sync with my Google Calendar?
How do I get Evolution to Sync with my Google Contacts?
These are good questions and the same one's I asked myself tonight. Since this is a very "Googlie" post, I Googled for the answer. Well I'll save you the trouble of sorting through all the Google articles and just give you the link to the site that solved all those problems for me. Here's the link. I saw no reason to rewrite what is already an easy to follow how-to.
My version of Ubuntu is: 10.04 LTS - the Lucid Lynx.
My version of Evolution is: 2.28.3
Tuesday, July 06, 2010
WINE. What I've got working.
I've found Linux equivalents of almost every application I want or need. For the ones I just can't live without, there's WINE. With WINE you can install and run MS Window's applications (but you have to tinker with them to get them right).
For me, the the App I really had to have was Photoshop. I have Photoshop CS2. I know it's not the most up-to-date Photoshop, but I own it and am use to it. I now have it running completely on Ubuntu with most of my plug-ins too. In addition I have Omniforms 5.0, GSAK (GEOcaching application) and IE6 (only use it for GSAK) running like they are native Linux apps.
So how do you do it?
First you install WINE into your Ubuntu build (mine is Ubuntu 10.04 LTS Lucid Lynx) by going to APPLICATIONS-->UBUNTU SOFTWARE CENTER. Then type WINE into the search box. Once you find the WINE application, install it.
You should now have WINE installed and see a WINE menu item under you APPLICATIONS Menu. There will be a single program under APPLICATION-->WINE-->PROGRAMS-->ACCESSORIES and that will be NOTEPAD. You can launch it now and see what WINE Apps will look and feel like.
Now WINE, like Ubuntu, has some add-ons that you'll have to install to make it useful. Some of these things are copyrighted (you've been warned). You can get everything you need in one package, WINETRICKS. To install WINETRICKS, Open a TERMINAL windows and Type the following:
sudo wget http://www.kegel.com/wine/winetricks (Press Enter)
Then you need to install CABEXTRACT by typing:
sudo apt-get install cabextract (Press Enter)
Now to run WINTRICKS type:
sh winetricks (Press Enter DO NOT sudo this command)
You will then be presented with a list of packages you can check mark and install.
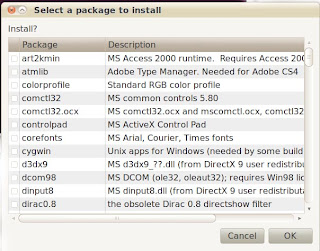
As you can see there are a lot of packages you can add. Simply CHECK the ones you want and click OK. But which ones do you want? Good question. That depends on which MS Windows application you want to run.
For Photoshop CS2, I install COREFONTS and VCRUN6. I also installed the MS TOHOMA FONT or you can check the ALL FONTS box.
You should now be able to put your Photoshop CS2 Install CD into your CD Rom, open it, right click on the SETUP.EXE and select OPEN WITH WINE WINDOWS PROGRAM LOADER. Your Photoshop should now install. Once it's done, it will be located in the APPLICATIONS-->WINE-->PROGRAMS menu. You can install you plug-ins with the same RIGHT CLICK Method. Here is a Wiki link to where I got most of this information.
Last thing to do to make Photoshop CS2 work fully is make the ALT key do what it is supposed to do in Photoshop. Go to SYSTEM-->PREFERENCES-->WINDOWS and under Movement Key, pick "Windows Logo" instead of "Alt". (this tidbit killed me for a month until I found that Wiki Link above).
How to get GSAK working. Run WINETRICKS (sh winetricks) again and install ie6. Reset your computer (really, reset it). Then download and install GSAK using the RIGHT CLICK Method. You may get an error but once you add a few caches to it, it will be fine. Also do not turn off the SHOW TIPS at startup. This caused me to crash. If yours does not work, reset your computer, that is the third time I've told you!
If all went well, you can now get your favorite MS Windows programs running side by side with your Ubuntu Linux stuff. Here is a screen shot of Photoshop CS2 running. I know the colors suck, but you can change them, a lesson for later.

DO NOT USE IE6 FOR ANYTHING OTHER THAN GSAK. IE6 IS FULL OF SECURITY HOLES. IT IS DANGEROUS TO USE FOR GENERAL SURFING.
Last Minute Note: If your photoshop hangs on the splash screen while loading, just press ENTER. That works for me.
For me, the the App I really had to have was Photoshop. I have Photoshop CS2. I know it's not the most up-to-date Photoshop, but I own it and am use to it. I now have it running completely on Ubuntu with most of my plug-ins too. In addition I have Omniforms 5.0, GSAK (GEOcaching application) and IE6 (only use it for GSAK) running like they are native Linux apps.
So how do you do it?
First you install WINE into your Ubuntu build (mine is Ubuntu 10.04 LTS Lucid Lynx) by going to APPLICATIONS-->UBUNTU SOFTWARE CENTER. Then type WINE into the search box. Once you find the WINE application, install it.
You should now have WINE installed and see a WINE menu item under you APPLICATIONS Menu. There will be a single program under APPLICATION-->WINE-->PROGRAMS-->ACCESSORIES and that will be NOTEPAD. You can launch it now and see what WINE Apps will look and feel like.
Now WINE, like Ubuntu, has some add-ons that you'll have to install to make it useful. Some of these things are copyrighted (you've been warned). You can get everything you need in one package, WINETRICKS. To install WINETRICKS, Open a TERMINAL windows and Type the following:
sudo wget http://www.kegel.com/wine/winetricks (Press Enter)
Then you need to install CABEXTRACT by typing:
sudo apt-get install cabextract (Press Enter)
Now to run WINTRICKS type:
sh winetricks (Press Enter DO NOT sudo this command)
You will then be presented with a list of packages you can check mark and install.

As you can see there are a lot of packages you can add. Simply CHECK the ones you want and click OK. But which ones do you want? Good question. That depends on which MS Windows application you want to run.
For Photoshop CS2, I install COREFONTS and VCRUN6. I also installed the MS TOHOMA FONT or you can check the ALL FONTS box.
You should now be able to put your Photoshop CS2 Install CD into your CD Rom, open it, right click on the SETUP.EXE and select OPEN WITH WINE WINDOWS PROGRAM LOADER. Your Photoshop should now install. Once it's done, it will be located in the APPLICATIONS-->WINE-->PROGRAMS menu. You can install you plug-ins with the same RIGHT CLICK Method. Here is a Wiki link to where I got most of this information.
Last thing to do to make Photoshop CS2 work fully is make the ALT key do what it is supposed to do in Photoshop. Go to SYSTEM-->PREFERENCES-->WINDOWS and under Movement Key, pick "Windows Logo" instead of "Alt". (this tidbit killed me for a month until I found that Wiki Link above).
How to get GSAK working. Run WINETRICKS (sh winetricks) again and install ie6. Reset your computer (really, reset it). Then download and install GSAK using the RIGHT CLICK Method. You may get an error but once you add a few caches to it, it will be fine. Also do not turn off the SHOW TIPS at startup. This caused me to crash. If yours does not work, reset your computer, that is the third time I've told you!
If all went well, you can now get your favorite MS Windows programs running side by side with your Ubuntu Linux stuff. Here is a screen shot of Photoshop CS2 running. I know the colors suck, but you can change them, a lesson for later.

NOTE:
DO NOT USE IE6 FOR ANYTHING OTHER THAN GSAK. IE6 IS FULL OF SECURITY HOLES. IT IS DANGEROUS TO USE FOR GENERAL SURFING.
Last Minute Note: If your photoshop hangs on the splash screen while loading, just press ENTER. That works for me.
Monday, May 17, 2010
Converting WMA to MP3 (LAME and XCFA)
Version Ubuntu 10.04.
First you have to be able to play MP3s and WMAs (or DVDs for that matter). Since this article is about conversion not making them work I will just give you a link to Ubuntu itself which will tell you how to get them working.
Once they're working, it's easy to get them converted. There are probably several ways to do this and a lot of TERMINAL methods but I wanted a mouse point and click solution. So go to APPLICATIONS-->UBUNTU SOFTWARE CENTER and search for LAME. Install LAME by clicking on the INSTALL button. Note this search will return several packages. The one you want is LAME AN MP3 ENCODING LIBRARY (front end). Now search for XCFA. This stands for X Convert File Audio. This search will just return one result. Install XCFA by clicking on the INSTALL button. Close the Software Center your done installing.
 To use XCFA to convert from WMA to MP3; first select the FILES TAB (yellow 1 in the pic) then CLICK the IMPORT button (yellow 2) and select your files you wish to convert (use shift and ctrl to select multiple files). CLICK in the FILE DESTINATION box to pick where you want your new MP3 files to go (yellow 3). Next CLICK the RED BOX's under the MP3 column on all the wma files you want to convert (yellow 4). Last, CLICK the APPLY THE CHANGES button at the bottom left (not pictured).
Your now done. The conversion will take some time to complete but you'll see a progression bar to keep you informed.
NOTE: You can install other CODEXs that will allow you to convert to other formats. You can see on mine that I can do WAV, FLAC, WavP, OGG, MPC, and MP3. I can not covert to APE,M4A, or AAC because I do not have those codexs installed.
First you have to be able to play MP3s and WMAs (or DVDs for that matter). Since this article is about conversion not making them work I will just give you a link to Ubuntu itself which will tell you how to get them working.
Once they're working, it's easy to get them converted. There are probably several ways to do this and a lot of TERMINAL methods but I wanted a mouse point and click solution. So go to APPLICATIONS-->UBUNTU SOFTWARE CENTER and search for LAME. Install LAME by clicking on the INSTALL button. Note this search will return several packages. The one you want is LAME AN MP3 ENCODING LIBRARY (front end). Now search for XCFA. This stands for X Convert File Audio. This search will just return one result. Install XCFA by clicking on the INSTALL button. Close the Software Center your done installing.

Your now done. The conversion will take some time to complete but you'll see a progression bar to keep you informed.
NOTE: You can install other CODEXs that will allow you to convert to other formats. You can see on mine that I can do WAV, FLAC, WavP, OGG, MPC, and MP3. I can not covert to APE,M4A, or AAC because I do not have those codexs installed.
Saturday, May 15, 2010
Adding 2nd Harddrive & Making it Mount on Boot
I haven't posted here forever, but that is a good thing (for me). It's because I have been able to solve most of my Linux (Ubuntu 10.04 now) problems myself, that is until tonight. I did solve these two problems, but not with a lot of searching and reading.
Problem #1; After updating to Ubuntu 10.04 my computer would go to a black screen and lock the computer after 5 minutes. Once you press any key or move the mouse you would have to enter your password to continue. This was a pain is the ass. I wanted this turned off or I wanted more time before it kicked in.
Solution; Goto SYSTEM-->PREFERENCES-->SCREENSAVER. Once there, UNCHECK the "Lock Screen Screen When Screensaver is Active" to turn this "feature" off. If you still want the SCREEN LOCKED but want more time, just set the screensaver to take longer to start by dragging the slider until you get the delay you want.
Problem #2; Adding a 2nd Hard Drive. This was easy but making it MOUNT (show up) on a reboot was a problem. It would show up under the HOME menu and I would have to click on it every time I want to use it. This was bad since I wanted to move the MUSIC, MOVIE, PICTURE directories to it. Ubuntu was basically treating this 2nd internal hard drive like a removable one.
Solution; I installed a 2nd hard drive and made sure it was showing up in BIOS. I then booted into Ubuntu 10.04 and went to SYSTEM-->ADMINISTRATION-->DISK UTILITY. This showed a list of all Hard Drives, Flash Drives, CD and DVD Roms that I have installed in my computer. The new hard drive was listed under PATA HOST ADAPTER. I Clicked on it and it showed me more information than I would ever need to know about my new hard drive. I clicked on the FORMAT DRIVE (Erase or Format the volume) option. This let me pick a partition size and format type. (it defaults to a linux ext3 and selects the whole drive, which is good if your only running Linux, I'm not) The new drive is a 1.5 TB drive and I wanted 300gb unpartitioned and the rest (1.2 TBs) formated in FAT32 so that Microsoft Windows can read it too. So I used the slider to set the size of the partition to 1.2TBs and used the drop down to select FAT or FAT32 as the format type. I also picked MASTER BOOT RECORD as the structure type (MBR is compatible with MS Windows). I then typed in a name for my new hard drive (this is what it will show up as under your PLACES and on your DESKTOP). Once this was done, there was a slight pause and a graphical representation of my partitions (one FAT32, one FREE) showed up. I clicked on the FAT32 picture (well really a grey box) and then clicked on the MOUNT VOLUME option. That was it, I closed DISK UTILITY and my new hard drive was on my desktop. I then rebooted the computer to see if it would stay. It didn't :-(
To make it show up after a reboot or a boot for that matter, you have to add a setting to a startup file called FSTAB (fstab, lower case, is it's real name). To edit FSTAB goto APPLICATIONS-->ACCESSORIES-->TERMINAL. At the prompt TYPE cd .. (press enter) TYPE cd .. (press enter, yes do it twice and it is two dots). TYPE cd etc (press enter) TYPE sudo gedit fstab (press enter). TYPE your password (press enter). This should navigate you from HOME/YOURUSERNAME directory to the SYSTEM/ETC directory, start the program GEDIT in ROOT MODE and open the FSTAB file for editing. Go past the last line in the FSTAB file (you should be on a blank line) and type the following
/dev/sdb1 /media/sdb1 vfat rw,nosuid,nodev,uhelper=hal,shortname=mixed,uid=1000,utf8, umask=077,flush 0 0
It will end up on two lines but don't hit the enter key to make it, let it do it on it's own. Those are zeros at the end. There is a space between vfat and rw. Now SAVE FSTAB and your done.
NOTE: My new hard drive got the device name sdb1 yours might be different. You must replace my SDB1 with your device name. DISK Utility will give you this name after you hit the MOUNT VOLUME option. It will read something like "Mounted at /media/sdb1". This is for FAT32 ONLY!! For Linux (ext3) it would read:
/dev/sdb1 /media/sdb1 ext3 default 0 0
Whoever wrote the DISK UTILITY program might want to include an option like a simple check box that says "mount at boot" and do this work for you.
Wednesday, May 07, 2008
Did Ubuntu release a Service Pack?
Did Ubuntu release a service pack for Hardy Heron? Yestarday I had 70mbs of crtical downloads, today I had another 20mbs. Don't get wrong I like quick resposes but that seams a little heavy on the mustard. Just two weeks into a new release and we have 90 plus meg of patches. The good thing was I saw the new "Critial Update" Icon, you know the bright red arrow pointing down with a white explantion make inside !. I like this change, it stands out from the interface and makes it plain for all to see that something wants your attention.
I've fixed both problems I've encountered thus far and I like some of the added touches. This release gets an "Upgrade to it" raating or a "Start with this build" award from me.
NOTE: Boot times seam better and shut down times are faster.
I've fixed both problems I've encountered thus far and I like some of the added touches. This release gets an "Upgrade to it" raating or a "Start with this build" award from me.
NOTE: Boot times seam better and shut down times are faster.
Sunday, April 27, 2008
Upgrade From 7.10 to 8.04 LTS Hardy Heron
Updated my Ubuntu Laptop from 7.10 to 8.04 LTS Hardy Heron. The Upgrade had two big problems and one minor one. The whole upgrade took about 2-3 hours if you don't count the reading and tinkering. Total Time 5 to 7 hours (I read slow)
Big Problem 1. Upgrading broke my SUDO command. You get an error "unable to resolve host YOUR-COMPUTER-NAME" every time you type SUDO in a terminal window. After hours of poking around I found that you have to go to SYSTEM-ADMINISTRATION-NETWORKS then the HOSTS tab, find your MachineName * in the table and delete anything after it on its line in the table, including the period. For some reason 8.04 does not like your domain or network name after your MachineName in the HOSTS table. This breaks SUDO.
* NOTE - This is your loopback or home address 127.0.0.1
Big Problem 2- No matter what you select during the upgrade install, your wireless network will break if you have a Broadcom Chip set. To fix it you have to unblack list the Broadcom Driver by typing in the terminal "SUDO GEDIT /etc/modprobe.d/blacklist" just add a "#" in front of the last line "blacklist bcm43xx" then save it (when done it should read " # blacklist bcm43xx"). Then goto SYSTEM-HARDWARE DRIVERS and enable "Broadcom B43 Drivers". Which will cause Ubuntu to nag you about these not being FREE drivers. Ubuntu will then download and install the Broadcom drivers (did I mention that you have to have a hardwire network connection working in order to do this). You then have to goto SYSTEM-NETWORK and select the WIRELESS CONNECTION and Properties and add your WEP/WAP key. You then shut down and unplug your wired network and boot up. If you are lucky your wireless will work. If not you will have to change to a STATIC IP. by going back to SYSTEM-NETWORK and select the WIRELESS CONNECTION and Properties and change the DHCP drop down to static IP and fill out the three lines; IP Address, Subnet Mask, and Gateway. This is just guesing but the most common choices for those three fields would be;
IP Address: 192.168.1.21
SubNet: 255.255.255.0
Gateway: 192.168.1.1
Those are just guesses. Because your router could be setup differntly which would make these numbers all wrong for you. Don't ask me why I choose 21 as the IP address, it just seams like a nice safe address..
* NOTE: You have to solve problem #1 to fix #2 because you will need the SUDO command to fix problem #2.
Minor Problem - The update for some reason puts FireFox 3 BETA 5 on your machine. Why would you promote Ubuntuv 8.04 as a stable LTS release and install Beta software. I think you should have installed the stable release and let the end user upgrade when Firefox 3 Final ships.
Conclussions:
I have fixed everything I've mentioned as of today. I don't know why problem #1 happened. Problem # 2 should turn out to be a blessing. Ubuntu has started offering NON-FREE-SOURCE drivers that just make your hardware work out of the box. I hope with the addition of the BROADCOM WIRELESS DRIVERS I will no longer have to spend two days fixing them after a new Ubuntu release. I'll admit, "Free would be better, but working is Nice!". One last thing before I go, there was a warning about CUPS (printers) during the install I told it to leave my old CUPS alone. This seams to have worked because I printed to a 7.10 machine's shared printer tody without any problems. So far the only sour note is that FireFox 3 Beta 5 has crashed twice while playing YouTube Videos. Thanks BETA Software.
Sunday, November 04, 2007
Gutsy Gibbon
Over all I like the 7.10 update. It's added a couple of things I like and I haven't noticed anything that quit working (for me). This was my third update since I've been using Ubuntu so I understood some of the options offered during the update process more. Gutsy fixed a couple of problems I was having with Feisty.
1. Sharing of a printer
2. NTFS partition access
3. Wireless Network Card worked without resorting to a command line.
4. Use of the priority drivers.
Because of the NTFS support it makes a duel boot machine much easier to do. You can keep your data on the NTFS partition and both OSs can see it.
Not having to resort to the command line just to get my wireless network working was nice. If you've read this Blog you will remember that I almost removed Linux from my laptop because of the difficulty of getting wireless to work.
The inclusion of the priority drivers (video, mp3, WMV, etc..) has kept me from having to put Automatix back on either machine. And speaking of this why all the STUPID warnings about using these drivers/codex? They work, they are needed, and they will help Linux grow. I think the way the warnings about their use are presented were intended to SCARE the very users who need them the most away from using them. Ubuntu should have just shown both drivers and let the end user decide WITHOUT THE WARNING. The Warnings reminds me of something Microsoft would do (Genuine Advantage anyone?).
Over the year that I have been using Linux (Ubuntu) I have come to like it and use it on three machine. With every update Ubuntu gets better and better. The problem that Linux has to over come is it's dependence on the command line. The command line needs to become a Power User Feature not the main way to do things. There are still too many tasks that require the command line. If the next release of Ubuntu did nothing other than make GUI's for every command line function it would begin to be an easy replacement for the joke that is Vista.
Tuesday, October 23, 2007
Gutsy Gibbon Killed my Beryl Install
When I upgraded to Gutsy I told it to overwrite my custom setting so my desktop lost some setting I changed. No big deal, it was my fault and I like the clean look. I noticed that it killed my Beryl Install too but it was running slow on my system anyway and while it was "cute" it was not very practical especially with the performance hit. I did notice that it has a new name now, Compiz Fusion and is built in to Gutsy. I guess I could turn it back on but I don't want to take the performance hit. You need to install the Manager to get it going. Open a TERMINAL WINDOW and type the following:
sudo aptitude install
compizconfig-settings-manager
Since I don't want to turn it back on I haven't tried it but here's a video of it in action if your interested.
sudo aptitude install
compizconfig-settings-manager
Since I don't want to turn it back on I haven't tried it but here's a video of it in action if your interested.
Gutsy Gibbon Sharing a Printer
I installed my Laser Jet 1100 printer on my desktop Ubuntu Feisty Fawn install. The printer worked just fine as a local printer under Feisty but I could not share it. I tried but I couldn't figure it out. You can read about those attempts below in past posts. I tried to hit it through the network with my Ubuntu Feisty Laptop and from a MS Vista machine. Neither worked.
Well I've upgraded both the Desktop and the Laptop to Gutsy Gibbon and decided to try to share the printer again. I figured I was in for another fight but when I went to SYSTEM - ADMINISTRATION - PRINTING I was presented with this screen:
 I thought I'd take a chance and checked the SHARE PUBLISHED PRINTERS CONNECTED TO THIS SYSTEM block and Clicked the Apply button on the Desktop. I then went to the Gutsy Laptop and checked the SHOW PRINTERS SHARED BY OTHER SYSTEMS box then Clicked the Apply Button. I few seconds pause and my Desktop Gutsy Printer Share appeared in the list of printers on left in the picture on the Gutsy Laptop. I selected the shared printer and was asked if I wanted to make it my default printer. I did then opened OO Writer and printed a test page from the Laptop. It worked. You can see there are other options here when sharing a printer but they are self explanatory.
A couple of notes:
1. I had already installed the printer and had it working locally under Feisty on the Desktop.
2. I had installed and connected the Laptop directly to the printer once under Feisty so the drivers were already on the Laptop too.
3. I had fought with CUPP and tried so many things I've forgotten most the ones I did try under Feisty (I never did get it to work).
4. Under Gutsy all I did was check the blocks and it worked.
5. I will try to get MS Vista to connect to the printer later this week.
Monday, October 22, 2007
Ubuntu Gutsy Gibbon 7.10 Upgrade
It's within a few days of being one year since I've installed Linux (Ubuntu) on one of my machines. When I committed to trying Linux I decided to use nothing but linux for a full 30 days and I layed out a "road map" of things I've wanted to do.
I've stuck with Ubuntu throughout this trial and I've installed it on two machines, a laptop and a desktop. I use both of these machines on a daily basis (I've given the desktop to my wife and she uses it mostly). I've kept both systems updated and upgraded. I started with Dapper Dan, switched to Edgy Elf then upgraded to Feisty Fawn as soon as it was released and today I've upgraded both to Gutsy Gibbon 7.10.
The upgrade to Gutsy was very easy and was done with no problems. There's not much to notice different about Gutsy but that's how an OS upgrade is supposed to be. If I want the UI (User Interface) to look/feel different I'd upgrade or change the UI. With an OS upgrade I expect better compatibility with hardware and tweaks that make things faster and the expansion of the feature sets that can be added (better software).
So with those goals in mind I'll look at Gutsy over the next few days and let you know what I think about it. Then I plan to do a "One Year with Linux" post and compare it with my "One Year with Vista" experience.
So far I have noticed that Gutsy did a better job upgrading my notebook than Edgy. Edgy messed up my wireless card when I upgraded and I had to spend two weeks without it before I finally fixed it. Gutsy got it right on the first boot.
Under Edgy I couldn't get my HP Laser Jet 1100 to work as a shared printer on the desktop machine but Gutsy promises better printer function so I'll try again over the next few days.
Monday, August 06, 2007
Updated The Links
I added a long list of useful Linux/Ubuntu Links to the right side bar. It a combination of different lists I've found while browsing.
Thursday, July 12, 2007
Six Months of Linux
It's really been just over seven months now. I started my Linux experiment on November 1, 1996. One of my friends was singing Linux's praises and told me I should try it.
To be honest I had tried Linux before but never did get any use out of it. I think it was SUSE Linux 6 or 7. I couldn't get it to work with my MS Windows network, couldn't get online with it or do anything productive. To be fair I didn't give it a real chance. I installed it, played with it for a few days, then never used it again.
My friend works in the IT field and told me that Linux had changed since I last tried it. He told me that there was a Distro that he liked called Ubuntu. Well I just happen to have a Dell box laying around that needed it's OS reinstalled, so I took a chance.
I decided to give it a try but remembering back to my first Linux experience, I decided to force myself to use it for 30 days no matter what problems I had. My friend was also Blogging and I thought I'd like to try that too so I decided to combine the two idea.
I forced myself to stick with my pledge to use nothing but Linux for 30 days. At first it was hard and I was tempted to cheat but never did. Every time I hit a road block I would research until I found a solution. In the end I solved every problem except one, the VPN to work, and someone has suggested a solution to that one too but I haven't had time to try it.
I thought that when MS Vista came out that it would set a new bar in the OS field and make Linux look out and tired. That couldn't have been further from the truth. Vista is such a poor OS Microsoft is having to force people to take it.
I had planed to reinstall MS Windows on this Dell box at the end of the 30 days but I had gotten used to Linux and started liking it. So seven months later Ubuntu Linux is still on this box and I've updated it from Version 6 to Version 7. I've taken XP off my old laptop and put Linux on. I've made my work laptop a duel boot Linux/XP and I am thinking about removing Vista from my new laptop and making it a duel boot XP/Linux. We will see.
Wednesday, July 11, 2007
Added a Printer but Can't Share It with Vista
There comes a time when you want to get information from the computer screen to paper. To do this you have to install a printer. I thought I'd have more trouble than I did but it was easy. I had an older HP Laserjet 1100 that uses the parallel port and I wanted to install it locally. I also want to share it so that my Linux Laptop and MS Windows Laptop can use it. Here's what I've done so far;
Add the printer locally;
0. I had to reset my computer and change my BIOS settings under PORTS-->Parallel setting it to the EPP Mode. (I read on-line before I installed the printer and this suggestion showed up in several articles so I made the change before I started).
1. Goto SYSTEM-->Administration-->Printing
2. This will open a new window. Double Click on NEW PRINTER. Next you will be presented with a three step wizard (Add New Print Wizard)
3. Wizard Step 1. Pick either Local/Detected Printer or Networked Printer. I choose Local, then clicked the Forward button.
4. Wizard Step 2. Pick your printer Manufacture and your pinter Model. Ubuntu suggested a Printer Driver for me (ljet4). The list of printers, models, and drivers looks pretty extensive but I'm sure not every modern printer will be full supported but you should be able to find a combo that will get you working. Click Forward
5. Wizard Step 3. Name your printer, give it a "friendly" Description and a Location. The printer name is the important part here since you will have to use it if you Share it on your network. Ubuntu suggested mine be named Laserjet-1100 and that was good to me. I assume that the name is case sensitive like everything else in Linux. Click Apply
If this is the only computer that will use the printer, you are done. You can Right Click on the printer in the SYSTEM-->Administration-->Printing window and change all the default settings and paper handling options for your printer. You can also change your driver setting and printer name.
I wanted my printer shared on my network So I had to plow on. I've ran into some trouble sharing the printer. I went to SYSTEM-->Administration-->Printing then Single Clicked on my printer (selecting it) and then clicked on Global Settings and checked the Share Printers option in the menu.
I then went to my MS Windows Laptop (running Vista) and tried to add the newly shared linux box printer. I went to START-->Printers-->Add New Printer. I told Vista that it was a Network Printer and it searched for all shared printers on my network. None were found. I figured this would happen so I told Vista that I would manually enter the printer location. I typed //LinuxBoxName/Laserjet-1100 (remember the Name from Wizard Step 3 above?). Vista thought about this for a second, sent out some packets on the network, then asked me for a User Name and Password to connect to this printer. Ok, I figured it wanted my LinuxBox User/Pword. Tried it and it didn't work. I tried the VistaBox User/Pword it didn't work. Remembering how MS windows likes to have DomainName/UserName or ComputerName/UserName, I tried LinuxBox/UserName and LinuxBoxPword , it didn't work !!!
It appears that Vista can see the LinuxBox on the network and can see it's printer but the LinuxBox wants a password to access the printer. I can't figure out how to get Vista to give the LinuxBox that User/Pword. I've read about it online and saw where Linux use a program called CUPS. To access CUPS you start a Browser and type http://localhost:631/printers/Laserjet-1100 as the Address (replace Laserjet-100 with your printer name). I have explored CUPS a little and can even access the CUPS interface from the VistaBox (http://LinuxBoxName:631/printers/Laserjet-1100) but still can't add the LinuxBox Printer to the VistaBox. This is where I'm stuck.
This weekend I will try to add the LinuxBox Printer to the LinuxLaptop and see if it's just a Vista thing.
Wednesday, May 16, 2007
Installing BERYL on Ubuntu Feisty Fawn
 I installed Beryl today and it looks great. Beryl gives your desktop a 3D look and adds tons of eye candy effects to windows moves, opens, closes, etc. The instructions below are not mine but they are ones I followed that got Beryl working on my machine. Here's the original article where I found the Howto. You need to note that the instructions vary with graphic cards. I have an Nvidia graphics card and this script worked for me. I have a 64mb card with 512mbs of system ram on a 2.0 ghz machine. The effects speeds are ok but they are a little choppy. There were some warnings about making your machine unusable if this script (or Beyrl) has problems during installation so use this with care. Read the linked article before you try this.
I've got a new laptop with Vista on it and Beryl puts Vista's effects to shame. Why risk your system? Here's why (some youtube videos of Beryl in action)
INSTRUCTIONS NVIDIA GRAPHIC CARD ONLY
1. Open a terminal. Execute:
sudo echo "Beryl for nVidia installation Ubuntu Feisty 704"
This step will ask for your password and let the rest of the script run without interuptions
2. Copy and paste all the text below into the Terminal in one action.
sudo cp /etc/X11/xorg.conf /etc/X11/xorg.conf.backup.beryl-script
sudo cp /etc/apt/sources.list /etc/apt/sources.list.backup.beryl-script
echo "deb http://ubuntu.beryl-project.org feisty main
deb-src http://ubuntu.beryl-project.org feisty main" | sudo tee -a /etc/apt/sources.list
wget http://ubuntu.beryl-project.org/root@lupine.me.uk.gpg -O- | sudo apt-key add -
sudo apt-get update
sudo apt-get -y install beryl beryl-manager emerald-themes
sudo nvidia-xconfig --add-argb-glx-visuals
sudo cp /usr/share/applications/beryl-manager.desktop /etc/xdg/autostart/beryl-manager.desktop
cp /usr/share/applications/beryl-manager.desktop ~/Desktop/beryl-manager.desktop
echo -e "Logout now and then press \e[0;31mCTRL+ALT+BACKSPACE\e[0m to restart xorg"
echo "Installation completed !"
3. Logout and then press [CTRL+ALT+BACKSPACE] to restart.
Tuesday, May 08, 2007
Someone Take Out the Trash
While playing around with WINE I got some files stuck in the trash can. I kept getting a "You do not have the permission required to delete" error. After a bit of reading I found the following command line will delete these stuck files.
Open a Terminal window and type:
sudo rm -rf $HOME/.Trash
I learned that you should NOT use the -f switch on whims, it will just remove (delete) whatever you tell it too without any undo or warnings.
BTW rm -r DIRECTORY will delete whole directories from a TERMINAL.
Open a Terminal window and type:
sudo rm -rf $HOME/.Trash
I learned that you should NOT use the -f switch on whims, it will just remove (delete) whatever you tell it too without any undo or warnings.
BTW rm -r DIRECTORY will delete whole directories from a TERMINAL.
Sunday, April 22, 2007
Upgraded from 6.1 to 7.04 (Feisty Fawn)
I upgraded from 6.1 to 7.04 (feisty fawn) last night. Everything went well but kinda slow. I started at 1230 am and didn't finish until 3:45 am. Compared to the initial install of 6.1 this seamed like a long time, but it was mostly flawless. I got a couple of pop-up messages telling me that a few pieces of software were no longer supported and Automatrix told me it was the wrong version now, but nothing I couldn't guess the answer to. I haven't noticed anything yet that is broken but I didn't see that much new either. This is my first Linux upgrade so I don't know what to expect. It said it had a fancier windows interface but when I turned it on it took away my minimize and maximize buttons.
After the three hour upgrade I was too tired to test it much, but I'll get into it soon and write about it here. I have NOT upgraded the laptop yet because one of my friends has been fighting 7.04's wireless support. I am using the laptop and don't consider it a test bed anymore so as soon as I put feisty fawn through it's paces on the test computer, I'll try it on the laptop.
p.s. I'm still working on the Pocket PC stuff
Tuesday, March 20, 2007
How to sync your Pocket PC with Ubuntu
I have a Dell Axim Pocket PC and want to connect it to Ubuntu. Well here we go.
Connect your pocket PC to your Ubuntu machine using the serial to USB cable and power on the pocket PC.
Open a terminal (Applications -> Accessories -> Terminal).
Load the USB to serial driver by entering the following command in the terminal.
sudo modprobe ipaq
Issue the following command to make sure Ubuntu detects your pocket PC.
dmesg | tail
It showed /dev/ttyUSB0
as the device name. The next step is to install the packages we need. Enter the command as shown below:
sudo apt-get install synce-dccm synce-serial librra0-tools
This command will ask you to enter the IP addresses for your pocket PC, your DNS server etc. Enter the IP address of your router for the DNS server option (where you’ll get a blank field, whereas for other options, you’ll get a default value). It’s usually 192.168.0.1, but then it depends on the router. Leave the defaults for all other IPs.
Once the installation is complete, run the following command to specify the serial port:
sudo synce-serial-config /dev/ttyUSB0
You’ll get a message that
You can now run synce-serial-start to start a serial connection.
Make sure your pocket PC is connected and on. If your pocket PC is setup to sleep after certain minutes, you may have to switch it on again. Now start the dccm daemon.
You can start it in 2 ways.
dccm -d 4 -f
where -d 4 shows debugging is enabled and -f forces the daemon to run in the foreground.
Once you issue the above command, you’ll see the following in the terminal:
dccm[xxxx]: Running in foreground
dccm[xxxx]: Listening for connections on port xxxx
where xxxx stands for some number.
Now open another terminal and issue the following command:
sudo synce-serial-start
This will start the pocket PC synchronization. If you have firewall enabled, then you might see the warning as shown below:
Warning!
You have firewall rules that may prevent SynCE from working properly!
synce-serial-start is now waiting for your device to connect
In that case follow the firewall steps below. If you don’t have a firewall, then go to Continue after Firewall.
Firewall setting:
I user Firestarter as the firewall for front end. If you are using Firestarter, then go to /etc/firestarter/ directory. Change the file permission for user-pre to rw-r—– using the following command:
sudo chmod 640 user-pre
Now edit the file using
sudo gedit user-pre
Enter the following lines in the file:
$IPT -I FORWARD 1 -s 192.168.131.0/24 -d 192.168.131.0/24 -j ACCEPT
$IPT -I OUTPUT 1 -s 192.168.131.0/24 -d 192.168.131.0/24 -j ACCEPT
$IPT -I INPUT 1 -s 192.168.131.0/24 -d 192.168.131.0/24 -j ACCEPT
Save and close the file. Change the file permission back to r–r—– by issuing
sudo chmod 440 user-pre
The above change will work only if you had gone with the default IPs while installing the packages required for syncing.
Restart the computer and open two terminals. Issue the dccm command as given above in one terminal and sudo synce-serial-start on the other terminal. Make sure your Pocket PC is on before you do this.
Continue after firewall:
Once you issue the command sudo synce-serial-start in terminal 2, you’ll see the following messages (or similar messages) in terminal 1 where you issued the dccm command.
dccm[xxxx]: Connection from 192.168.xxx.xxx accepted
info package (88 bytes):
0000: 24 00 00 00 03 00 a3 2b $……+
0008: 11 0a 00 00 00 00 00 00 ……..
0010: 61 05 f3 56 00 00 00 00 a..V….
0018: 24 00 00 00 2c 00 00 00 $…,…
0020: 3e 00 00 00 50 00 50 00 >…P.P.
0028: 43 00 00 00 50 00 6f 00 C…P.o.
0030: 63 00 6b 00 65 00 74 00 c.k.e.t.
0038: 50 00 43 00 00 00 44 00 P.C…D.
0040: 65 00 6c 00 6c 00 20 00 e.l.l…
0048: 41 00 78 00 69 00 6d 00 A.x.i.m.
0050: 20 00 58 00 35 00 00 00 ..X.5…
0058:
dccm[xxxx]: Talking to ‘PPC’, a PocketPC device of type Dell Axim X5
This shows that the system is talking to the pocket PC. The next step is to setup a partnership. You are generally allowed upto 2 partnership. I have setup a partnership with my Windows machine and one more was remaining. I used that for syncing with Ubuntu.
Issue the following command in terminal 2 to establish the partnership:
synce-matchmaker create
You’ll get a message similar to the one shown below if you are able to establish the partnership.
[rra_matchmaker_create_partnership:xxx] Partnership file not found for ID XXXXXXXX
[rra_matchmaker_create_partnership:xxx] Partnership slot 2 is empty on device
Partnership creation succeeded. Using partnership index 2.
Once the partnership is established, then you can issue the following command to list the files in the pocket PC. You’ll get the list of files if the partnership is established.
synce-pls
Archive 5136 Sat 10 Feb 2007 05:04:15 PM CST House materials.psw
Archive 408 Sun 28 Jan 2007 11:10:28 AM CST Note2.pwi
Archive 408 Sun 24 Dec 2006 06:30:38 PM CST Note1.pwi
Directory Mon 31 Dec 2001 06:00:00 PM CST Business/
Directory Mon 31 Dec 2001 06:00:00 PM CST Personal/
Directory Mon 31 Dec 2001 06:00:00 PM CST Templates/
The above list is the list of folders in my pocket PC. Here is the list of command you can use to access the pocket PC files:
synce-pcp - Copy a file
synce-pmkdir - Create a directory
synce-pmv - Move a file
synce-prmdir - Delete a directory.
Once you are done syncing your pocket PC, issue the following command to kill the daemon and then disconnect the pocket PC.
killall -HUP dccm
That’s it. Next we figureout how to do somethinng usefull with this like sync with Evolved
Subscribe to:
Posts (Atom)