Wednesday, November 02, 2011

Create a Desktop Shortcut to a VPN Connection

I connect to my Office's VPN all the time.  I don't like the multiple clicks required to do this (Click on your NETWORK ICON in the system tray, Click on VPN CONNECTION, then Click on "NAME OF YOUR VPN").  I want a simple desktop shortcut. To do this I needed to know the TERMINAL command to start and connect to a given VPN.  After some searching I found it!

nmcli con up id "NAME OF YOUR VPN"

If you type this into Terminal your VPN will connect!

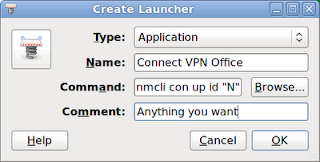
So let's make a shortcut to do this for us with just one click (Ubuntu 11.04).

1. Right Click on your desktop

2. Select CREATE LAUNCHER

3. In TYPE set it to APPLICATION

4. In NAME type what you want to call this shortcut

5. In COMMAND copy and paste the following:

   nmcli con up id "NAME OF YOUR VPN"

6. Inside the quote marks replace NAME OF YOUR VPN with what you called your VPN connection when you created it. (mine is Main Office)

7. Add anything you want in COMMENT

8. Click Ok and your done!

NOTE: you can change the icon for your new VPN Shortcut by click on it (Picture of a spring) in the CREATE LAUNCHER window and browsing your hard drive for the icon of your choice.

BONUS NOTE:  You can create a VPN DISCONNECT shortcut by creating a new launcher and replacing the COMMAND (Operation 5 above) with:

nmcli con down id "NAME OF YOUR VPN"


This was done on Ubuntu 10.04 booting to the CLASSIC desktop.  I don't care for UNITY and have no idea if this will work there.

Sunday, September 25, 2011

Learn the Command Line Interface (CLI) through Videos

Want to learn some COMMAND LINE (CLI) goodness.  Here's a cool site that will teach various Command Line usage through videos (WWW.PLAYTERM.ORG).  Most of the tutorials are short and easy to follow so don't be scared to let your inter geek out and impress your friends when you drop your mouse and start pound on that dusty keyboard.

A short post but the good ones usually are.

Wednesday, August 17, 2011

Change the GRUB default boot option

When I upgraded from Ubuntu 10.10 to 11.04 the default operating system selection in the GRUB Boot menu did not work for me. I found a nice program that allows you to change this setting along with a lot of other boot up options.

STARTUP-MANAGER


Let install it and make the change:

1. Open a command prompt and type or paste

sudo apt-get install startupmanager

2. Type in your password when prompted and let it do its thing.

3. After it installs you'll find it under SYSTEM-----ADMINISTRATION----StartUp-Manager

4. Click on it and give it your password when asked.


5. Under DEFAULT OPERATING SYSTEM pick the boot option you want.

Close and done!

There are probably other ways to do this without installing an application but I wanted it to have a GUI interface to make it easy since it's a bad thing to miss this up.

Upgraded to Ubuntu 11.04 (Natty Narwhal)

Well I've done it now! I upgraded from Ubuntu 10.10 to 11.04, Natty Narwhal, and right from the beginning it gave me trouble.

The upgrade process took about an hour and went smoothly but on the first boot I was presented with the dreaded command prompt. It asked for my user name and password which I gave. It answered me with another command prompt!

Okay, don't panic...What is the command to start the GUI...hmmm...win? no! gnome? no!...gdm? Well I powered it off and rebooted and picked a different GRUB selection on the boot menu. I noticed that the default was "Ubuntu 11.04, kernel 2.6.38-10-generic-pae". I don't remember that -pae part being there on 10.10 so I looked down the list and saw a "Ubuntu 11.04, kernel 2.6.38-10-generic" and tried it. That Worked!!! A GUI...yeah!!! Well, I guess you could call it a GUI, it's the UNITY interface.

I wanted to give Unity a chance but after 10 minutes of looking around I decided it had to go. This IS NOT A DESKTOP GUI. It looks like it was made for low res monitors or netbooks and buries everything. I'll not get into it here but it has to go!!!

Let's change the GUI from Unity to Gnome 2.x or Classic;

1. Click on your logoff/shutdown button in the upper right conner by your user name.


2. Click on the SYSTEM SETTINGS

3. That opens the below screen. Find the LOGIN SCREEN button and click it.


4. Click the UNLOCK button in the window that pops up and type in your password.

5. Click on the drop down and Select UBUNTU CLASSIC as the Default and close.

Next time you boot up you'll get Gnome 2.x (Classic) instead of the Unity Crap!


Sunday, August 07, 2011

How to Install LibreOffice on Ubunutu 10.10

The jury is still out on Ubuntu 11.04 (Natty Narwhal). I've come to relay on my Ubuntu box too much to upgrade but I wanted to run LibreOffice. Here's how to get LibreOffice on your Ubuntu 10.10 box:


1. Uninstall OpenOffice. Open a TERMINAL window and type:

sudo apt-get purge "openoffice*.*"

Hit ENTER and type Y when asked if you want to remove OpenOffice.


2. Add the LibreOffice Repository (still in the TERMINAL type:)

gksu add-apt-repository ppa:libreoffice/ppa

Hit ENTER

gksu apt-get update

Hit ENTER


3. Download and Install LibreOffice (still in the TERMINAL type:)

sudo apt-get install libreoffice libreoffice-gnome language-support-en

Hit ENTER


4. DONE.


NOTE: Step 3 will download about 140mbs of data from the Internet so be patience.

Tuesday, June 21, 2011

Garmin 305 Forerunner, Runkeeper.com and GPSBABLE

I have a Garmin 305 Forerunner watch which tracks several things about your runs, walks, or bike rides. It tracks the path you take with it's GPS, your distance, time and several other things. I use a nice Linux program to track activity with it, PYTRAINER. I even wrote an article on how to get PYTRAINER working with the 305. The problem is that this data is locked to the local computer and it's not easily shared with your running partners.

Well I found a nice Android App called RUNKEEPER. This App uses your cellphones GPS and it's internet connection to track and share your running session with your friends. I really like and recommend this App but I hate carrying my cell phone while I run and the GPS Tracking eats the phones battery.

I wanted a solution that would use the my Garmin 305 but allow me to put my data on RUNKEEPER. This is where GPSBABLE comes in. Here's how to do it.

1. Follow the instructions for installing PYTRAINER and GPSBABLE
2. Sign up for a FREE RUNKEEPER account at http://runkeeper.com
3. To get a copy of your run data off you Garmin 305 you need to connect it to your computer through it's USB.
4. Once your 305 is connected, open a TERMINAL window and type the following:

sudo gpsbabel -i garmin -t -f usb: -o gpx -F yourfilename.gpx

5. Hit ENTER and type your SUDO PASSWORD and hit ENTER.
6. This will create a file named yourfilename.gpx in your
HOME Directory.
7. Log in to RunKeeper
8. Select ACTIVITIES from the menu on the left.

9. Select POST NEW ACTIVITE (Top Menu)


10. Click on the the ACTIVITY TYPE and
EQUIPMENT TYPE then Click the NEXT Button on the bottom


11. Click on the IMPORT MAP button


12. Click on the CHOOSE FILE button and select the yourfilename.gpx which you created in steps 4 - 6. This file will be in your HOME directory.


13. After the gpx file UPLOADS you will see DETAILS Screen where you can change anything you like. When finished click on the SAVE Button.


DONE!!!

I know that seems like a lot of steps but it's not that hard to do, just hard to explain. The nice thing is that your run data is still on your watch and you can download it to PYTRAINER (or other program) to keep locally.

GPSBABLE can do much, much, more and I encourage you to read its documentation.
Saturday, February 12, 2011

IOS 4.2.1 DBus Error Fix (Iphone)

I've upgraded my Iphone 3gs to IOS 4.2.1 and it quit working with Ubunutu. It gave me the following error;

DBus error org.freedesktop.DBus.Error.NoReply: Message did not receive a reply (timeout by message bus)

After a little searching I found a solution that worked for me.

1. Goto APPLICATIONS-->UBUNTU SOFTWARE CENTER
2. Once your software center app starts goto EDIT-->SOFTWARE SOURCES
3. Click on the OTHER SOFTWARE tab
4. Click the ADD button
5. In the pop up box type ppa:pmcenery/ppa
6. Click the ADD SOURCE button.
7. Once added, close your Software Center.
8. Goto SYSTEM-->ADMINISTRATION-->UPDATE MANAGER
9. Check for system updated and allow them to install.
10. Plug your Iphone into your computer and it should work.

I hope this helps someone else who's have this problem. I'm running Ubuntu 10.10 32-bit OS with Iphone IOS 4.2.1 on an Iphone 3GS phone. (No Jailbreak)

Sunday, February 06, 2011

A Couple of Nautilus Tips

Nautilus is the FILE MANAGER Ubuntu uses. Here are a couple of quick tips.


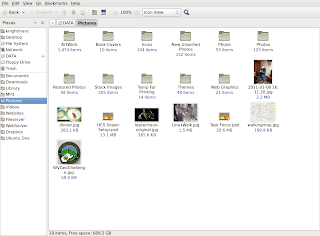
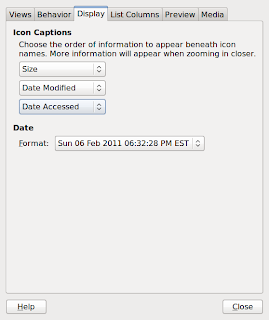
How to show File Sizes under the thumb nails Nautilus uses.


1. Start Nautilus

2. Goto EDIT-->PREFERENCES

3. Click on the DISPLAY Tab

4. The top drop down box should say NONE. Change it to SIZE.


DONE!!!!


Tips number two will let you make Nautilus a little prettier.

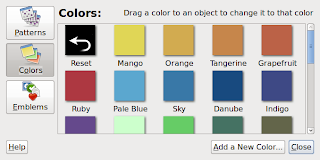
How to change the background color or make it a texture in Nautilus display window.

1. Start Nautilus
2. Goto EDIT-->BACKGROUND AND EMBLEMS
3. The window on the left will appear.
4. Click and hold on the color or pattern you want
5. Drag that color or pattern onto the area of Nautilus you want to have that pattern or color.

DONE!!!!


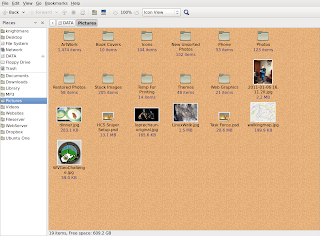
I've applied the CORK pattern to the Nautilus' Main Window.

There you have it, two quick tips to make your "File Manager" a little better in Ubuntu. If you really want to get fancy you can add some ACTIONS or EXTENSIONS to enhance Nautilus' usability.

Sunday, January 02, 2011

A working Web Cam

Just a short note but was something I had trouble finding. I wanted a web camera that worked with Skype under Ubuntu. I found the Logitech C270. It has a built in microphone and was truly plug and play.

Just download and install Skype 2.1 Beta for Ubuntu, plug in your C270 and it just works. You will have to go into the microphone selection section and pick the mic on the C270 instead of your microphone port if you want to use the built-in mic.


Go to SYSTEM-->PREFERENCES-->SOUND then click on the INPUT tab and you can pick which microphone you want to use.

The Logitch C270 has a hinge mounting system that is more suited to laptops than LCDs but with a small piece of Velcro it worked with my LCD just fine. The camera head can tilt so you can angle it up or down once you mount it.

The C270 has a very nice picture over Skype too. It is a 720P camera and seams to work nice even in my low light setting. Even using external speakers mounted on my monitor I noticed no feed back while using the cameras mic.